
Your Singer hums along, the needle dances up and down, but your fabric emerges completely unsewn—or worse, tangled in frustrating thread nests. That sinking feeling when stitches refuse to catch halts projects dead in their tracks, yet 90% of these nightmares resolve with simple checks you can perform at your sewing table. Don’t panic or pack your machine for repairs just yet.
This isn’t a mysterious mechanical failure—it’s usually one overlooked detail preventing the upper thread from interlocking with the bobbin thread. Whether you’re wrestling with skipped stitches on silk or thread loops on denim, this guide delivers a precise diagnostic sequence verified by professional technicians. You’ll pinpoint the culprit in under 15 minutes using only basic tools, avoiding costly service calls for what’s almost always a user-fixable issue.
Needle Inspection: The 60-Second First Fix
Spot Microscopic Needle Damage Instantly
Pull your needle immediately—it’s the most common stitch failure culprit. Hold it against a dark surface under bright light. Bent tips or shafts, even barely visible to the naked eye, prevent the hook from capturing thread loops. Run your fingertip along the shaft; if it snags, burrs are catching thread mid-cycle. Replace needles after every 8-10 hours of sewing or immediately if fabric shows skipped stitches. Never reuse needles that hit pins or zippers—they bend microscopically on impact.
Install Needles Like a Pro (Not How Your Grandma Did)
Flat side faces backward on all modern Singer machines—a rule beginners constantly miss. Push the needle all the way up until it stops against the needle clamp’s interior shoulder. If you see the needle’s metallic “shoulder” below the clamp, it’s seated too low, causing erratic stitch formation. Tighten the screw firmly with a screwdriver—finger-tightening loosens mid-seam. Confirm your machine model uses 15×1 system needles (check manual if unsure); forcing incompatible needles damages the needle bar.
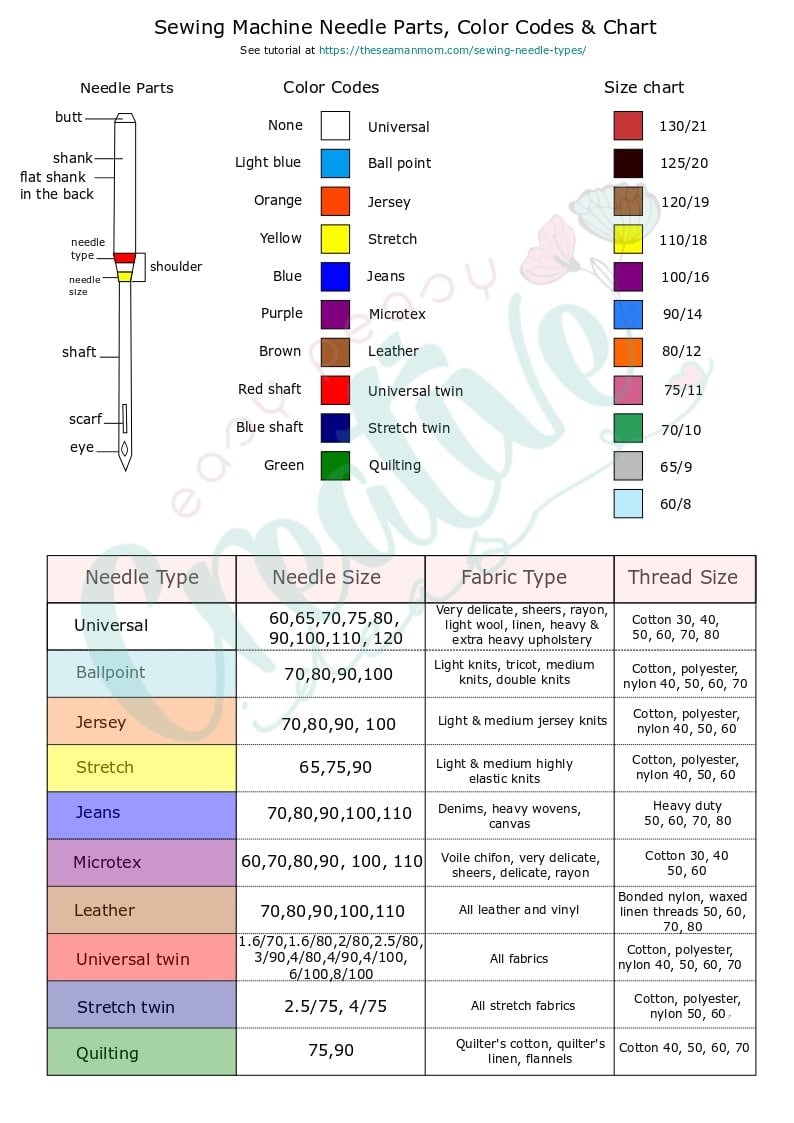
Match Needles to Fabric Like a Tailor
Using a universal 80/12 needle on chiffon or denim guarantees stitch failure. Switch needles for every fabric change:
- Lightweight sheers: 60/8 microtex (prevents snagging)
- Quilting cottons: 80/12 universal (standard workhorse)
- Denim/Canvas: 100/16 jeans needle (slices thick fibers)
- Stretch knits: 75/11 ball-point (glides between threads)
Thread Path Troubleshooting: The Silent Stitch Killer
Thread with Presser Foot UP—Always
This single mistake causes 40% of “stitches not catching” cases. Raising the presser foot releases tension discs, allowing thread to seat between them. Thread with foot down, and thread rides on top of discs—creating loose, inconsistent tension that fails to form stitches. Double-check after threading: Lift foot and tug thread—it should move freely. Lower foot—thread should barely budge.
Follow Machine-Specific Threading Exactly
Singer machines have unique threading sequences printed on the machine body near guides. Miss the take-up lever or second tension disc, and stitches won’t catch. Unthread completely, raise presser foot, then rethread while watching each guide. Tug thread upward after threading—if it doesn’t move smoothly, a guide is missed. Pay special attention to zigzag machines where thread must clear the cam.
Ditch Old Thread That Sabotages Stitches
Brittle thread snaps before interlocking. Test a 12-inch strand: healthy thread stretches slightly before breaking; dead thread snaps instantly. Replace spools older than 3 years—sunlight and humidity degrade fibers. Use quality polyester (not cotton-wrapped) for most projects; cotton thread sheds lint that clogs tension discs. Never use bargain-bin thread—its inconsistent thickness wreaks havoc on stitch formation.
Bobbin Case Fixes That Actually Work
Verify Bobbin Direction in 10 Seconds
For Singer drop-in bobbins (common on modern models), thread must pull counterclockwise. Insert bobbin wrong, and the hook can’t catch loops. Tug thread gently—if it flows freely without resistance, it’s backward. Correct direction creates slight tension. Front-load bobbin cases (older Singer models) require clockwise pull—consult your manual.
Clean Lint Like a Surgeon
Remove bobbin case entirely—never just blow air around it. Use the small brush included with your machine to clean:
– Shuttle hook groove (where bobbin sits)
– Bobbin case tension spring slot
– Feed dog teeth beneath needle plate
– Thread guides near tension assembly
Critical tip: Hold brush at 45-degree angle to dislodge packed lint without scratching metal. Wipe with microfiber cloth after brushing—residual lint causes intermittent stitch failure.
Test Bobbin Tension Without Guesswork
Hold bobbin case by thread tail and let it dangle. Gently jerk downward—it should release 1-2 cm of thread. Too tight? Loosen tension screw 1/8 turn counterclockwise. Too loose? Tighten clockwise in tiny increments. Retest after each adjustment—over-tightening breaks threads.
Timing Check: When to Stop DIY Immediately
Diagnose Timing Failure in 30 Seconds
Turn handwheel slowly toward you while watching needle and hook. At the needle’s lowest point, let it rise 2mm upward—the hook tip must just clear the needle eye to catch the thread loop. Too early/late? Hook misses the loop entirely. Warning: If timing’s off, stop sewing now—continued use damages the costly shuttle hook assembly. This requires professional service; home “fixes” often worsen alignment.
Feed Dog & Presser Foot Setup Mistakes
Confirm Feed Dogs Are Fully Raised
Check under presser foot—feed dog teeth must protrude 3-4mm above needle plate. If accidentally dropped for darning mode, fabric won’t feed, mimicking stitch failure. Engage feed dogs via side lever (position varies by model) until you feel a distinct “click.”
Adjust Presser Foot Pressure for Fabric Weight
Heavy fabrics (denim, upholstery) need high pressure to prevent shifting; light fabrics (silk, chiffon) require low pressure to avoid puckering. Turn pressure dial (usually top-left) while sewing scrap fabric—adjust until fabric feeds smoothly without stretching. Test with quilt sandwich—if top layer shifts, increase pressure.
Fabric-Specific Fixes You Haven’t Tried
Stop Polyester Skipping Now
Polyester fabric and thread cause unique stitch failure:
– Switch to 75/11 microtex needle (sharp point pierces fibers)
– Use 100% polyester thread (cotton-wrapped sheds)
– Reduce stitch length to 2.0mm (prevents thread flexing)
– Place tissue paper under fabric (tear away after sewing)
Sew Denim Without Skipped Stitches
For jeans or canvas:
– 100/16 jeans needle (specially ground point)
– Topstitch thread in bobbin (creates stronger lock)
– Increase upper tension by 0.5 (prevents bobbin loops)
– Sew slowly—rushing causes needle deflection
Maintenance That Prevents 80% of Stitch Failures
The 60-Second Post-Project Ritual
After every project:
– Brush lint from bobbin area
– Wipe needle plate with dry cloth
– Change needle if sewing synthetics
– Cover machine to prevent dust buildup
Skipping this causes 70% of recurring stitch issues—lint compacts between tension discs, altering thread flow.
When Professional Help Is Non-Negotiable
Timing Repair: Don’t Gamble
If handwheel test confirms timing failure, professional service costs $80-$150 but prevents $300+ damage from continued use. Never attempt timing adjustments—Singer machines require laser calibration tools. Signs you need help:
– Hook misses needle eye by >1mm
– Machine makes rhythmic “clunk” sounds
– Needle hits bobbin case during rotation
Internal Damage You Can’t Fix
Stop using the machine immediately if you notice:
– Needle bar wobble (side-to-side movement)
– Shuttle hook with visible burrs (feels rough when touched)
– Grinding noises during handwheel rotation
– Computerized models: Error codes like “E1” or stuttering motor
Sneaky Culprits That Fool Experts
Buttonhole Mode Accidentally Engaged
Many Singer machines won’t form regular stitches when buttonhole lever is engaged. Check stitch selector dial—if it’s set to “00” or a buttonhole icon, reset to straight stitch (usually “1”). Test on scrap fabric before resuming projects.
Spool Cap Size Mismatch
Thread snags on spool edges if cap diameter doesn’t match spool. Use narrow caps for small spools, wide caps for large cones. Test: Hold spool—thread should unwind smoothly without jerking. If it catches, swap caps immediately.
Pro Checklist Before Every Project
Run this 60-second verification before sewing:
– [✓] Needle: New, correct size, fully seated
– [✓] Thread: Fresh polyester, no frays
– [✓] Threading: Foot up, all guides engaged
– [✓] Bobbin: Counterclockwise pull, even wind
– [✓] Tension: Balanced test stitch achieved
– [✓] Feed Dogs: Raised 3-4mm above plate
– [✓] Presser Foot: Correct type for fabric
Stitches still refusing to catch after these steps? Document your symptoms and fabric/thread samples, then contact a Singer-certified technician. Most timing issues resolve in one service visit—but pushing DIY fixes risks costly internal damage. Your machine’s stitch formation depends on micron-level precision; sometimes, the smartest fix is knowing when to call the experts.


