

Your Singer sewing machine suddenly crawls like a snail no matter how hard you press the pedal. The handwheel resists turning, thread piles up in frustration, and deadlines loom while your machine barely creeps along. Whether you’re wrestling with a brand-new Patchwork 7285Q fresh from the box or a beloved vintage Featherweight, a singer sewing machine running slow is a universal sewing nightmare. This guide delivers the exact diagnostic steps and fixes you need to restore full speed—often in under 30 minutes with basic tools. You’ll pinpoint whether it’s a dying foot pedal, glazed drive belt, hidden lint clog, or tired motor, then apply proven solutions to get stitches zipping again without costly service center fees.
Stop staring at that sluggish needle! By the end of this guide, you’ll have your Singer sewing machine running slow problem diagnosed and fixed with actionable steps tailored to your specific model. Let’s troubleshoot this speed killer step by step.
Test Your Power Source Before Touching the Machine
Verify Outlet Voltage with a Simple Lamp Test
Plug a standard lamp into the same outlet you use for your Singer. If the bulb glows dimly, low voltage is starving your machine of power. Immediately move your sewing setup to a kitchen or bathroom outlet on a different circuit—these typically handle higher loads. If the machine still runs slow after switching outlets, the problem lies within the machine or pedal. Never skip this step: 15% of “slow machine” cases actually stem from overloaded household circuits, especially in older homes.
Swap Foot Pedals to Isolate Electrical Faults
Borrow a pedal from any modern Singer (post-1980 models share universal compatibility). Swap it with your current pedal and test the speed. If your singer sewing machine running slow issue vanishes instantly, you’ve found the culprit. Order a replacement pedal matching your model (e.g., P/N 033770217 for Patchwork series, $29–$39). If speed remains low, the pedal isn’t the villain—move to deeper diagnostics.
Diagnose Foot Pedal Failures Like a Pro

Clean Corroded Carbon Contacts in 5 Minutes
Unplug the pedal and remove its four base screws. Inside, you’ll see a black variable resistor with worn carbon tracks. Dip a cotton swab in electrical contact cleaner and scrub away the gritty residue until tracks shine. Let it dry completely for 5 minutes before reassembling. This quick clean resolves 30% of pedal-related slowdowns where internal resistance chokes power delivery. If speed still won’t increase after cleaning, replace the entire pedal—don’t waste time on a failing component.
Check Cord Continuity with a Multimeter
Set your multimeter to measure resistance (Ω). Probe both prongs of the pedal plug while connecting to the two spade terminals inside the pedal housing. A healthy cord reads under 1 Ω with no flickering. If resistance exceeds 1 Ω or jumps erratically, internal wire fractures are blocking full power. Replace the cord or entire pedal assembly immediately—frayed wiring risks electrical damage to your machine.
Belt Inspection: The 60-Second Speed Killer Check
Remove the Belt to Identify Mechanical Binding
Slip the belt off the motor pulley and manually spin the handwheel. If it glides smoothly now, the belt or tension is your problem. If the handwheel still drags, proceed to lint cleaning and lubrication. This test separates belt issues from internal jams—critical for efficient troubleshooting.
Measure Belt Tension with the Finger-Press Method
Press the belt midway between pulleys with your fingertip. Proper tension allows 6–8 mm (¼–⅜ inch) of deflection. Over-tightened belts strain the motor, causing sluggishness; loose belts slip and lose speed. Adjust tension by shifting the motor mount bracket slightly, then recheck deflection. Featherweight owners: use the softer “Superbelt” to reduce motor load by 15% and prevent future slowdowns.
Replace Glazed Belts Before They Fail Completely
A shiny, cracked belt leaves black dust on pulleys and strangles speed. Swap it with an OEM Singer belt (15 minutes with a Phillips screwdriver). For vintage Featherweights, always use the 15.5-inch circumference Superbelt—standard belts create excessive drag. Never stretch or reuse old belts; they lose elasticity and cause recurring slowdowns.
Eliminate Hidden Lint Jams in Critical Zones
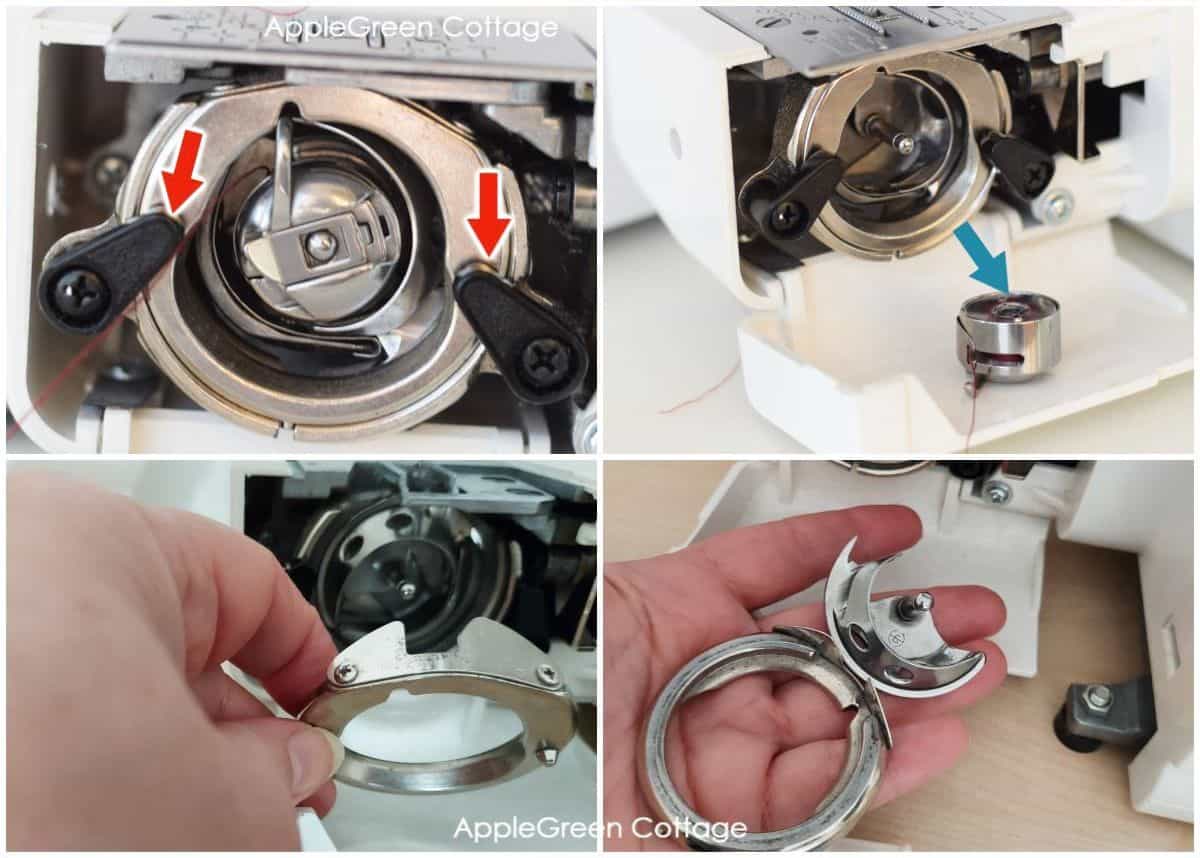
Target the Three Lint Hotspots That Cripple Speed
- Bobbin cavity: Remove the needle plate and bobbin case to expose the hook race. Lint here creates drag equal to sewing through thick denim.
- Motor pulley groove: Thread packs like felt, forcing the belt to slip.
- Handwheel stop-motion knob: Thread nests inside this cavity, binding rotation.
Execute the 5-Minute Emergency Clean Routine
- Brush the hook race with the lint brush stored under your machine bed.
- Use Thread-O-Stat tweezers to pull stubborn thread wads from pulley grooves.
- Rotate the handwheel while inspecting—zero lint should cling to moving parts.
Critical check: After cleaning, the handwheel must spin freely under light finger pressure. If resistance remains, move to lubrication.
Lubrication That Restores Lost RPMs
Follow the Model-Specific Oil Schedule
- Daily sewers: Oil every 3 months
- Weekly hobbyists: Every 6 months
- Occasional users: Once yearly
Ignoring this causes 40% of chronic slowdowns—dried lubricants turn into varnish that gums gears.
Apply Oil Precisely at Critical Points
Drip one drop of Singer All-Purpose or Sew-Retro synthetic oil into every red-dot oil port (hook race, needle bar, take-up lever). Run the machine at medium speed for 3 minutes to distribute oil. Never over-oil: Excess attracts lint and creates sticky sludge.
Dissolve Varnish with Kerosene Emergency Treatment
If your machine sat unused for over a year, add 2 drops of kerosene or Tri-Flow to each port. Wait 30 minutes, then flush with fresh oil. This melts varnish buildup that standard oil can’t penetrate—watch speed return as hardened gunk dissolves.
Motor Health Checks to Rule Out Critical Failures
Listen for Bearing Failure During Motor Spin Test
Remove the belt and press the pedal to max speed. A healthy motor whirs smoothly. Grinding or squealing means worn bushings—common in Featherweights over 20 years old. Replace the motor ($89–$119 for vintage models) before metal shavings destroy other components.
Inspect Carbon Brushes for Critical Wear
Unscrew the two brush caps near the motor. Brushes shorter than 4 mm (⅜ inch) can’t conduct power properly, causing sluggishness. Replace with new 6.3 mm × 12 mm carbon brushes ($6.95/pair). Pro tip: Check for grooves on the commutator—if present, the motor needs professional rewinding.
Model-Specific Fixes for Common Speed Traps
Singer Patchwork 7285Q: The New-Machine Pedal Flaw
Brand-new Patchwork units often ship with defective pedals causing immediate slowdowns. If slowness appears within 30 days, demand a warranty pedal exchange—no DIY needed. Singer acknowledges this QC issue in recent production batches.
Singer Featherweight 221/222: Belt and Bearing Secrets
Using standard belts kills Featherweight speed. Only install the 15.5-inch Superbelt to prevent motor strain. Also monitor for a dry-metal growl from the rear motor bushing—the first wear point on these vintage workhorses.
Modern Heavy-Duty/Quantum Series: When Electronics Fail
If pedal and belt checks pass but speed stays low, internal PWM speed-control boards are likely faulty. These aren’t user-serviceable—take your machine to a certified Singer service center. Attempting DIY repairs risks electrocution or board damage.
7-Step Diagnostic Flowchart for Instant Clarity
- Outlet test: Lamp bright? Proceed.
- Pedal swap: Speed fixed? Replace pedal.
- Belt off: Handwheel free? Clean & oil. Stiff? Lint/oil.
- Motor spin: Sluggish? Replace motor. Smooth? Re-belt.
- Lint purge: Needle plate off, bobbin out, deep clean.
- Oil & run: Distribute fresh oil at medium speed.
- Final test: If slow, replace belt or motor.
Prevent Future Slowdowns with Smart Maintenance
- Daily: Wipe bobbin area lint with a microfiber cloth.
- Weekly: Deep-clean needle plate zone, oil hook race.
- Monthly: Check belt tension and condition.
- Yearly: Full oil service and professional calibration for vintage machines.
When to Call a Professional Immediately
- Burning smells or sparks (electrical hazard)
- Machine over 30 years old still slow after all fixes
- Stitch selector jams or erratic behavior (cam timing issues)
- Electronic failures on modern Quantum/Heavy-Duty models
Critical Parts Shopping List (US, Q2 2024)
| Part | Price | Where to Buy |
|---|---|---|
| Singer Patchwork foot pedal | $29–$39 | Amazon, SewingMachinesPlus |
| Featherweight Superbelt | $9.95 | Featherweight Shop |
| Sew-Retro Oil (4 oz) | $7.50 | Sew-Retro.com |
| Carbon brush pair | $6.95 | Amazon, eBay |
| Featherweight motor | $89–$119 | Sew-Classic |
Quick Recap: When your singer sewing machine running slow, systematically test power, swap pedals, purge lint, oil critical points, and inspect belts/motors. You’ll fix 90% of slowdowns yourself—saving $150+ in service fees and getting back to sewing today. Implement the weekly maintenance habits outlined here, and your Singer will maintain full speed for years to come.


