
That sudden metallic screech from your Singer can transform a peaceful quilting session into a nerve-wracking experience. When your sewing machine starts making loud noise, it’s not just annoying—it’s a warning sign that something’s wrong with your machine’s delicate mechanics. Most sewing enthusiasts face this issue at least once, whether they’re stitching a simple hem or tackling a complex garment. The good news is that 90% of loud noise problems stem from simple issues you can diagnose and repair yourself in under 15 minutes. This guide cuts through the confusion with a step-by-step approach to silence your noisy Singer machine and prevent future disruptions to your creative flow.
Why Your Singer Machine Suddenly Sounds Like a Drum Set
Needle Strike Clicks That Drive You Crazy
That rhythmic clicking sound isn’t random—it’s your needle striking something it shouldn’t. When your Singer sewing machine making loud noise with each stitch cycle, a damaged needle is almost always the culprit. Bent needles deflect into the rotating hook mechanism, creating that distinctive “pop” with every revolution. Inserting the needle backward or too low causes it to scrape against the bobbin basket floor, producing a continuous metallic scrape. Even a slightly dull needle develops microscopic burrs that catch on fabric and create ticking sounds. The solution? Always replace needles after 6-8 hours of sewing or at the first sign of unusual noise. Keep different sizes handy—Microtex 70/10 for silks, Universal 80/12 for everyday fabrics, and Denim 100/16 for heavy materials.
Bobbin Area Scrapes You Can’t Ignore
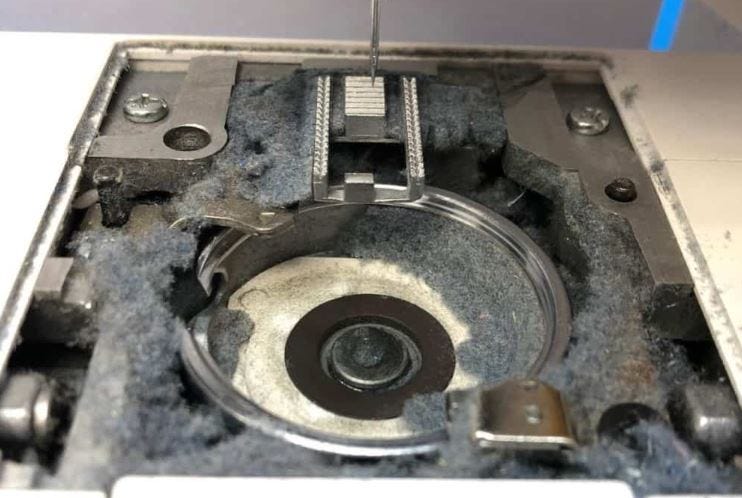
If your machine emits a grinding or scraping noise from the lower mechanism, compressed lint is likely the silent saboteur. Thread fragments accumulate under the feed dogs, forcing the needle plate to flex unnaturally against debris with each stitch. Left unchecked, this pressure can permanently bend your needle plate. A warped bobbin case—often caused by a previous needle strike—creates rhythmic banging as it rotates against the hook race. Shine a flashlight into the bobbin area; if you see bright silver burrs on the metal race, that’s your noise source. On vintage Singer models with front-loading bobbins, a dry hook race commonly causes mechanical growling that disappears with just one drop of proper sewing machine oil.
Motor Whines That Signal Serious Trouble
High-pitched whining from the motor compartment typically indicates a worn drive belt or loose motor mount. Unlike upper-mechanism noises that sync with the needle position, these sounds intensify with machine speed. If you hear metallic clanging that resembles a bell ringing, your Singer may have a cracked internal O-ring—a serious issue requiring professional attention. Before panic sets in, perform this quick test: unplug your machine and turn the handwheel toward you. If rotation feels uneven or catches at specific points, you’ve got timing or lubrication issues deep inside the machine.
Stop the Noise: Your 5-Step Emergency Fix
The Part Removal Diagnostic Test
Don’t guess—diagnose systematically with this foolproof method. Power on your machine but remove all fabric, then run at slow speed while removing components one by one:
- Remove the needle – If noise stops, replace with a fresh needle of correct size
- Reinstall needle, remove presser foot – Silence means burrs on foot or plate misalignment
- Remove needle plate – Quiet operation indicates feed dog debris or bent plate
- Remove bobbin case – Noise vanishing here points to warped case or hook race burr
- Hand-turn the wheel – Feeling tight spots confirms internal timing problems
This elimination process isolates the noise source faster than any technical manual. Keep a small notepad nearby to document exactly when the noise disappears during testing.
Critical Visual Inspection Hotspots

When your Singer sewing machine making loud noise, these three areas require immediate attention:
- Needle plate underside: Run your fingernail across the surface—any catch indicates a burr needing smoothing
- Bobbin case lip: Hold against a light source to spot microscopic chips causing scraping sounds
- Hook race surface: Use a magnifying glass to detect metal burrs that create continuous grinding
For minor burrs, lightly sand with 600-grit emery tape in one direction only. Never use metal files—they remove too much material and worsen the problem. Severe damage requires replacement parts; keep a spare bobbin case on hand for quick diagnosis.
Oil vs. No Oil: Singer’s Critical Lubrication Rules
Machine-Specific Oil Guidelines
Your Singer’s oil requirements depend entirely on its age and model:
- Vintage mechanical Singers (201-2, 221): Apply one drop to the hook race and needle bar every 6-12 months
- Modern computerized models: Most require zero user oil—check your manual before applying anything
- Top-loading rotary hook machines: Oil hook race only when noise appears after storage
Over-lubrication is worse than none at all—it attracts lint that turns into abrasive paste. Always wipe away excess oil immediately with a lint-free cloth. Never use household oils like WD-40; they gum up delicate mechanisms.
Cleaning Protocol That Actually Works
Follow this sequence for noise-eliminating cleaning:
- Power off and unplug your machine
- Remove needle, presser foot, and needle plate
- Use a small lint brush (not compressed air!) to dislodge debris from feed dogs
- Gently brush the hook race area with a soft paintbrush
- Clear tension discs with a pipe cleaner threaded between plates
- Reassemble and test with a new needle
Resist the temptation to blast compressed air into computerized machines—it forces lint deeper into electronics. For stubborn buildup, use a wooden toothpick to carefully dislodge packed fibers.
When Your Singer Needs Professional Help
Red Flags You Shouldn’t Ignore
Certain noises demand professional attention immediately:
- Continuous metallic grinding from the bobbin area
- Bell-like resonance indicating a cracked internal O-ring
- Motor whine that increases with speed
- Handwheel binding or uneven rotation
Before taking your machine to a technician, record a 15-second video showing both the noise and handwheel movement. Many repair shops can diagnose issues remotely from this footage, saving you a trip. If your machine is under warranty, email the video to the manufacturer first—some companies cover shipping for verified defects.
Finding the Right Repair Tech
Not all sewing machine technicians are equally skilled. When your Singer sewing machine making loud noise requires professional help:
- Ask for technicians certified by the manufacturer
- Verify they own timing gauges specific to your model
- Request a diagnostic fee that applies to repair costs
- Avoid shops that “oil everything” as a first solution
Bring your machine with all accessories and note exactly when the noise occurs (during straight stitching? zigzag? at high speed?). This information helps technicians diagnose faster.
Prevent Future Noise With This 30-Second Routine
Daily Noise Prevention Checklist
Make these quick habits part of your sewing ritual:
- Before sewing: Insert a fresh needle appropriate for your fabric
- During sewing: Stop immediately at the first unusual sound
- After sewing: Remove lint from bobbin area with one quick brush
Keep a needle tracking log—mark each project with the needle used. Replace needles after 6-8 hours regardless of visible damage. Store your Singer covered when not in use to prevent dust accumulation.
Quarterly Maintenance That Saves Headaches
Every three months, perform this noise-prevention ritual:
- Tighten all visible screws (needle plate, presser foot thumb screw)
- Inspect feed dogs for burrs using magnification
- Verify proper needle insertion depth
- Clean thread path thoroughly
For vintage machines, add one drop of SAE 20 non-detergent oil to specified points. Modern machines generally require no user lubrication—consult your manual.
Essential Tools for Noise Troubleshooting
Keep these items in your sewing toolkit:
- Needle variety pack (80/12, 90/14, 100/16)
- SAE 20 sewing machine oil (for oilable models only)
- Small lint brush and soft paintbrush
- 600-grit emery tape for minor burr removal
- Spare bobbin case matching your machine model
Having these tools on hand means you can silence most noisy Singer machines during your next sewing session rather than waiting for a repair appointment.
A quiet Singer is a productive Singer. Most loud noise issues stem from simple causes that disappear with proper needle maintenance and regular lint removal. When your Singer sewing machine making loud noise, follow the systematic diagnostic steps outlined here before assuming the worst—chances are excellent you’ll restore peaceful stitching in minutes. Remember that prevention beats repair every time; incorporate the 30-second post-sewing routine into your habit and enjoy years of silent, reliable operation. If professional help becomes necessary, your thorough diagnostics will help the technician resolve the issue faster and potentially save you money on unnecessary repairs.


