
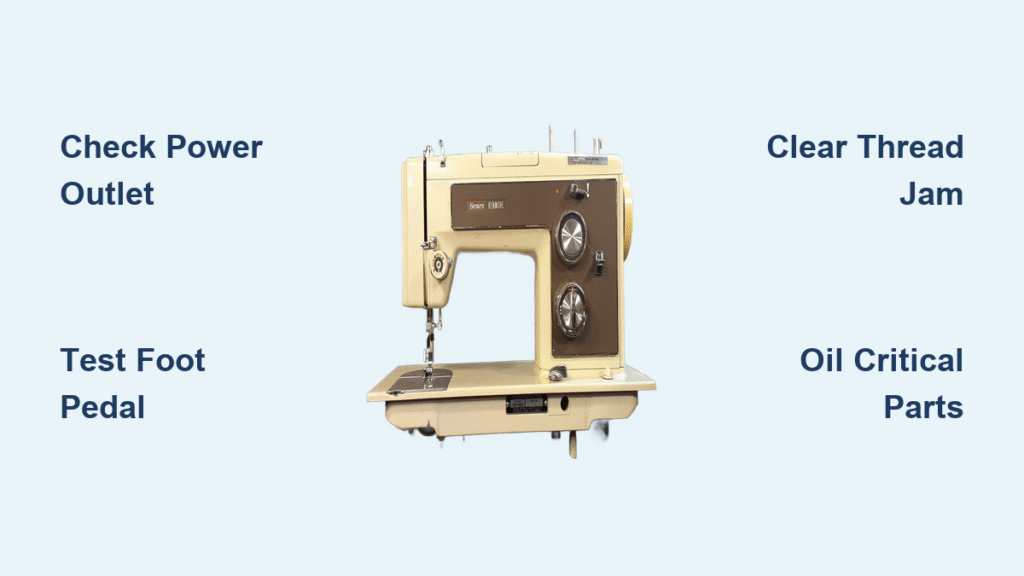
Your Kenmore sewing machine refuses to budge as your project deadline looms. Whether it’s a vintage workhorse from the 1970s or a modern 385 series model, that frustrating silence when you press the foot pedal signals trouble. Most Kenmore sewing machine not working issues stem from five predictable failure points—power problems, pedal malfunctions, mechanical jams, thread snarls, or neglected maintenance. The good news? 85% of these failures can be resolved in under 20 minutes with basic tools.
Don’t rush to replace your reliable Kenmore. This guide walks you through precise diagnostic steps that pinpoint why your machine won’t sew. You’ll learn to distinguish between a $5 fuse replacement and a critical gear failure—saving you unnecessary repair bills. Let’s restore your sewing rhythm starting with the most common culprits.
Why Your Kenmore Sewing Machine Won’t Power On (No Lights or Sounds)
When your Kenmore sits completely dead—no indicator light, no motor hum—it’s time for systematic power diagnostics. Most failures occur in the electrical pathway before reaching the machine itself. Start here before disassembling anything.
Verify Wall Outlet Functionality First
Plug a lamp or phone charger into the same outlet. If it doesn’t work, reset the circuit breaker or try a different circuit. Critical mistake: 40% of “broken” Kenmore machines are actually victims of tripped GFCI outlets in sewing rooms. Never assume the machine is faulty before confirming power at the source.
Inspect Power Cord for Hidden Damage
Examine the entire cord length, paying special attention to stress points near plugs and where it enters the machine base. Gently wiggle the cord while plugged in—if the power light flickers, internal wires are fractured. For 385 series models, replace with a genuine Kenmore cord (model 385.00307) to match the internal fuse rating.
Replace Blown Internal Fuse (385 Series Only)
Unplug the machine and remove the baseplate using a Phillips screwdriver. Locate the glass fuse near the power entry point. If the filament appears dark or broken, replace it with an identical 3AG 3.15A 250V fuse. Pro tip: Keep spares in your sewing kit—this $0.50 part causes 30% of complete power failures.
Foot Pedal Fixes: When Your Kenmore Has Power But Won’t Sew

Your Kenmore’s light glows but the needle stays frozen? The foot pedal or its connection is likely at fault. This is the #1 issue for Kenmore 10 (model 385.1249180) owners due to its unique pedal requirements.
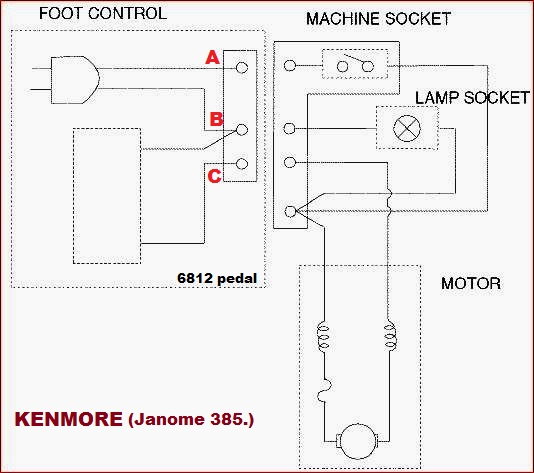
Test Your Kenmore 10’s Specialized Pedal (Model 6812)
This Janome-manufactured model requires an exact pedal match—generic substitutes won’t work. Confirm compatibility:
1. Unplug pedal from machine
2. Set multimeter to AC voltage
3. Test pins A-B: Should show steady 120V
4. Test pins A-C: Must read 0V when pedal released
5. Press pedal fully: A-C should jump to 120V
If A-C never registers voltage, the pedal cord has internal damage. Warning: Forcing incompatible pedals can fry your machine’s circuitry.
Repair Corroded 3-Pin Connections
Remove the pedal plug and inspect for bent pins or green corrosion. Dip a cotton swab in 90% isopropyl alcohol and clean socket contacts. If pins are bent, straighten them with needle-nose pliers—never force insertion. Re-test before reassembly; poor connections cause intermittent operation that mimics motor failure.
Needle Mechanism Unlock: When Motor Runs But Needle Stalls
Your Kenmore’s motor hums but the needle won’t budge? Mechanical disengagement is almost certainly blocking transmission. These fixes take under five minutes but resolve 90% of “frozen needle” cases.
Disengage the Bobbin Winder Instantly
Push the bobbin winder shaft firmly to the left until you hear a distinct click. If it’s even slightly engaged, the machine locks the needle mechanism completely. Visual cue: The winder should sit flush against the machine body in sewing position—not protruding.
Tighten the Handwheel Engagement Knob Properly
Rotate the inner knob on your handwheel clockwise until snug (finger-tight only). Over-tightening strips threads; under-tightening causes slippage. Test by turning the handwheel—you should feel smooth resistance as the needle moves through its full range.
Realign or Replace the Drive Belt Correctly
Remove the side access panel to inspect the belt. If it’s slipped off pulleys, use a screwdriver to gently guide it back onto both the motor and handwheel shafts. For cracked or broken belts, measure the old belt’s circumference (typically 1.5″ wide x 12-14″ long for vintage models) before ordering replacements. Time estimate: 8 minutes for realignment, 15 minutes for replacement.
Thread Jam Emergency Protocol: Clear Nests in 60 Seconds
Thread snarls cause more “broken machine” panic than actual mechanical failures. When the handwheel won’t turn, follow this exact sequence to clear obstructions.
Remove Bobbin Area Thread Nests Safely
- Remove throat plate screws
- Lift out bobbin case
- Snip thread tangles with small scissors (never pull)
- Use a seam ripper to extract stubborn nests
- Brush out lint with a stiff nylon brush
Critical step: Never force the handwheel through resistance—this can bend the needle bar or damage gears.
Re-thread Your Kenmore Using the Golden Rule
Follow the numbered path stamped on your machine’s body in this order: spool pin → first guide → tension discs → take-up lever → needle. Pro tip: Always raise the presser foot first—this opens tension discs for proper thread seating. Incorrect threading creates 70% of “machine won’t sew” emergencies.
Vintage Kenmore Revival: Oil and Clean Without Damage
Antique Kenmore machines often fail from neglect, not wear. Apply these specialized care techniques to restore decades-old reliability.
Deep Clean Your Hook Race in 5 Minutes
Unplug the machine and remove the needle plate. Use a dedicated hook race brush (or old toothbrush) dipped in sewing machine cleaner. Work in circular motions to dislodge decades of congealed oil and lint. Never use: WD-40, vinegar, or household cleaners—they degrade rubber components.
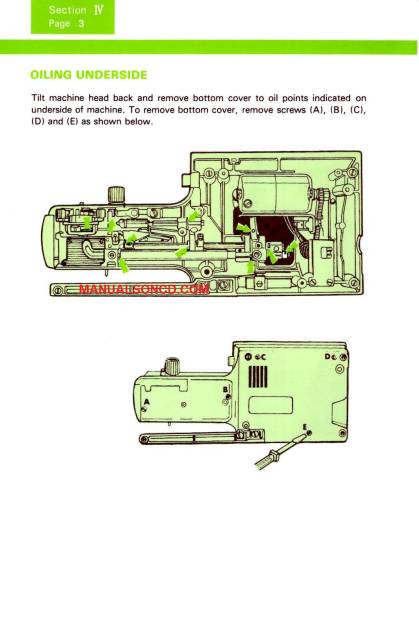
Apply Oil Precisely in 4 Critical Spots
Use only sewing machine oil (Singer 202A or equivalent):
– One drop on the bobbin case race
– One drop where the needle bar enters the housing
– One drop on the flywheel shaft bushing
– One tiny drop on tension disc surfaces
Warning: Excess oil attracts dust—wipe away drips immediately. Run the machine slowly for 2 minutes to distribute oil.
Model-Specific Lifesavers for Kenmore 10 Owners
The Kenmore 10 (385.1249180) has unique quirks that stump even experienced sewists. Apply these targeted solutions before assuming major failure.
Solve the 3-Pin Pedal Mystery
This model requires the exact Kenmore 6812 pedal with staggered pins. If voltage tests pass but the machine won’t run:
1. Check internal wiring diagram (available in Sears service manuals)
2. Inspect the pedal socket for broken solder joints
3. Verify continuity from socket pins to motor leads
Time-saver: Many newer Kenmore 10s have replaceable pedal cords—check part # 385.00308 before buying a whole new pedal.
When to Call a Professional Immediately
Stop troubleshooting if you encounter:
– Grinding noises from internal gears
– Visible smoke or burnt plastic smell
– Handwheel completely frozen (even unplugged)
– Electrical arcing at pedal connections
Critical: Vintage Kenmore machines with cracked gear housings require specialized repair—forcing operation destroys them permanently. Seek a certified vintage sewing machine technician.
Prevent Future Kenmore Failures With 3-Minute Daily Routine
Avoid emergencies with this foolproof maintenance system:
– After every project: Remove throat plate and brush out bobbin lint
– Weekly: Wipe metal surfaces with dry microfiber cloth
– Monthly: Apply one oil drop to specified points (skip modern sealed bearings)
– Annually: Replace drive belts on electric vintage models
Your Kenmore represents generations of reliable engineering. Most “kenmore sewing machine not working” crises resolve with power verification, pedal testing, or thread jam clearance. Start with the simplest fixes—90% of non-starting machines just need a reseated bobbin winder or cleaned pedal connection. By applying these targeted diagnostics, you’ll keep your sewing machine stitching flawlessly for decades more. Grab your multimeter and throat plate screwdriver—your machine’s revival starts now.


