
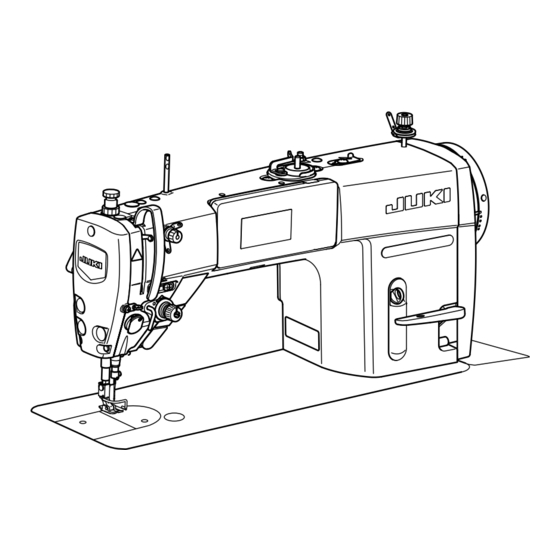
You’re halfway through sewing a delicate silk blouse when your reliable Juki machine starts leaving gaps in every seam. Those skipped stitches aren’t just frustrating—they’re ruining your carefully cut fabric and wasting precious thread. Whether you’re working on a simple craft project or professional garment construction, stitch skipping transforms what should be a smooth sewing experience into hours of frustrating rework and potential project failure.
The good news is that most Juki skipping stitch problems stem from simple, fixable issues that don’t require expensive service calls. Juki machines are precision instruments where even a slightly bent needle or millimeter of timing drift can cause missed stitches. This guide walks you through exactly what to check and how to fix it—saving you time, money, and your sanity. By the end, you’ll know how to diagnose and resolve skipping stitches on your Juki machine like a professional technician.
Why Your Juki Machine Suddenly Skips Stitches Mid-Project
Immediate Needle Inspection and Replacement Protocol
Start your troubleshooting with the needle—it resolves approximately 80% of Juki skipping stitch issues. Juki sewing machines are particularly sensitive to needle condition, even when damage isn’t visible to the naked eye. Look for random hook catching or missed threads, problems that appear suddenly during a project, or frequent thread breakage—all telltale signs of needle issues.
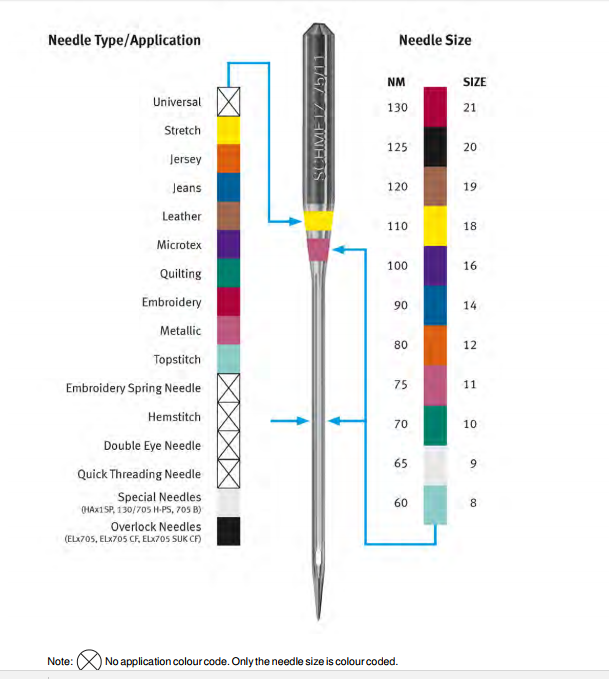
A needle that’s just slightly bent can throw off the precise timing between the needle and rotary hook, causing the hook to miss the thread loop entirely. Replace needles after 6-8 hours of sewing time, or immediately when working with heavy fabrics like denim or canvas. Always use Juki-recommended needle types—while universal needles might work temporarily, Juki’s titanium-coated needles provide superior durability and resistance to bending under pressure.
When installing a new needle, ensure it’s fully seated in the needle clamp with the flat side facing backward and the scarf (the indentation on the needle) positioned correctly toward the hook. An improperly installed needle will immediately cause skipping stitches regardless of other factors.
Precise Thread Tension Calibration for Juki Machines
Juki’s precision tension system requires perfectly balanced top and bottom tension to form consistent stitches. When upper tension is too tight, the thread pulls out of the hook’s grasp before a stitch forms. When it’s too loose, the hook can’t properly capture the thread loop, resulting in skipped stitches.
Perform this quick tension test: thread your machine normally with the presser foot raised, then lower the presser foot and gently pull the thread toward you. It should move with slight, consistent resistance—not too tight and not too loose. Adjust the tension dial in quarter-turn increments, testing on scrap fabric of the same weight as your project after each adjustment. Remember that tension requirements vary significantly between fabrics—lightweight silks need different tension than heavy denim.
Juki Model-Specific Timing Diagnosis and Correction
DDL Series Rotary Hook Timing Verification
Juki DDL industrial machines use rotary hooks that must meet the needle at precisely 2.2mm above the needle eye. This critical timing point can drift slightly with heavy use, especially after accidental needle strikes against the hook or plate. Timing that’s off by even 0.5mm causes intermittent skipped stitches that seem random but follow a mechanical pattern.
To check timing marks: remove the needle plate, turn the handwheel toward you slowly, and watch the hook point as it passes the needle scarf. The hook point should catch the thread at the exact timing mark specified in your model’s manual. Most DDL models have external timing marks visible through access points—consult your specific model documentation for reference points. If you notice the hook hitting the needle instead of passing by cleanly, timing is significantly off and requires adjustment.
Computerized HZL Model Timing Troubleshooting
Juki’s computerized HZL series machines use different hook assemblies but operate on the same fundamental timing principle. These models often display specific error codes when timing issues develop, making diagnosis more straightforward. The E6 error code commonly indicates timing problems on HZL machines.
Watch for these specific symptoms on computerized models: stitches skipping only during forward motion, bobbin thread looping on top of your fabric, or unusual clicking sounds during operation. Unlike mechanical models, computerized Jukis sometimes self-correct minor timing issues through built-in calibration procedures—making them worth attempting before more invasive troubleshooting.
Critical Visual Inspection Procedures for Juki Machines

Comprehensive Hook Area Examination
Before attempting any adjustments, power off your machine completely and unplug it for safety. Remove the bobbin case and use a bright flashlight to thoroughly examine the hook assembly area. Look specifically for hook points with burrs or chips that catch and release thread inconsistently, lint buildup preventing smooth rotation, or thread caught in the hook race that displaces the entire mechanism.
Clean the hook area using a soft, stiff-bristled brush designed for sewing machines—never use compressed air as it drives lint deeper into critical mechanisms. Pay special attention to the hook race (the circular track where the hook rotates), as even small amounts of lint here can push the hook out of alignment by critical fractions of a millimeter.
Accurate Needle-Bar Height Verification
A dropped needle bar (often from needle strikes) causes consistent skipping stitches across all fabrics and stitch types. Juki needle bars have specific height settings that vary by model and must be precisely measured.
To verify height: turn the handwheel to the lowest needle position, then measure from the needle plate to the needle eye. Compare this measurement to the specifications in your model’s manual—most Juki machines require 18-22mm depending on model. If the measurement falls outside specifications, you’ll need to adjust the needle bar clamp position. Make micro-adjustments of no more than 0.5mm at a time, retesting after each change.
Safe Timing Adjustment Procedures for Different Juki Models
Mechanical DDL Series Timing Correction
While most significant timing issues require professional service, minor adjustments are possible on mechanical Juki models if you’re comfortable with mechanical work. Incorrect timing adjustments can cause expensive damage, so proceed with caution.
Follow these steps for DDL series machines: remove the needle plate and bobbin case, locate and loosen the hook set screws (typically three screws), turn the handwheel to the timing position, carefully align the hook point with the needle scarf, hold this position steady, and tighten the set screws. Always test your adjustment on scrap fabric before resuming your project—look for consistent, secure stitches without thread breaks.
Computerized Model Calibration Reset
Juki computerized machines often resolve minor timing issues through built-in calibration cycles. This simple procedure can save you a service call for intermittent skipping problems.
Perform this reset: power off the machine completely, hold down both the start/stop and reverse buttons simultaneously, power on while continuing to hold the buttons, release when the display shows “INIT,” and allow the machine to complete its calibration cycle. The machine will automatically adjust internal timing mechanisms to factory specifications. Test stitch quality on scrap fabric before resuming your project.
Skipping Stitch Prevention Strategies for Long-Term Juki Performance
Strategic Needle Maintenance Schedule
Prevent 90% of skipping stitch issues before they start with proper needle maintenance. Replace needles when starting a new project with different fabric, after sewing over pins or thick seams, every 6-8 hours of sewing time, or when thread starts breaking frequently. Keep multiple needle sizes and types organized in a labeled case for quick access during projects.
Store needles in a protective case when not in use—loose needles in drawers often develop microscopic bends from contact with other objects. Before installation, hold the needle against a straight edge to verify it hasn’t developed a slight curve. A perfectly straight needle is critical for Juki’s precision timing.
Premium Thread Selection for Juki Machines
Cheap thread causes more skipping stitches than any mechanical issue on Juki machines. These precision instruments are engineered for quality thread and will skip constantly with bargain brands that have inconsistent thickness or weak fibers.
Select thread based on your project: use mercerized 50-weight cotton for natural fiber fabrics, continuous filament polyester for synthetics and stretch fabrics, and match thread weight to needle size for heavy materials. Never use old or sun-damaged thread—the UV exposure weakens fibers and causes inconsistent tension. Store thread in a cool, dark place to maintain quality.
When to Seek Professional Juki Service Instead of DIY Repair
Critical Indicators for Professional Timing Service
Some timing issues require specialized tools and expertise that exceed safe DIY repair parameters. Don’t risk expensive damage attempting complex repairs when you see these warning signs: timing marks that don’t align at all, visible hook damage or chips, needle bar wobble during sewing, grinding noises from the hook assembly, or persistent skipping after multiple adjustment attempts.
Professional Juki service centers have precision timing gauges and factory specifications that allow them to restore your machine to optimal performance quickly. Most skipping stitch repairs cost $75-150—significantly less than replacing damaged parts from incorrect DIY timing adjustments. Consider professional service as an investment in your machine’s longevity rather than an expense.
Juki Skipping Stitch Troubleshooting Decision Table
| Symptom Pattern | First Diagnostic Step | Immediate Action | Professional Service Needed |
|---|---|---|---|
| Random skips across fabric | Needle inspection | Replace with correct Juki needle | No |
| Skips only on thick seams | Needle size verification | Install larger needle (90/14 or 100/16) | No |
| Consistent skipping every 4-5 stitches | Timing mark verification | Minor timing adjustment | Maybe |
| No stitches form, thread breaks immediately | Complete rethreading | Follow threading path exactly | No |
| Skips accompanied by clicking sound | Hook damage inspection | Service appointment | Yes |
Keep Your Juki Stitching Perfectly
Skipped stitches don’t have to derail your sewing projects when you know exactly what to check and in what order. Start with the simplest solutions—a fresh needle installed correctly, perfect threading path, and proper tension setting—before moving to more complex timing adjustments. Most Juki machines respond quickly to basic maintenance, returning to flawless stitching within minutes.
Remember that your Juki represents a significant investment built for decades of reliable service. Implement a simple maintenance routine: change needles regularly, use quality thread appropriate for your fabric, and keep the hook area meticulously clean. These three habits prevent 90% of skipping stitch issues before they start. When problems persist after methodical troubleshooting, professional service restores factory performance—protecting both your machine and your creative momentum. With these techniques in your sewing toolkit, you’ll spend less time fixing problems and more time creating beautiful projects with confidence.


