
Your Juki sewing machine stitches perfectly one day, then suddenly starts skipping stitches, making strange noises, or shredding thread faster than you can replace it. This frustrating scenario affects thousands of sewists who don’t realize their juki sewing machine maintenance habits are the real culprit behind most breakdowns. Whether you own a mechanical TL series workhorse or a computerized DX7 powerhouse, neglecting proper care transforms your precision machine into a frustrating paperweight within months.
The good news? Consistent juki sewing machine maintenance prevents 90% of common issues, and most essential tasks take less than 15 minutes with basic tools you likely already own. Professional repair technicians confirm that machines requiring costly service almost always suffered from skipped cleaning routines, improper oiling, or neglected needle changes long before the breakdown occurred.
This guide reveals the exact maintenance protocol Juki factory technicians recommend—plus the critical mistakes that void warranties and destroy machines. You’ll learn model-specific procedures for mechanical and computerized machines, warning signs that indicate impending failure, and how to extend your machine’s life by decades with minimal effort.
Essential Tools Every Juki Owner Must Have

Before touching your machine, gather these six critical items that make juki sewing machine maintenance effective and safe:
Non-Negotiable Tools:
– Microfiber cloth (slightly damp with water only)
– Craft pipe cleaner for tight crevices
– Juki Defrix Oil No.1 (never substitute with household oils)
– T-screwdriver specifically for needle plate removal
– Small paint brush or cosmetic brush for lint removal
– Lighted tweezers for precision thread extraction
Proven Product Recommendations:
– Juki Defrix Oil No.1: $7.99-$9.99 (2-4 oz bottle lasts 6+ months)
– Machine Care Bundle: $29.99 (includes all essentials)
– Maintenance Tracker Stickers: $4.99 (prevents missed service dates)
Critical Warning: Never use canned air during your juki sewing machine maintenance. It forces lint deeper into sensitive components, creating blockages that cause premature wear. Instead, use your small brush with gentle outward motions to extract debris.
Three-Step Daily Maintenance Protocol
Daily Cleaning Routine for Flawless Stitches
Safety First: Always power off completely, remove the needle, and take off the presser foot before starting any cleaning. This prevents accidental activation and protects you from needle pricks.
Surface Cleaning Process:
Wipe your machine’s exterior with a barely damp microfiber cloth. For stubborn spots, add one drop of mild detergent directly to the cloth—not the machine. Harsh chemicals damage finishes and can seep into internal components, causing long-term corrosion that affects stitch quality.
Deep Cleaning Steps:
1. Remove needle plate using your T-screwdriver (finish removal by twirling screws with fingers)
2. Gently brush bobbin area with small paint brush using outward motions
3. Extract trapped threads with lighted tweezers
4. Wipe with oiled paper towel (oil attracts remaining dust particles)
Model-Specific Tip: Mechanical machines (TL series) tolerate more aggressive cleaning, while computerized models (DX7, NX7) require gentle handling around sensors. Apply minimal pressure when cleaning near visible electronic components.
Oil Application: Mechanical vs. Computerized Machines
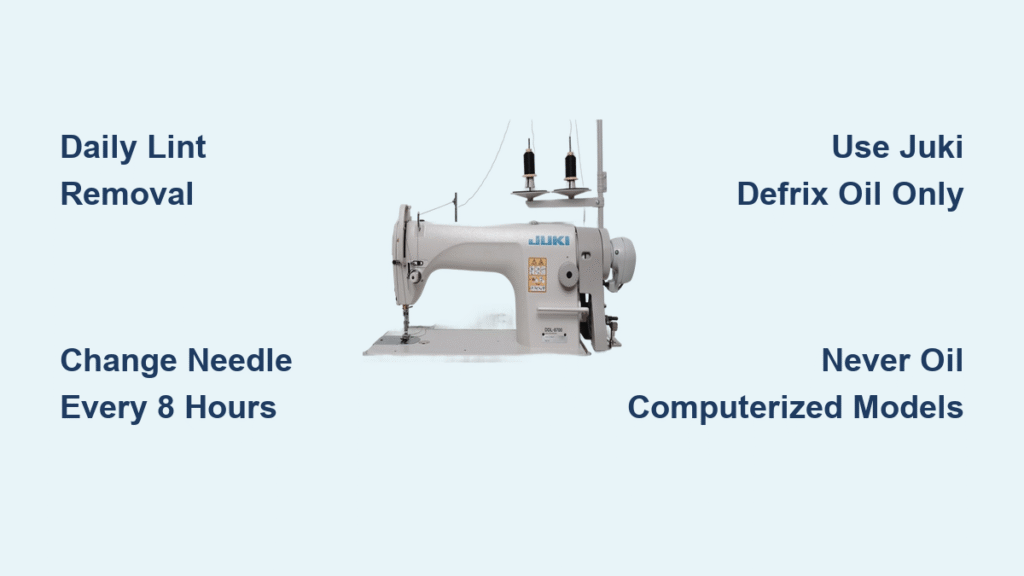
Critical Distinction: Mechanical machines (TL series) require regular oiling, while computerized models (DX/NX series) are self-lubricating—never oil these! Oiling computerized machines voids warranties and attracts lint that clogs sensors.
For Mechanical Juki Machines:
1. Consult your manual for exact oiling points
2. Apply one single drop of Juki oil per designated spot
3. Run machine for 30 seconds without thread to distribute oil
4. Wipe excess oil with microfiber cloth to prevent fabric staining
Oiling Schedule:
– After every 8 hours of sewing
– Before starting large projects
– When machine sounds louder than normal
– Never oil computerized models—this causes more problems than it solves
Needle Replacement: The 90-Second Fix That Saves Hours of Frustration
When to Change:
– Every 8 hours of active sewing
– At the start of each new project
– Immediately after cleaning your machine
– When thread starts shredding or skipping stitches
Installation Steps:
1. Position correctly:
– HZL DX/NX7: Flat side faces away from you
– TL straight stitch: Flat side faces right
2. Push needle all the way up into the clamp (this is critical!)
3. Tighten screw securely with screwdriver
4. Test on scrap fabric before starting your project
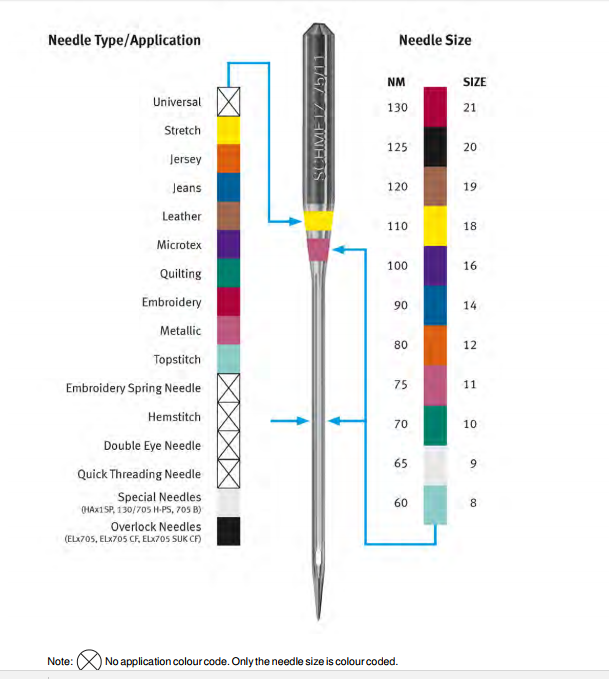
Needle Selection Cheat Sheet:
– Fine fabrics (chiffon, silk): Size 60/8-70/10, small eye
– Medium fabrics (cotton, linen): Size 80/12-90/14, medium eye
– Heavy fabrics (denim, canvas): Size 100/16-110/18, large eye
Advanced Warning Signs Requiring Professional Attention

Hook Timing Issues: When to Call a Technician
Red Flags:
– Thread loops consistently appear on fabric bottom
– Needle physically hits bobbin case
– Skipped stitches persist despite new needle and proper threading
Before Scheduling Service:
– Verify correct bobbin type (Juki machines are picky)
– Ensure needle isn’t bent (roll on flat surface to check)
– Confirm proper threading path through tension discs
DIY Hook Adjustment (Mechanical Models Only):
1. Remove covers and bobbin case
2. Hand-crank to observe timing
3. Align timing marks per manual specifications
4. Adjust hook-needle distance to 0.01-0.16 inches
5. Warning: This requires precision—when in doubt, call professionals
Bobbin Winder Troubleshooting
Symptoms:
– Irregular winding speed
– Complete winding failure
– Bobbin winding unevenly
Quick Fix:
1. Remove bobbin and case
2. Test winder by hand—should move smoothly but not loosely
3. Insert flathead screwdriver at beveled edge to stabilize mechanism
4. Apply one drop of oil only if mechanism feels stiff
Model-Specific Maintenance Requirements

TL Series (Mechanical):
– Requires monthly oiling at designated points
– Can withstand more thorough cleaning
– Manual adjustments possible for experienced users
DX Series (Computerized):
– Never oil—self-lubricating system
– Gentle cleaning around sensor areas
– Software updates handled by technicians
NX Series (Computerized):
– Self-lubricating like DX series
– Requires careful handling of advanced features
– Annual calibration essential for optimal performance
Costly Maintenance Mistakes That Destroy Juki Machines
Never Commit These Errors:
– Using WD-40 or household oils instead of Juki Defrix Oil
– Ignoring the “change needle every 8 hours” rule
– Attempting timing adjustments without proper tools
– Skipping annual professional servicing on computerized models
– Using compressed air anywhere on the machine
Real-World Consequences:
– Oiling computerized models voids warranty immediately
– Wrong needle type damages both fabric and machine internals
– Skipping professional service leads to $200+ repairs that could have been prevented
Professional Servicing Schedule You Can’t Skip
Annual service is non-negotiable for:
– Internal component cleaning unreachable at home
– Belt tension adjustments that affect stitch quality
– Electrical connection inspection (computerized models)
– Sensor calibration for precise stitch formation
Service Indicators:
– Performance decline despite proper home maintenance
– Unusual grinding or clicking sounds during operation
– Inconsistent stitch quality across different fabrics
– Visible wear on accessible parts like needle clamp
Maintenance Tracking System That Works
Create Your Schedule:
– Daily: Quick bobbin area lint removal (2 minutes)
– Weekly: Thorough accessible cleaning (5 minutes)
– Every 8 hours: Mandatory needle change
– Monthly: Comprehensive cleaning (mechanical only)
– Annually: Professional servicing appointment
Tracking Tools:
– Use Juki’s $4.99 maintenance sticker set on your machine
– Set phone reminders for needle changes
– Mark calendar for annual service appointments
Pro Maintenance Tip: Sew a dated fabric swatch with each new needle. When stitches deteriorate on the swatch, you know it’s time for maintenance—even if you haven’t hit the 8-hour mark.
Before every sewing session checklist:
– [ ] Inspect needle for burrs or bends
– [ ] Clean visible lint from bobbin area
– [ ] Test stitch on scrap fabric
– [ ] Verify correct thread tension
After each major project:
– [ ] Change needle regardless of hours used
– [ ] Deep clean bobbin area
– [ ] Oil mechanical models if due
– [ ] Update maintenance log with date and hours
Your Juki represents a significant investment that can last decades with proper care. These simple juki sewing machine maintenance routines prevent 90% of common problems and keep your machine sewing perfectly for years. Machines that last 20+ years aren’t lucky—they’re meticulously maintained. Start implementing these protocols today and transform your sewing experience from frustrating to flawless.


