
Oil pooling beneath your industrial Juki sewing machine brings production to a screeching halt while threatening costly fabric damage. Whether you’re operating a DDL-5550 or other Juki model, sudden oil leaks signal specific mechanical failures—not random malfunctions. Left unaddressed, even minor seepage escalates into major downtime and ruined projects. This guide delivers immediate diagnostic steps, precise repair protocols, and proven prevention strategies to get your Juki machine back online safely. You’ll learn to identify the exact leak source within minutes, implement correct fixes without voiding warranties, and establish maintenance routines that prevent 95% of oil leakage issues before they start.
Pinpoint Your Juki Machine’s Leak Source
/DDL-5550-6%20series,%20Parts%20List,BE008900PJA(No.0288-02)/14.EXCLUSIVE%20PARTS%20FOR%20DDL-5550H-6.jpg)
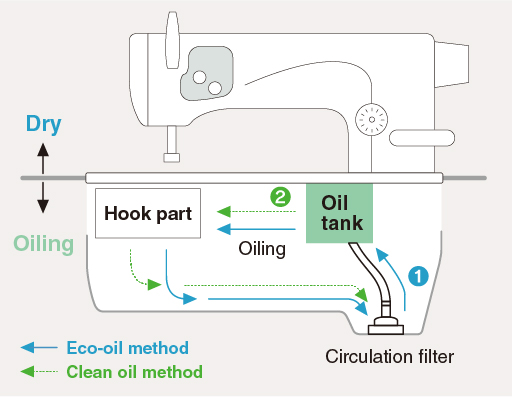
Oil escapes through predictable pathways in Juki machines. Each leakage point creates distinct visual evidence that speeds accurate diagnosis—no guesswork required.
Oil Tank Reservoir Failure Signs
Fresh droplets accumulating directly beneath the main oil housing indicate reservoir issues. Juki’s positive displacement gear pump creates internal pressure that forces excess oil past compromised gaskets. Immediately check the sight glass: oil must sit precisely at the center mark. Any level above the maximum line creates immediate leakage pressure. Overfilling remains the most common—and easiest to fix—cause of oil pooling.
Needle Bar Assembly Seal Breakdown
Vertical oil streaks running down the needle bar shaft reveal deteriorated wiper seals. These components maintain critical lubrication while preventing oil migration toward fabric. When seals harden or crack from age or improper oil, gravity pulls lubricant downward during operation. This creates persistent seepage that worsens with machine speed.
Hook Assembly Gasket Failure
Oil visibly contaminating the needle plate signals hook assembly gasket deterioration. The rotating hook requires constant lubrication, but failed seals allow oil to migrate upward onto your sewing projects. This creates the most damaging leakage pattern—immediately ruining fabrics and requiring extensive cleanup before repairs can begin.
Immediate Visual Inspection Protocol
Power down and unplug your machine the moment oil appears. Conduct this 60-second assessment before existing residue masks new leaks:
Surface Pattern Decoding:
– Droplets beneath oil tank → Reservoir overfill or gasket breach
– Streaks down needle bar → Wiper seal failure
– Oil on needle plate → Hook assembly seal breach
– General coating → Multiple gasket failures or excessive oil application
Wipe all surfaces clean with lint-free cloth before proceeding. Residual oil obscures fresh leaks and leads to misdiagnosis. Never operate the machine while oil is present—this spreads contamination and risks electrical hazards.
Fix Juki Sewing Machine Oil Tank Overfill Issues

Overfilling accounts for 40% of leakage cases in industrial Juki units. Operators often add oil until visible in the reservoir—a critical error that overwhelms the system.
Corrective Procedure:
1. Extract excess oil using a clean turkey baster
2. Wipe reservoir rim thoroughly to remove spills
3. Verify level using sight glass while machine sits perfectly level
4. Restart at slow speed (100-200 RPM) and monitor for 5 minutes
Precision Filling Protocol:
– Add oil only while machine runs slowly
– Stop filling when oil reaches center mark of sight glass
– Wait 30 seconds for distribution before adding more
– Use exclusively Juki-specified ISO VG 68 oil
Never exceed sight glass indicators. The DDL-5550 reservoir holds precise capacity—overfilling creates immediate pressure-induced leaks.
Replace Worn Gaskets and Seals in Your Juki Machine
Gasket failure causes persistent leaks that worsen daily. The DDL-5550 oil pan gasket (part 229-31901) requires replacement every 3-5 years under normal operation—proactive replacement prevents catastrophic failure.
Gasket Replacement Essentials
Critical Tools:
– 8mm socket wrench
– Flathead screwdriver
– Genuine Juki oil pan gasket (229-31901)
– Lint-free cloths and solvent
Step-by-Step Replacement:
1. Drain all oil into clean container
2. Remove oil pan bolts in crisscross pattern
3. Clean mounting surfaces with solvent—zero debris allowed
4. Install new gasket dry (no sealants)
5. Torque bolts to 12 ft-lbs in sequence
6. Refill with fresh ISO VG 68 oil to center mark
Warning: Improper installation causes immediate re-leakage. First-time technicians should schedule professional service—misaligned gaskets damage sealing surfaces permanently.
Clean Contaminated Oil Pathways
Lint and oil sludge create secondary failures by blocking return channels. Debris accelerates gasket deterioration and interferes with sealing surfaces.
Critical Cleaning Sequence:
– Remove needle plate and bobbin case
– Extract all lint from hook area using compressed air (max 30 PSI)
– Clear oil return channels with thin wire brush
– Clean wiper seals with cotton swabs
– Verify unobstructed oil flow back to reservoir
Complete this cleaning after every gasket replacement. Blocked return channels cause artificial overfilling—oil has nowhere to drain during operation.
Prevent Future Juki Sewing Machine Oil Leaks
Proactive maintenance prevents 95% of leakage issues. Implement these tiered routines to eliminate downtime.
Daily Prevention Routine
Spend 2 minutes before starting work:
– Visually inspect for fresh oil accumulation
– Wipe reservoir rim clean
– Verify slow-speed operation shows no seepage
Weekly Maintenance Tasks
- Check oil level using sight glass (never dipstick)
- Tighten visible fasteners to 12 ft-lbs torque
- Clean oil return channels of debris
- Inspect gasket surfaces for hardening
Monthly Deep Inspection
Schedule 30 minutes monthly:
– Remove covers to examine hidden gaskets
– Replace any showing wear (cracks, hardening)
– Verify unobstructed ventilation channels
Professional Service Decision Points
Some leaks demand certified technician intervention. Seek professional help when:
Critical Triggers for Professional Help:
– Leakage persists after DIY gasket replacement
– Multiple components show simultaneous failure
– Oil contaminates timing mechanisms
– Machine remains under warranty
Professional repair typically requires 2-3 hours labor plus parts. Factor downtime costs against DIY attempts—failed repairs often double final service expenses.
Oil Specification Requirements for Juki Machines
Using incorrect oil accelerates seal failure and voids warranties. Juki specifies ISO VG 68 viscosity exclusively—automotive oils create sludge and damage seals.
Approved Oils Only:
– Juki Genuine Sewing Machine Oil
– Singer Sewing Machine Oil (ISO VG 68 grade)
– Industrial synthetic ISO VG 68 blends
Never Substitute With:
– 3-in-1 oil (causes sludge)
– Motor oil (any weight)
– WD-40 or penetrating oils
– Cooking oils (attracts lint)
Incorrect oil thins seals and creates permanent leakage pathways.
Environmental Impact on Oil Performance
Operating conditions directly affect oil behavior and seal longevity. Extreme temperatures thin oil, increasing leak potential by 70% in uncontrolled environments.
Temperature Management:
Maintain shop between 65-80°F. Cold thickens oil causing pressure spikes; heat thins oil reducing sealing effectiveness. Install thermostats near machines.
Humidity Control:
Keep relative humidity below 60%. High humidity causes gasket swelling and premature deterioration. Use dehumidifiers in coastal or tropical climates.
Emergency Containment During Production
When leaks occur mid-production, implement these immediate containment steps:
Critical Response Actions:
1. Place absorbent pads beneath machine (change hourly)
2. Lower oil level immediately if overfilled
3. Reduce operating speed below 300 RPM
4. Schedule repair during next planned downtime
5. Photograph leak pattern for technician diagnostics
Never ignore leaks during critical runs—oil spreads rapidly and ruins multiple projects.
Long-Term Durability Planning for Juki Machines
Plan gasket replacement every 3-5 years regardless of visible leaks. Proactive replacement prevents failures during peak production.
Component Lifecycle Schedule:
– Gaskets: Replace every 3-5 years or 5,000 operating hours
– Oil changes: Every 6-12 months based on usage
– Complete seal kits: Use for comprehensive overhauls
Parts Inventory Strategy:
Maintain stock of critical spares:
– DDL-5550 oil pan gasket (229-31901)
– Needle bar wiper seals
– Hook assembly gaskets
Order during routine maintenance to avoid emergency delays.
Documentation and Warranty Compliance
Detailed service records protect warranty coverage and streamline future repairs.
Essential Records to Maintain:
– Date/time of each leak incident with location photos
– Oil quantity estimates and resolution steps
– Parts used (Juki genuine part numbers only)
– Technician signatures for professional service
Warranty claims require proof of genuine parts usage and adherence to maintenance schedules—skip documentation and void coverage.
Stop Juki sewing machine leaking oil issues before they halt production. Address overfilling immediately, replace worn gaskets proactively, and implement daily visual checks. Use only ISO VG 68 oil and maintain environmental controls to extend seal life. For complex failures or warranty-covered machines, rely exclusively on Juki-certified technicians with genuine parts. Your machine’s longevity depends on precise oil management—treat leaks as urgent mechanical warnings, not minor annoyances. Implement these protocols today to eliminate 95% of oil leakage problems and protect your production workflow.


