
Your quilt layers shift despite careful pinning. Your knit seams stretch and ripple. That thick denim project? Impossible to feed evenly. The Brother walking foot solves these frustrations by syncing upper and lower feed dogs to move all fabric layers together—no more bunching, stretching, or mismatched seams. This specialized attachment transforms challenging projects into smooth sewing sessions by gripping the top fabric layer while working with your machine’s built-in feed dogs. Within minutes of proper installation, you’ll conquer thick seams, slippery silks, and stretchy knits with professional results. Whether you’re using a Brother CS6000i, XR9550, or PE800 model, this guide delivers the exact steps to harness your walking foot’s full potential.
Install Your Brother Walking Foot Correctly

Power Down and Position Your Machine
Turn off your Brother sewing machine completely before starting. Raise the presser foot lever to its maximum height and bring the needle to its top position using the hand wheel. Remove your standard presser foot by pressing the quick-release button or loosening the thumb screw—this prevents accidental needle strikes during installation. Never skip this safety step; working on a powered machine risks damaging internal mechanisms.
Attach and Secure the Walking Foot
Hold the walking foot with the forked extension facing you and slide it under the presser foot holder. For snap-on systems (common on Brother CS and XR series), push firmly until you hear a distinct click. Screw-on models (like the PQ1500SL) require inserting the screw through the holder and tightening just enough to secure without stripping. Now lower the side lever so it rests securely on the needle clamp screw—this critical connection activates the upper feed mechanism. Visual cue: The lever should sit flat against the screw head without wobbling.
Verify Proper Installation Before Sewing
Manually turn the hand wheel while observing the walking foot’s movement. The upper feed dogs should move in perfect sync with the needle bar, and the needle must clear the foot’s opening without touching metal. If you hear clicking or scraping, immediately remove and reinstall—the needle striking the foot can bend needles or damage your machine. Test with scrap fabric: feed multiple layers through to confirm even movement before starting your project.
Thread Your Brother Machine with Walking Foot
Thread your Brother exactly as usual—the walking foot doesn’t alter the standard threading path. Ensure thread flows through all tension disks correctly since the side lever sits beside (not through) the thread path. Draw up the bobbin thread normally, then test stitch on scrap fabric matching your project layers. Critical pro tip: Hold thread tails for the first 3-4 stitches to prevent tangling in the dual feed mechanism. If stitches jam immediately, recheck that the walking foot lever isn’t interfering with thread flow.
Dial Perfect Tension Settings for Flawless Stitches
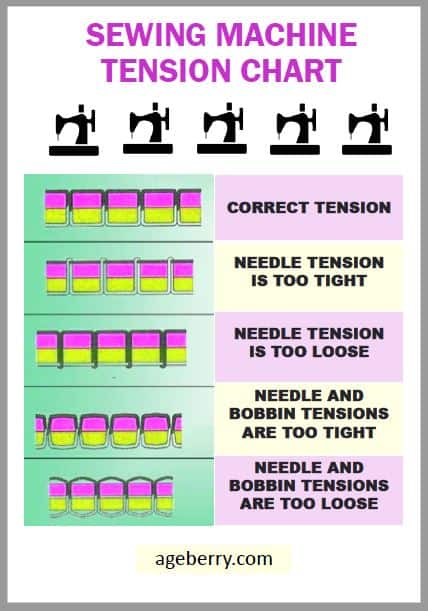
Quick Tension Adjustments by Fabric Type
Increase upper tension by 1/4 turn for standard quilting cottons to compensate for the walking foot’s extra grip. Heavy denim requires a 1/2 turn increase to prevent top thread nesting, while stretch knits often need slightly reduced tension (about 1/8 turn) to avoid puckering. Always test first: Stitch a 4-inch sample on actual project fabric before committing. Incorrect tension shows as uneven stitches or fabric puckering within the first few seams.
Optimal Stitch Settings Cheat Sheet
| Fabric Type | Stitch Length | Needle Size | Thread Weight |
|---|---|---|---|
| Quilting cotton | 2.5-3.0mm | 90/14 | 50wt cotton |
| Heavy denim | 3.0-3.5mm | 100/16 denim | 40wt polyester |
| Stretch knits | 2.0-2.5mm | 80/12 ballpoint | polyester |
| Leather | 3.5-4.0mm | 100/16 leather | heavy polyester |
Warning: Using standard tension settings on thick layers causes skipped stitches. The walking foot’s dual feed demands these micro-adjustments for balanced tension.
Master Basic Walking Foot Sewing Techniques
Start Sewing Without Thread Snarls
Place fabric under the foot and lower the presser foot. Hold thread tails for the first inch to prevent feed dog tangling. Begin slowly for 3-4 stitches, then maintain steady speed—never pull or push fabric. Let the synchronized feed dogs move layers evenly. Pro tip: Support large quilt sections with both hands to prevent drag that causes uneven feeding.
Navigate Sharp Corners Without Puckering
Stop sewing with the needle down in fabric. Lift the presser foot (keeping needle embedded), pivot your fabric to the new direction, then lower the foot and continue. For mitered corners on placemats or bags, shorten stitch length to 1.5mm before turning—this creates precise, puckering-free angles. Never backstitch at corners; it creates bulk that jams the walking foot.
Handle Multiple Layers Like a Quilting Pro
When sewing quilt sandwiches, start from the center and work outward in spiral patterns. At bulky seam intersections, place a folded fabric “hump jumper” under the presser foot to level the height difference. Critical mistake to avoid: Forcing fabric through thick seams—this strains the walking foot mechanism. Instead, approach intersections from both directions: sew to 1/4″ before the bulk, stop, then flip and sew toward it.
Fix Common Brother Walking Foot Problems Immediately
Fabric Won’t Feed Evenly? Reinstall Correctly
If top layers advance faster than bottom layers causing puckering, reinstall the walking foot immediately. Verify the side lever sits flush on the needle clamp screw—not resting on the needle bar. Clean lint from upper feed dogs using a small brush (compressed air drives debris deeper). Check for bent needles that throw off alignment.
Breaking Needles? Check Clearance First
Needle breakage almost always means the walking foot hits the needle during operation. Stop sewing immediately. Remove the foot and manually turn the hand wheel while observing needle-foot clearance. Reinstall ensuring the needle has 1-2mm clearance around the foot’s opening. Urgent fix: A single strike can bend the walking foot’s forked extension.
Skipped Stitches on Knits? Switch Needle Type
The walking foot works perfectly on knits when paired with the right needle. Skipped stitches indicate you’re using a standard sharp needle instead of an 80/12 ballpoint. Polyester thread also prevents skipped stitches on stretch fabrics—cotton thread lacks necessary elasticity.
Advanced Brother Walking Foot Applications

Quilt Perfect Parallel Lines with Guide Bar
Insert the quilting guide bar into your walking foot’s holder slot. Set spacing (1/2″ is ideal for beginners), then run the previous stitched line against the bar for consistent spacing. Pro technique: After stitching a line, move the guide bar to touch it, then sew the next line—this eliminates cumulative measurement errors.
Professional Topstitching on Denim and Bags
Use the walking foot’s side edge as a guide for straight topstitching. Align fabric edges precisely with the foot’s metal ridge for consistent 1/4″ seams. On jeans, increase stitch length to 3.5mm and use 40wt polyester thread—the walking foot prevents the wobble common with standard feet.
Sew Sticky Materials Like Leather
Attach a Teflon walking foot (sold separately for Brother machines) to prevent vinyl or leather from sticking. Increase stitch length to 3.5-4.0mm and use a leather needle to avoid skipped stitches. Secret tip: Place tissue paper between layers—it tears away cleanly after sewing without affecting stitch quality.
Maintain Your Brother Walking Foot for Longevity
Daily Cleaning Prevents Costly Repairs
After each use, brush lint from between the upper feed dogs with a dedicated sewing machine brush. Never use compressed air—it forces debris into moving parts. Wipe the foot body with a dry microfiber cloth to remove fabric residue that causes slippage.
Monthly Deep Maintenance
Remove the walking foot monthly to inspect lever movement. If it squeaks, apply one drop of sewing machine oil to the joint pivot point—wipe excess immediately to prevent thread gumming. Store in its original case to protect the delicate forked extension from bending.
Walking Foot Project Success Roadmap
Beginner: Quilted Place Mats
Layer cotton backing, batting, and top fabric. Pin every 4-6 inches with safety pins. Start sewing from the center using a 2.5mm straight stitch, spiraling outward. Add cross-hatching with the quilting guide bar set to 1.5″ spacing—this beginner project builds confidence with dual-feed control.
Intermediate: Stretch Knit Dress
Sew shoulder seams with stay tape using an 80/12 ballpoint needle. Construct side seams with the walking foot feeding layers evenly—no more stretched necklines. Finish hems with a twin needle and polyester thread for professional bounce. Key insight: The walking foot eliminates the need for stabilizers on most knits.
Advanced: Denim Jacket Construction
Approach thick pocket corners from both directions. Use a hump jumper at seam intersections to prevent skipped stitches. Topstitch yokes with 3.5mm stitches using 100/16 denim needles—the walking foot handles 8+ layers of indigo fabric that would jam standard feet.
Mastering your Brother sewing machine walking foot transforms frustrating projects into satisfying victories. Proper installation, tension tweaks, and technique adjustments unlock professional results on quilts, knits, and heavy fabrics. Keep this guide by your machine, and your walking foot will become indispensable for tackling challenging fabrics with confidence. Remember: perfect installation and fabric-specific tension settings make all the difference—test on scraps first, and let the dual-feed mechanism do the work.


