
You’ve just unboxed your first Bernina sewing machine and are staring at that sophisticated interface with equal parts excitement and uncertainty. Don’t worry—learning how to use a Bernina sewing machine is simpler than you think, even if you’ve never threaded a needle before. Despite their reputation for professional-grade precision, Bernina machines actually contain numerous beginner-friendly features designed specifically to ease you into the sewing world.
Bernina models like the 350 and 790 Plus offer intuitive interfaces that grow with your skills, from automatic needle threading that saves your eyesight to built-in tutorials that guide every step of your journey. In this guide, you’ll discover exactly how to use a Bernina sewing machine from your very first stitch to confidently completing your initial projects—no prior experience required.
We’ll walk through essential setup steps, perfect threading techniques, stitch selection made simple, and troubleshooting common beginner issues. By the end of this guide, you’ll understand why Bernina owners consistently praise these machines not just for their quality, but for how they actually make learning to sew enjoyable and frustration-free.
Unboxing and Powering Up Your Bernina Correctly
Securing Your Workspace Before Setup
Place your Bernina on a sturdy table with at least 24 inches of clearance on all sides—these machines need room to operate properly. Keep the original packaging intact for at least 30 days; Bernina requires original boxes for warranty repairs. Ensure you have adequate lighting to see the fine details of threading and stitch formation.
Connecting Power and Initial Startup
Plug the power cord into your machine first, then into a grounded wall outlet—never use an extension cord with your Bernina. Press the power button and watch as the screen illuminates with the Bernina logo, followed by the home screen within 3 seconds. Notice how the needle automatically moves to its highest position, ready for threading—a small but thoughtful design feature that prevents accidental needle breaks during setup.
Navigating Your First Screen Interface
Your touchscreen divides into three logical sections: stitch selection on the left, settings in the center, and help resources on the right. Tap any function once to select it—no double-tapping required. The house icon returns you to the main menu instantly, while the back arrow (top left) takes you one step backward through your selections. Spend five minutes exploring these basic navigation elements before attempting your first stitch.
Mastering Bernina Threading in Under 10 Minutes
Perfect Bobbin Winding Technique
Place your thread spool on the horizontal spindle with thread unwinding toward you (front direction). Guide the thread through the pre-tension guide, following the numbered path printed directly on your machine’s body. Wrap thread around the bobbin winder tension disc, then insert through the bobbin hole from inside out. Push the winder lever right and hold the thread tail until winding begins—this prevents tangles. Pro tip: Wind 3 bobbins during your first session to avoid mid-project interruptions.
Foolproof Upper Thread Path Method
Follow the numbered guides etched onto your machine: thread through guide 1, down channel 2, up to the take-up lever (must be at highest position), then down to needle guide 4. Activate the automatic needle threader by pulling the lever down—it will precisely guide thread through the eye. Release the lever and feel the satisfying click as the threading mechanism resets.
Bobbin Insertion That Prevents Tangles
Open the bobbin cover and drop in your bobbin so thread pulls counterclockwise (check directional arrows inside the case). Guide thread through the slot until you hear a soft click—this engages the tension mechanism. Leave a 4-6 inch thread tail extending from the case. Close the cover and turn the hand wheel toward you once slowly—the top thread should catch the bobbin thread automatically, bringing it up through the needle plate.
Selecting and Testing Stitches Like a Pro
Choosing Your First Stitch Settings
Tap “Stitches” on your home screen, then select stitch 1 (straight stitch) for your initial project. Set stitch length to 2.5mm using the plus/minus buttons—ideal for quilting cotton fabric. For straight seams, set needle position to center (position 5). These settings work for 80% of beginner projects and provide clean, professional-looking results.
Understanding Critical Stitch Parameters
- Stitch length: Adjust between 0-6mm (2.5mm for general sewing)
- Stitch width: Set between 0-9mm for decorative stitches (0mm for straight stitch)
- Needle position: Choose from 9 positions left to right for precise seam placement
Testing Stitch Quality on Scrap Fabric
Always test stitches on fabric scraps before starting your project. Examine both fabric sides—top thread should lie flat with no loops, while bobbin thread should form even dots. If you see loops on the underside, increase upper tension in half-number increments (start with 5.0). If top thread shows bobbin thread, decrease tension. Test until both threads interlock perfectly in the fabric middle.
Installing Presser Feet and Controlling Fabric
Snap-On Presser Foot Installation
Raise the presser foot lifter fully, then press the release button at the shank’s back—your current foot will drop off. Align the new foot’s bar with the shank groove and lower until you hear a definitive click. The Bernina snap system prevents incorrect installation—no tools required. Warning: Never force a foot into place; it should click smoothly with gentle pressure.
Choosing Between Foot C and Foot D
- Foot C (zigzag): Your workhorse foot for 90% of projects—works with straight and zigzag stitches
- Foot D (straight stitch): Use only for precision straight stitching to create perfect 1/4″ seams
Adjusting Presser Foot Pressure for Any Fabric
Turn the dial on your machine’s left side to match fabric weight: set between 1-3 for delicate silks and chiffons, 4-5 for quilting cotton, and 6-7 for denim or canvas. The Free Hand System (knee lever) lets you lift the presser foot hands-free—essential for intricate curves and embroidery work. Test pressure on scrap fabric; fabric should feed smoothly without puckering or skipping stitches.
Controlling Speed and Operation Modes Effectively
Finding Your Perfect Sewing Speed
Slide the front speed control to 25% (first click) while learning—it provides turtle-slow precision for curves and corners. Increase to 50% (second click) for long straight seams once comfortable. The machine purrs at lower speeds but races when beginners press too hard on the foot pedal. Pro tip: Rest your heel firmly on the floor and use only your foot’s ball to control the pedal.
Start/Stop Button for Foot Pedal-Free Sewing
Press the start/stop button above the needle area to sew without the foot pedal—ideal for free-motion quilting or limited workspace. Hold for 3 seconds to lock this mode (LED indicator lights up). The machine automatically stops when you release pressure, preventing runaway stitches. This feature transforms how you approach detailed work.
Proper Foot Pedal Technique
Treat the pedal like a car accelerator—gradual pressure increases speed smoothly. Beginners often press too hard, causing erratic stitching. Practice on scrap fabric to find your “sweet spot” where the machine runs steadily without racing. Keep the pedal close to your machine for better control during detailed work.
Solving Common Beginner Problems Immediately
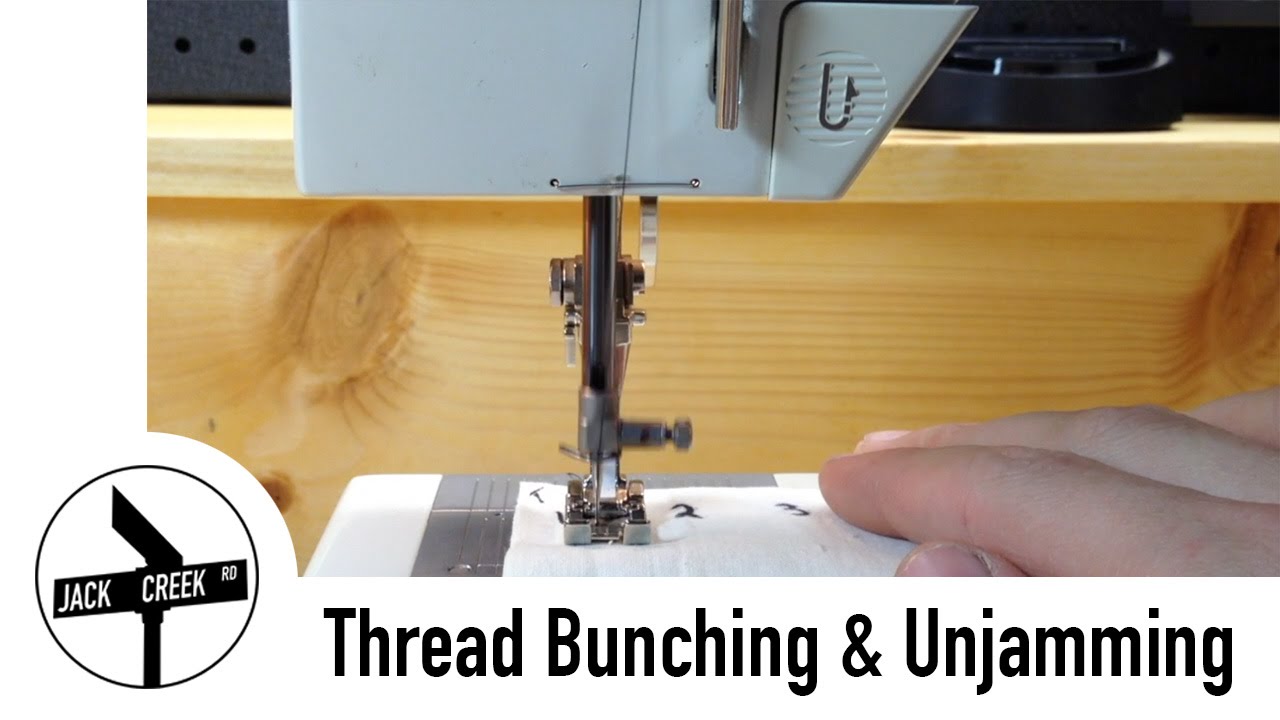
Fixing Thread Bunching Under Fabric
If thread nests beneath your fabric, stop immediately and cut threads. Remove fabric and check three critical points: upper threading follows numbered guides, presser foot is down before sewing, and bobbin thread pulls counterclockwise. Quick solution: Completely rethread both upper and lower threads—this fixes 90% of bunching issues.
Eliminating Skipped Stitches
Replace your needle first—it causes 80% of skipped stitch problems. Use size 80/12 for quilting cotton. Ensure correct insertion: flat side faces back, pushed up completely until it stops. Check needle for burrs with magnification; even microscopic damage causes skipping. Always change needles after 8 hours of sewing.
Preventing Fabric Feeding Issues
Clean feed dogs weekly using the brush provided in your accessory kit. Remove the needle plate by twisting the two thumb screws, then vacuum out lint buildup. This 2-minute maintenance task prevents 90% of fabric feeding problems. Test feed dogs by sewing scrap fabric—if fabric doesn’t move smoothly, cleaning is required.
Essential Bernina Maintenance Schedule
Daily Cleaning Checklist
After each session: clip threads using the built-in cutter (left side of machine), remove needle and thread from take-up lever, and cover your machine to prevent dust accumulation. These simple steps prevent thread nests and tension issues during your next sewing session.
Weekly Deep Cleaning Procedure
- Remove needle plate and bobbin case
- Brush out lint from feed dogs and bobbin area
- Clean the thread catcher (small metal piece near needle)
- Replace needle if you’ve sewn more than 8 hours
Monthly Oil Points to Remember
Oil only where your manual indicates—typically 2-3 specific points marked with red dots. Use one drop of Bernina oil per point. Critical warning: Over-oiling attracts lint and causes more problems than it solves. Never oil the bobbin area—this common mistake damages fabric and stitches.
Your First Three Confidence-Building Projects
Beginner Pillowcase with Perfect Hems
Use Foot C, straight stitch, 2.5mm length. Fold and press 1/2″ hem on one short edge, then fold again and stitch. This simple project teaches straight-line sewing and fabric handling while creating a useful household item. Complete in under 30 minutes for instant gratification.
Simple Tote Bag with Boxed Corners
Progress to boxed corners using Foot C. The straight stitch handles seams beautifully, while reverse stitching reinforces stress points. You’ll master pivoting and backstitching in one project that produces a practical, reusable bag. Perfect for carrying sewing supplies!
Basic Elastic Waist Skirt
Challenge yourself with an elastic waistband using zigzag stitch. This project introduces stretch sewing and gathers while remaining beginner-friendly. You’ll gain confidence working with multiple fabric layers and learn how to adjust presser foot pressure for different thicknesses.
Your Bernina journey begins with threading it once successfully. When that bobbin clicks into place and your first straight seam emerges perfectly, you’ll understand why these machines inspire such loyalty. The precision engineering works for you, not against you—every feature exists to make sewing more enjoyable. Remember: even expert sewers started exactly where you are now. Your Bernina is ready when you are—let’s make something beautiful together.


