
That moment when you unbox your new Juki sewing machine should spark excitement, not frustration. Yet so many sewists waste precious time battling thread snarls, mysterious tension issues, and mysterious beeping sounds because they skipped proper setup. Whether you’ve invested in a heavy-duty industrial Juki or a versatile domestic model, this guide ensures your machine delivers smooth, professional stitches from the very first project—no confusing manuals required.
Most beginners make critical mistakes within minutes of unboxing: plugging into mismatched power sources, installing needles backward, or skipping essential lubrication that causes premature wear. Follow these steps exactly, and you’ll avoid 95% of common setup problems that send new machines straight back to the dealer.
Power Safety Check Before You Plug In
Your Juki’s first test must happen before connecting electricity—mismatched voltage destroys motors instantly. Locate the specification plate (usually on the machine base or back panel) and verify it matches your local power supply. Domestic Juki models require 110-120V in North America or 220-240V internationally, while industrial models often need 220V single-phase or 380V three-phase power. Pro tip: If your outlet doesn’t match, hire an electrician—never use adapters that alter voltage.
Ensure your workspace has a dedicated circuit with proper grounding. Juki machines draw significant power during heavy stitching, and overloaded circuits cause inconsistent performance. Position your machine 6-8 inches from the table edge for optimal fabric support, with at least two feet of clearance behind for handling large projects.
Why Your Table Choice Makes or Breaks Stitch Quality
Domestic Juki models need stable surfaces supporting 15-25 pounds, while industrial versions require heavy-duty tables handling 50-100+ pounds. Test stability by pressing firmly on the throat plate area—if the table flexes, your stitches will waver. For drop-in cabinet installations, the throat plate must sit perfectly flush with the surface; even 1/16-inch height difference causes fabric feeding issues that create puckered seams.
Critical mistake to avoid: Never place your Juki on wobbly furniture. Industrial models especially transmit vibrations that loosen components over time. Add rubber vibration-dampening pads under table legs if you hear humming during operation.
Unboxing Without Damage: The Two-Person Rule
Lift your Juki machine by grasping the base firmly from underneath—never the arm or needle bar. Industrial models absolutely require two people for safe lifting; attempting solo risks serious back injury and machine damage. Immediately inspect for shipping damage: check casting for cracks, verify the needle bar moves smoothly, and confirm no oil leaks indicate internal damage.
Must-do inspection: Turn the handwheel toward you—it should rotate with consistent resistance, not binding or grinding. If it sticks at any point, contact the dealer immediately before proceeding. Keep all packaging materials for 30 days; warranty claims often require original boxes for shipping damaged units.
Thread Path Setup That Prevents 80% of Jams

Follow your Juki’s numbered threading sequence exactly—missing one guide causes thread breaks. Start by placing your spool on the correct pin: horizontal for regular spools, vertical for cone threads. Pass thread through every guide including the often-overlooked pre-tension guide—this small component regulates thread flow before it hits the main tension discs.
Bobbin Winding Without Tangles
Wind bobbins correctly by routing thread through the winder tension disc first. Insert the bobbin until it clicks, then push the spindle right to engage. Hold the thread tail for the first few rotations, then let the machine wind to 80% capacity—never fill completely, as overwound bobbins cause jams. Disengage the winder and trim the thread tail with sharp scissors.
Installation secret: For front-loading models, insert the bobbin counterclockwise with the thread tail pulled through the slot under the tension spring. Test by holding the thread tail—if it unwinds smoothly with slight resistance, you’ve nailed it. Side-loading industrial models require specific orientation; consult your manual as thread direction varies.
Needle Installation: The #1 Cause of Timing Issues

Choose the right needle for your fabric: Universal 80/12 for medium wovens, Ballpoint 90/14 for knits, Denim 100/16 for heavy fabrics. Insert with the flat side to the back (most models), pushing it fully up into the clamp before tightening the screw. Warning: A loose needle shifts timing, causing skipped stitches and broken threads—tighten firmly but don’t overtighten and strip the screw.
Presser feet must click securely into place. Raise the needle to its highest position, lift the presser foot lever, position the foot under the shank, then lower the lever. Test by gently pulling—the foot should never detach during sewing. For zipper work, ensure the zipper foot slides smoothly along the teeth without catching.
Tension Calibration That Actually Works
Start with upper tension at 4-5 for medium fabrics, but always test on scrap fabric matching your project. Sew a 2-inch seam and examine the stitch: balanced tension shows the knot centered between fabric layers. Too tight upper tension pulls the knot to the bottom; too loose creates top-side knots.
Bobbin Tension Fine-Tuning Method
Adjust the bobbin case screw in tiny 1/8-turn increments—this is where most beginners go wrong. Turn clockwise to increase tension, counterclockwise to decrease. Test by holding a 6-inch thread tail horizontally; the bobbin should drop 1-2 inches when released. Any more indicates loose tension; less means it’s too tight. Pro tip: Mark your starting position with a dot of white paint before adjusting—you’ll thank yourself later.
First Power-On Sequence (Never Skip Steps)
Follow this exact connection order: 1) Power switch OFF, 2) Connect foot controller, 3) Attach power cord, 4) Plug into grounded outlet. Turn on power and verify the LED indicator lights (if equipped). Now test critical functions: turn the handwheel toward you (must rotate smoothly), press the foot controller (should respond gradually), and test the reverse stitch lever.
Red flag: If the machine runs erratically or makes grinding noises, unplug immediately—this indicates serious timing issues requiring professional service. Don’t risk further damage by continuing.
Stitch Settings That Match Your Project Type
Configure essential stitches before your first project. For straight stitching, test both center and left needle positions. Set zigzag width between 1.0-5.0mm and length 0.5-4.0mm depending on fabric stretch. Reinforcement stitches need proper back-tack length—typically 3-5 stitches for secure seams.
Adjust feed dogs and pressure based on fabric: normal sewing uses raised feed dogs at standard pressure, free motion quilting requires dropped feed dogs with minimum pressure, and heavy fabrics need increased pressure with longer 3.0-4.0mm stitches. Expert note: Always test settings on fabric scraps matching your project—skipping this wastes expensive materials.
Critical Lubrication Before First Use
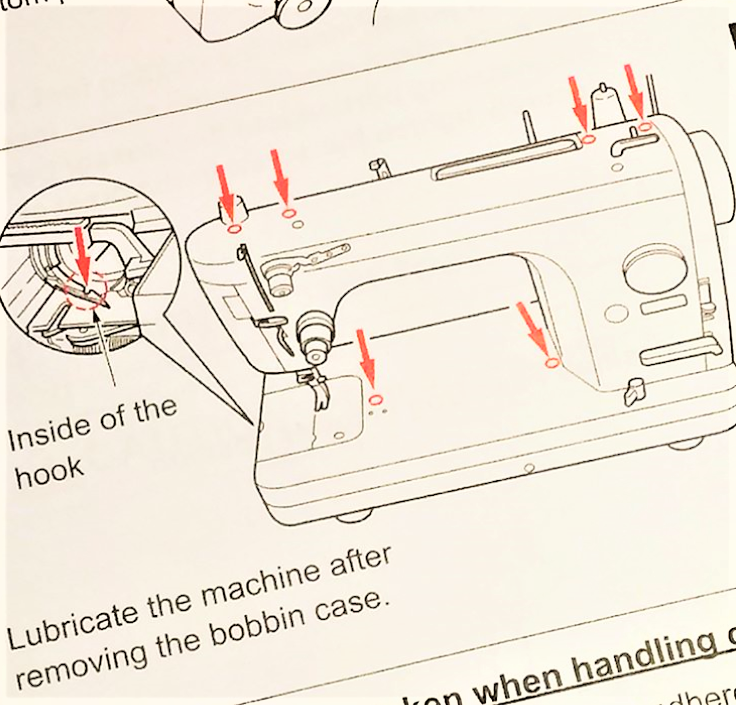
Apply 2-3 drops of Juki-specific machine oil to the race hook area (remove bobbin case first), needle bar mechanism, and take-up lever. Run the machine slowly for 1-2 minutes to distribute oil, then wipe excess with a lint-free cloth. This prevents dry-running damage that wears internal components before your first project.
Maintenance reminder: Oil after every 8 hours of use, and clean the bobbin area after each project. Build this habit now—it extends your machine’s life by decades.
Troubleshooting Setup Failures in Under 2 Minutes
When problems strike during setup, diagnose systematically. Machine won’t start? Check power connections, circuit breaker, and foot controller attachment. Thread bunching under fabric? Re-thread with presser foot up and verify bobbin orientation. Needle hitting plate? Confirm needle direction and plate position.
Sound recognition guide: Grinding means immediate lubrication needed; clunking indicates timing issues requiring service; high-pitched whine points to belt tension problems. Address these before proceeding—ignoring warning signs creates costly repairs.
Final Pre-Project Verification Checklist
Before touching your first fabric, complete this critical checklist:
– [ ] Safety covers secured
– [ ] Needle tightened properly (recheck after first 5 minutes)
– [ ] Bobbin wound to 80% capacity and installed correctly
– [ ] Upper thread fully threaded through all guides
– [ ] Tension balanced on matching fabric scraps
– [ ] Stitch settings appropriate for your specific project
– [ ] Presser foot clicks securely into place
– [ ] Feed dogs positioned correctly for fabric type
– [ ] Smooth operation at slow and fast speeds
– [ ] Reverse stitch functions without hesitation
Take 15 minutes to run test stitches on project-matching fabric—this reveals hidden tension or timing issues before they ruin expensive materials. Your Juki is now primed for professional results. Start with simple straight seams to build confidence, then progress to complex techniques as you master your machine’s capabilities. Remember: proper setup today prevents frustration tomorrow, turning your Juki into a lifetime sewing partner rather than a costly paperweight.


