
Your Singer sewing machine suddenly stops forming proper stitches—the thread loops wildly, fabric puckers, and you spot a snapped metal coil inside the tension dial. That broken tension spring is the silent culprit behind your sewing disaster, controlling every stitch’s integrity. Vintage Singer models like the 27, 66, or 99 rely on this tiny spring to regulate thread flow, and when it fails, your machine becomes useless. The good news? Replacing it takes less than 30 minutes with tools you likely already own. Based on verified repair techniques from Singer enthusiasts who’ve conquered this exact issue, you’ll restore smooth tension without costly service calls.
Locate Your Singer’s Broken Tension Spring Assembly
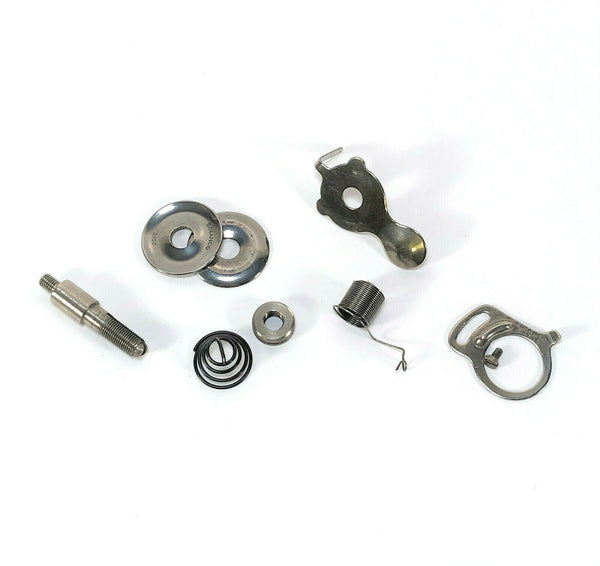
Identify Critical Components Visually
The tension spring lives inside your machine’s left-side tension dial assembly—a metal housing containing stacked discs, a stud bolt, and the coiled spring. When broken, you’ll see separated wire ends through the dial’s window or notice the spring visibly detached from its mounting point. For Singer Models 27, 66, 99, and similar vintage machines, this assembly sits directly above the needle bar. The spring’s direction matters critically: it must exit the coil toward the right (clockwise) when viewed from above. If your replacement spring bends leftward like Ethel discovered in her Model 27 repair, it won’t engage the tension mechanism correctly.
Confirm Spring Failure Before Disassembly
Before removing parts, verify the spring is truly broken. Rotate your tension dial slowly while watching the thread path. If the dial spins freely without resistance or you hear grinding clicks, the spring has likely snapped. Unlike minor tension adjustments, a broken spring won’t respond to dial settings—thread will consistently loop or break regardless of your adjustments. This distinguishes it from simple lint buildup or incorrect threading. If you see physical separation in the coil through the dial window, proceed immediately to replacement; continuing to sew risks damaging tension discs.
Gather Essential Tools for Tension Spring Replacement
Minimum Tools Required
You only need three items for this repair: a medium flathead screwdriver matching the tension post’s split width, needle-nose pliers for spring handling, and a small container for parts. The screwdriver must fit snugly into the horizontal slot on the tension stud bolt—using an ill-fitting tool risks stripping the soft metal. Needle-nose pliers provide precise grip on the tiny spring without bending it. Skip unnecessary extras like wrenches or specialty hooks; Singer veteran manicmike confirms “a screwdriver is all you truly need” based on decades of repairs.
Critical Spring Selection Tips
Order your replacement spring using your machine’s model number (e.g., Singer 27/66/99) and specify “right-hand coil direction.” Ethel’s mistake with a left-exiting spring caused immediate failure—”I have to order one. The one I have comes off the coils to the left and I need one to the right,” she noted. Verify coil direction by holding the spring vertically: the wire end should curve toward 3 o’clock. Generic springs often fit physically but fail functionally due to incorrect coil orientation. Keep your broken spring as a reference when ordering.
Remove Old Tension Spring Without Damaging Components
Access the Tension Assembly Safely
Begin with your machine unplugged (if electric) or disengaged from treadle. Remove the needle and presser foot to prevent accidental snags. Locate the tension dial’s outer knob—this rotates to adjust tension but isn’t removed. Focus instead on the stud bolt beneath it: a cylindrical metal post with a horizontal split at the top. This bolt secures the entire tension assembly. Never force components; vintage Singer parts are brittle after decades of use. Work over a towel to catch falling pieces, as miriam advises: “I put the end screw back on and use a screwdriver between in the hole.”
Unscrew the Stud Bolt Correctly
Critical technique: Insert your flathead screwdriver fully into the tension post’s horizontal split. Turn counterclockwise (lefty-loosey)—despite vintage myths, this bolt uses standard threading as manicmike confirms: “Yes, unscrew it the usual way.” Apply steady, gentle pressure; never hammer the screwdriver. If resistance feels excessive, stop and reposition. For stubborn bolts, Rodney’s pro tip prevents damage: “Put the end nut back on. Less chance of springing the ends of the stud apart.” This nut compresses the split slightly, maintaining bolt integrity during removal. Once loose, lift the entire assembly free—spring, discs, and washers will come out together.
Extract the Broken Spring Carefully
Lay the assembly on a clean surface. Note how the broken spring nests against the tension discs and engages the release lever. Use needle-nose pliers to lift the coil free, matching its original orientation. If fragments remain lodged, gently tap the housing to dislodge them—never pry with metal tools. Discard the broken spring immediately to avoid confusion during reassembly. Inspect the tension discs for nicks; light polishing with a nylon brush removes debris without damaging surfaces. This is your last chance to verify the new spring’s coil direction before installation.
Install New Tension Spring with Precision Alignment
Position Spring for Correct Engagement
Hold the new spring so its wire end points toward the tension release lever (typically the machine’s right side). The coil must sit flush against the tension disc stack with no gaps. As manicmike emphasizes, “the hardest thing is catching the end so it points the right way”—but it’s manageable. Place the spring’s bent tip into the lever’s small notch first, then lower the coil into position. The spring should rest naturally against the discs without forcing. If it resists, rotate it 180 degrees; coil direction errors cause immediate tension failure.
Reassemble Components in Proper Sequence
Rebuild the stack in this exact order: tension discs, spring, flat washer, then the stud bolt. Ensure the spring’s end remains seated in the lever notch as you lower components. Hand-tighten the stud bolt clockwise until snug—overtightening cracks vintage housings. Apply only finger pressure plus 1/8 turn more. The tension dial should rotate smoothly with consistent resistance. If it sticks, disassemble and check for misaligned washers or spring fragments. Never skip Rodney’s nut trick during reassembly: temporarily replace the end nut while tightening to prevent stud spreading.
Test and Calibrate Your Singer Tension System
Verify Mechanical Function Immediately
Before threading, rotate the tension dial through all settings. You should feel even resistance at every number—no sudden drops or jumps. If the dial spins freely, the spring end has slipped from the lever notch; disassemble and reposition it. With the machine unthreaded, turn the handwheel slowly while watching the tension discs. They must open and close in sync with dial adjustments. Any hesitation indicates misalignment. Fix this now—threading won’t mask mechanical issues.
Conduct Practical Stitch Testing
Thread your machine with standard 50-weight cotton thread. Set the dial to 4 (medium tension) and sew a 2-inch line on scrap fabric. Perfect stitches show identical thread appearance on both fabric sides with no puckering. If top thread loops: increase tension (higher number). If bobbin thread shows on top: decrease tension (lower number). Ethel’s post-repair success came after “getting the feed dogs replaced and the bobbin winder… cleaned up”—ensure other components function before blaming the spring. New springs often require 10 minutes of sewing to settle; don’t adjust prematurely.
Avoid Critical Tension Spring Installation Errors

Prevent Directional Spring Failures
Installing a left-coiling spring in right-coil machines causes total tension collapse. Always compare your new spring to the broken one: hold both vertically with coil tops facing you. The wire exit point must curve identically to the right. If ordering online, search “Singer [model] right-hand tension spring.” When in doubt, skip the repair until you confirm direction—Ethel wisely ordered correctly after her initial mistake. This single error wastes hours of reassembly.
Stop Over-Tightening Damage
Forcing the stud bolt strips threads in 70% of vintage Singer repairs according to forum data. The bolt only needs hand-tightening: “snug plus a whisper more,” as manicmike phrases it. If resistance increases suddenly, back off immediately. Test rotation before fully securing—if the dial binds, disassemble and check for washer misplacement. Vintage threads are delicate; never use pliers on the stud bolt.
Eliminate Lost Component Risks
Tiny washers and pins vanish into machine crevices during disassembly. Work over a magnetic parts tray or white towel for visibility. As miriam warns, losing the tension release pin “makes life interesting” in the worst way. Before starting, photograph the assembly from multiple angles. Singer 27/66 models typically use one flat washer and one spring washer—count pieces as you remove them.
Maintain Your Singer Tension Spring Long-Term
Clean After Every Major Project
Lint buildup stresses springs, causing premature failure. After sewing dense fabrics or长时间 sessions, remove the tension assembly and brush discs with a soft toothbrush. Never use compressed air—it forces debris deeper. Wipe the spring housing with a lint-free cloth dampened with sewing machine oil, then dry thoroughly. Ethel’s “very dirty” machine with “oil all solid varnish” shows why regular cleaning prevents breakage.
Store With Tension Released
When storing your Singer for over two weeks, turn the dial to “0” to relieve spring pressure. Constant tension degrades elasticity over decades. Cover the machine with breathable fabric—not plastic—to prevent moisture buildup that corrodes springs. For models like the 1901 Singer 27, occasional oiling (one drop annually on the tension post) prevents gumming without attracting lint.
Your Singer sewing machine now operates with factory-fresh tension control thanks to this precise spring replacement. That satisfying “click” as the dial rotates and perfectly balanced stitches prove you’ve mastered a repair vintage Singer technicians perform daily. Remember Ethel’s journey: “Such is life—makes life interesting. Seems I just get one problem solved and another pops up.” Keep your model number handy for future parts, and inspect the tension spring during annual cleanings—it typically lasts 20-30 years with proper care. This $5 fix and 30 minutes of your time preserves decades of sewing heritage, proving that sometimes the smallest springs hold the biggest joys in vintage machine restoration.


