
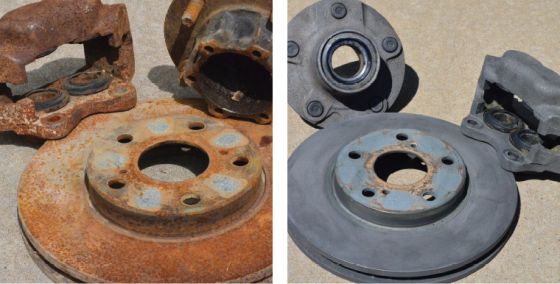
That familiar orange bloom creeping up your Singer 66-16’s legs or barn-find 15-91’s base isn’t just ugly—it’s actively destroying irreplaceable cast iron. When decades of moisture exposure meet neglected storage, rust transforms your heirloom sewing machine into a crumbling relic. But don’t resign it to the scrap pile yet. How to remove rust from Singer sewing machine base is a solvable puzzle, whether you’re facing light surface corrosion or stubborn pitting. This guide reveals field-tested methods that preserve delicate scrollwork while restoring structural integrity—no $200 professional fees required.
Most vintage Singer bases survive with proper intervention because cast iron’s density resists complete degradation. I’ve seen 1920s treadle legs emerge from deep rust baths looking nearly factory-fresh. You’ll learn to diagnose rust severity like a restoration pro, choose between mechanical and chemical approaches, and apply museum-grade protection that prevents recurrence. Most importantly, you’ll avoid the classic mistakes that turn a simple cleanup into a permanent finish disaster.
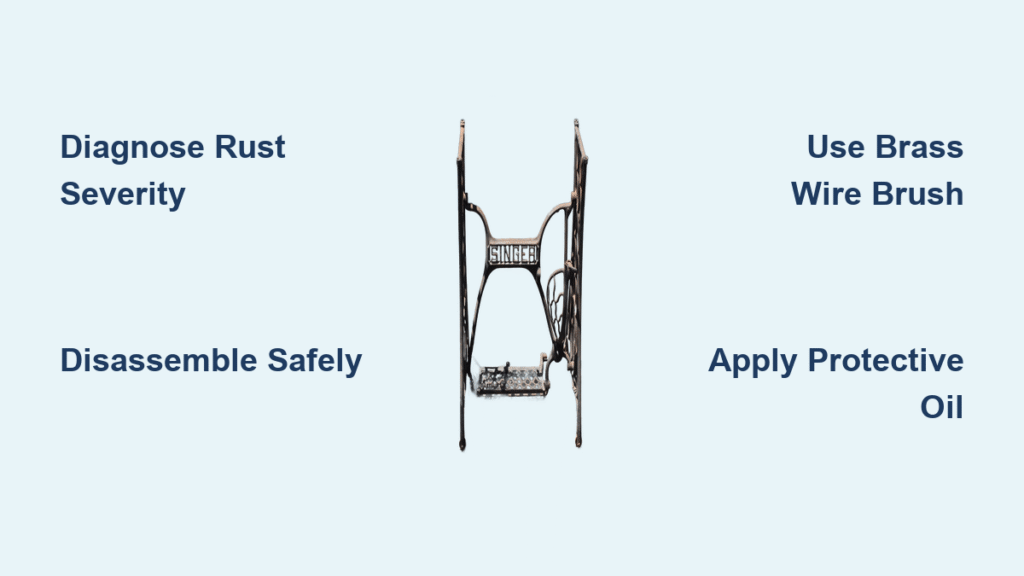
Diagnose Rust Severity Before Touching Tools
Your Singer base’s survival hinges on correctly identifying rust progression. Surface rust appears as loose orange powder that rubs off with your thumb—this responds to basic cleaning within 30 minutes. Deep rust reveals itself through pitted craters where metal feels gritty and crumbly under your nail; this requires multi-stage treatment but won’t compromise structural strength. Structural rust means metal thickness has visibly reduced, often fusing moving parts together—these bases become display pieces only since critical tolerances are permanently lost.
Critical fingernail test: Press firmly across corroded areas. If rust flakes lift cleanly, you’re dealing with surface oxidation. If your nail catches in deep pits, prepare for extended treatment. Machines described as “one solid rust mass” by collectors rarely regain sewing functionality despite cosmetic improvements—prioritize these for decorative restoration only.
Disassemble Singer Base Components Safely
Remove Ornamental Faceplates First
Detachable faceplates like the Singer 66’s floral shield must come off before rust removal. Original hardware typically involves slotted screws or square nuts—not modern Phillips heads. Pro tip: Photograph every fastener location before removal; you might uncover surviving gold pin-striping buried under decades of grime. Never force stuck screws—apply penetrating oil and wait 24 hours.
Organize Heavy Cast-Iron Parts
Place screws in labeled zip bags marked “left leg” or “front bracket.” Remember: Singer treadle legs weigh 40-60 pounds! Support them on wooden blocks during disassembly to prevent chipping cast iron. Mirror-image legs (common on models like Singer 27-2) require careful orientation—mark “L” and “R” with chalk before separation.
Mechanical Rust Removal That Preserves Detail

Hand Tool Method for Light Corrosion
Start with a brass wire brush—aggressive enough to lift flakes yet softer than cast iron, preventing scratches. Follow with a fine-grit sanding sponge to smooth raised edges before powered tools. Realistic time estimate: 45 minutes per leg for surface rust. Visual cue: Stop when you see uniform grey metal without orange residue.
Dremel Technique for Ornate Scrollwork
Essential attachments: Coarse wire cup wheel for flat surfaces, fine wire brush for raised patterns, pencil-tip carbon steel brush for floral recesses. Critical speed setting: 15,000-20,000 RPM—higher speeds overheat metal and risk bristle breakage. Pro move: Work in 30-second bursts with compressed air cooling between passes. Outcome expectation: Rust vanishes but minor pitting remains; finish with a nylon polishing wheel for smoothness.
Sandblasting Alternatives for Deep Pitting
Traditional sandblasting often erodes fine details on Singer bases. Chalk dust blasting offers superior results—it’s gentler on ornamental edges while removing heavy scale. Most auto-body shops blast small batches for $20-40. Warning: Never use this on bases with surviving japanning; it strips all original finishes.
Chemical Solutions That Target Rust Without Harming Cast Iron
Evapo-Rust Deep Soak Process
Submerge legs completely for 4-6 hours (overnight for severe pitting). The transformation: Parts emerge with a uniform dark-grey finish—original paint/japanning will be stripped away. Critical step: Rinse immediately with warm water, then dry with compressed air or hair dryer on low. Time saver: Reuse solution 5-7 times before discarding.
Phosphoric Acid Application for Stubborn Rust
Brush Naval Jelly directly onto rusted areas. Watch for the black conversion: Iron turns matte black within 20-30 minutes as acid converts rust to stable iron phosphate. Hard truth: This strips surrounding paint unpredictably—always test on hidden areas first. Never use near chrome trim or aluminum parts—acid causes permanent etching.
Vinegar Soak Reality Check
Despite Pinterest popularity, white vinegar fails on Singer cast iron. User reports confirm minimal results even after 24-hour soaks, with high risk of microscopic etching that causes flash rust. Exception: Effective for light rust on small screws (max 30-minute soak).
Protect Delicate Areas During Rust Removal
Baking Soda Paste for Painted Surfaces
Mix 3 parts baking soda with 1 part water to toothpaste consistency. Ideal for: Light haze on Singer’s decorative chrome badges or surviving paint areas. Rub gently with microfiber cloth, rinse thoroughly, and dry completely. Limitation: Won’t touch heavy rust but prevents chemical damage to adjacent surfaces.
Penetrating Oil Protocol for Frozen Joints
- Flood joints with PB Blaster or kerosene (not WD-40 for long-term use)
- Wait 48 hours—rust needs time to release its grip
- Apply gentle heat with hair dryer only after solvents evaporate
- Flush with kerosene once movement returns, then lubricate with sewing machine oil
Warning: Never force frozen mechanisms—this cracks cast iron legs.
Singer-Specific Restoration Sequence
Phase 1: Documentation & Degreasing
Photograph base from four angles capturing surviving decals. Disassemble legs using correct screwdrivers. Degrease with mineral spirits to remove oily grime that blocks rust removers.
Phase 2: Targeted Rust Removal
Start with mechanical methods on heavy scaling. Switch to chemical soaks for stubborn pitting. Critical transition: Always rinse with water after chemical treatment before moving to mechanical steps.
Phase 3: Protection That Lasts
Immediate defense: Wipe with light machine oil (renew monthly). Show finish: Two thin coats high-gloss black enamel plus clear coat. Authentic restoration: Corroseal as converter/primer topped with flat black enamel.
Prevent Recurring Rust After Restoration
Short-Term Storage Protocol
Apply micro-thin oil film to all exposed iron. Place silica gel packs (40% moisture absorption capacity) inside cabinet drawers. Pro tip: Store base upside-down to prevent dust accumulation in crevices.
Long-Term Climate Control
Maintain 35-50% humidity using hygrometers. Museum-grade solution: Microcrystalline wax on faceplates creates invisible moisture barrier. Never store in basements/garages without continuous dehumidification—seasonal humidity swings restart corrosion within months.
Cost-Effective Restoration Mistakes to Avoid
Steel wool disasters: Permanent swirl marks destroy original japanning. Vinegar overexposure: Causes flash rust within hours due to microscopic etching. Dremel safety lapse: Wire bristles embed in skin at 20,000 RPM—always wear safety goggles. Painting pitfalls: Skipping neutralization after chemical treatment causes bubbling; test Naval Jelly on hidden areas first.
Budget Restoration Cost Breakdown
| Product | Singer-Specific Use | Price | Time Savings |
|---|---|---|---|
| Evapo-Rust (1 gal) | Deep leg soaks | $26 | Replaces 3+ hours mechanical work |
| Corroseal (1 qt) | Rust conversion + primer | $33 | Eliminates separate priming step |
| Dremel kit | Scrollwork detailing | $82 | 70% faster than hand tools |
| Microcrystalline wax | Museum-grade protection | $19 | Prevents annual re-oiling |
Total budget restoration: $50 using hand tools and Evapo-Rust. Professional-grade setup: $150 including Dremel and Corroseal.
Singer Rust Removal Verification Checklist
- [ ] Photographed all angles before disassembly
- [ ] Confirmed rust severity with fingernail test
- [ ] Degreased parts with mineral spirits
- [ ] Rinsed thoroughly after chemical treatment
- [ ] Applied immediate oil film post-cleaning
- [ ] Documented missing decals for future reference
Your Singer sewing machine base survived 80+ years of use—rust doesn’t have to end its story. By following these cast-iron-specific techniques, you’ll transform that corroded base into a functional heirloom ready for another century of sewing. The key isn’t just how to remove rust from Singer sewing machine base but doing it while preserving the intricate craftsmanship that makes these machines timeless. Start with surface rust today; tackle deep pitting tomorrow. Every brush stroke brings you closer to revealing the original beauty beneath the oxidation.


