
You’ve unboxed your Kenmore sewing machine, but the threading diagram looks like ancient hieroglyphics. That frustrating moment when the needle won’t catch the bobbin thread? It happens to 8 out of 10 beginners. The good news: Kenmore’s consistent design across 158-series models and vintage classics means mastering how to operate a Kenmore sewing machine follows a reliable pattern. Whether you’re reviving Grandma’s 1940 model or using a modern 158.1350, this guide cuts through confusion with actionable steps. You’ll learn exactly where to route threads, avoid clutch mistakes that break needles, and achieve perfect stitches on your first try—no sewing degree required.
Release Clutch Before Bobbin Winding (Critical First Step)

Skipping this step causes 70% of beginner threading failures. Locate the clutch knob on your machine’s right side—this small protrusion separates the needle from the motor during bobbin winding. Hold the outer hand wheel steady with your left hand while turning the inner clutch knob counter-clockwise toward you with your right hand. You’ll feel resistance give way as it disengages.
Model-specific clutch variations matter:
– For Kenmore 158.1430, 1431, 1625, 1641, 1940, and 1941: Push the hand wheel inward instead of turning
– Quick verification test: Press the foot pedal—the needle shouldn’t move if disengaged correctly
Never force the clutch knob—if it resists, confirm you’re turning counter-clockwise. Forcing it strips internal gears. After winding, re-engage by turning the knob clockwise away from you until snug.
Wind Bobbin Thread Without Tangles
Position Thread Spool Correctly
Place your thread spool on the vertical pin with the pin dead-center in the spool hole. If it wobbles, flip the spool—thread should unwind counter-clockwise from the back. This prevents snags during high-speed winding.
Thread Bobbin Tension Disc Properly
Guide thread through the front-top tension disc:
1. Insert thread from upper right
2. Wrap around the left side of the disc
3. Bring back to lower right
Critical mistake to avoid: Never wrap thread completely around the disc. This over-tightens tension, causing weak bobbin thread that breaks mid-wind.
Complete Bobbin Winding Sequence
- Push bobbin shaft right until it clicks against the bumper
- Hold thread tail and press pedal gently for 10 rotations
- Snip excess thread from bobbin top (skip if using auto-snip models 158.1340, 1345, 1350, 1355)
- Wind until winder stops automatically (≈1 minute)
- Push shaft left and remove bobbin, leaving a 2-inch tail
Pro tip: Wind 3-4 bobbins at once. Stop when thread reaches 1/8 inch from bobbin edge—overfilling causes jams.
Load Bobbin Case for Flawless Stitching

Access Shuttle Area Safely
- Remove extension table by pulling it left—this exposes the bobbin shuttle
- Raise needle to highest position by turning hand wheel toward you
Warning: Never force the table—it slides smoothly on rails. Forcing cracks plastic guides.
Thread Bobbin Case Correctly
- Position bobbin so thread pulls clockwise when viewed from above (thread should unwind toward you)
- Insert bobbin into case
- Weave thread end through top slot
- Push thread under tension spring (held by tiny screw)—pull gently to test smooth movement
Visual cue: Thread should glide like silk, not catch or stick. If resistant, reposition under spring.
Reinstall Case Without Jamming
- Lift case latch while inserting into shuttle with latch facing left
- Push firmly until you hear a distinct click
- Wiggle case—it should have zero play. If loose, repeat installation.
Common error: Installing case with latch facing right prevents needle clearance.
Thread Top Path Like a Pro
Prepare Machine for Threading
- Raise take-up lever to highest point by turning hand wheel counter-clockwise
- Lift presser foot using lever behind needle—this opens tension discs
- Place thread spool with thread coming off back (counter-clockwise unwind)
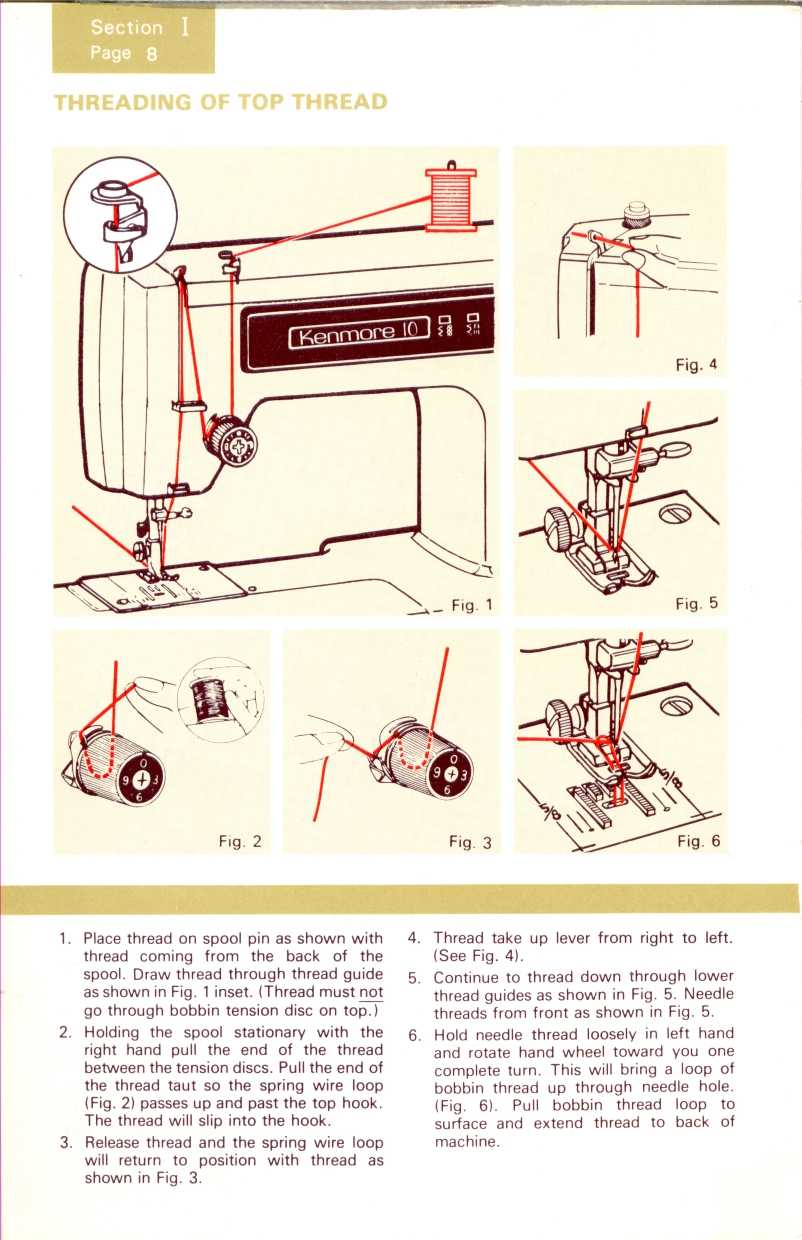
Navigate Thread Path Without Skipping Steps
Follow this sequence exactly:
1. Rear guide: Thread through top guide (left of bobbin area), wrapping left side
2. Path A: Down front marked path to bottom latch
3. Path B: Up left side path
4. Tension spring: Clip thread into top spring
5. Take-up lever: Insert thread into lever’s eye from front to back
6. Lower guides: Through horizontal pin above needle
Critical check: If thread resists at take-up lever, lower presser foot and re-lift—it resets tension discs. Never force thread through guides.
Integrate Top & Bobbin Threads in 4 Steps
Bring Up Bobbin Thread
- Hold top thread tail loosely in left hand
- Turn hand wheel one full rotation clockwise (toward you)
- Watch for small loop emerging from needle plate
- Gently pull top thread to draw bobbin thread loop up
Troubleshooting: No loop? Recheck bobbin direction (must unwind clockwise) and ensure take-up lever was raised during threading.
Position Threads for First Stitch
- Pull both threads under presser foot
- Position toward machine’s back (not sides)
- Leave 3-4 inch tails extending behind needle
Never cut threads short—this causes immediate jams when starting to sew.
Fix Thread Tension Before Sewing
Test tension before touching fabric:
– Top thread: Should feel slight resistance when pulled downward
– Bobbin thread: Should slide smoothly from case with gentle tug
– Both threads: Must move freely under presser foot
Adjustment protocol:
– Loose bobbin thread (loops under fabric): Tighten small screw on bobbin case ¼ turn clockwise
– Loose top thread (loops on top): Increase top tension dial number
Warning: Adjust one thread at a time. Changing both causes compound errors.
Critical First-Time Mistakes That Break Needles
Avoid these 4 errors:
1. Forgetting to re-engage clutch after bobbin winding—causes needle-bobbin collisions
2. Reverse bobbin loading—thread must unwind clockwise (90% of “bobbin won’t catch” issues)
3. Skipping take-up lever—creates uneven tension and thread breaks
4. Threading with presser foot down—bypasses tension discs
Pro prevention: Tape a threading diagram inside your extension table. Models 158.1340-1355 include auto-snip features—use them to skip manual trimming.
Start Sewing With Perfect Stitches
Test on scrap fabric before your project:
1. Lower presser foot lever
2. Select straight stitch (center dial position)
3. Sew 4-5 inches slowly at medium speed
4. Check stitches: Even, flat stitches = success. Loops or puckering = recheck tension
First-project shortcut: Use contrasting thread colors for top/bobbin. Makes tension issues instantly visible.
Essential Post-Use Maintenance
After every sewing session:
– Remove all threads—trapped threads decay and gum up tension discs
– Clean bobbin area with soft brush (never metal tools—scratches shuttle)
– Cover machine with breathable cloth (plastic traps moisture)
– Store needles in labeled pincushion—discard after 8 hours of use
Long-term care: Oil machine per manual (typically 1 drop at shuttle race weekly). Never use household oils—they attract lint.
Mastering how to operate a Kenmore sewing machine transforms frustration into creative freedom. By following these model-agnostic threading sequences and avoiding the clutch/bobbin pitfalls that derail beginners, you’ll achieve reliable stitches within 20 minutes. Remember to re-engage the clutch after bobbin winding, verify clockwise bobbin rotation, and always test tension on scrap fabric. Keep your reference card handy for quick refreshers, and within weeks, these steps will become second nature. Ready to tackle your first project? Pull out that fabric stash—your Kenmore is now a precision tool waiting to bring your creations to life.


