Your Singer sewing machine suddenly starts coughing and sputtering during embroidery work. The handwheel turns like it’s stuck in mud, thread snaps every few stitches, and that familiar whir becomes an alarming grinding sound. These symptoms scream one critical need: your machine desperately requires proper lubrication. Learning how to lube Singer sewing machine components correctly transforms a frustrating, broken tool into a smooth-running precision instrument. Without this simple maintenance, you risk permanent damage that could cost hundreds in repairs or replacement.
Regular lubrication isn’t just about quiet operation—it extends your Singer’s life by decades. Most vintage Singer machines still running today owe their longevity to consistent oiling. This guide reveals the exact lubrication protocol used by professional repair technicians, using only materials you likely already own. Within 15 minutes, you’ll silence those grinding noises and restore buttery-smooth stitching performance.
Singer Sewing Machine Oil Application Essentials
Must-Have Lubrication Supplies
Gather these specific items before starting:
– Clear sewing machine oil (5cc bottle with precision needle tip)
– Microfiber cloth (lint-free to prevent fiber contamination)
– Specialized brush (stiff nylon brush included in Singer accessory kit)
– Precision screwdriver (matches your machine’s needle plate screws)
– Bright LED flashlight (illuminates shadowed oil points)
– Compressed air can (for stubborn lint removal without moisture)
Critical Oil Selection Mistakes to Avoid
Never substitute household oils—this single mistake destroys more Singer machines than any other maintenance error. Automotive oil, WD-40, or cooking oils thicken into sticky sludge that traps lint and eventually seizes mechanisms. Quality sewing machine oil remains crystal clear and flows consistently at room temperature. Check your oil bottle: if it’s yellowed or cloudy, discard it immediately—contaminated oil causes irreversible damage.
Pre-Lubrication Machine Readiness Protocol
Complete Power Disconnection Method
Unplug your machine and remove the power cord before any disassembly. Then rotate the handwheel toward you until the needle reaches its highest position. Loosen the needle clamp screw counterclockwise with your precision screwdriver and slide the needle out. This prevents painful puncture wounds when accessing internal mechanisms.
Needle Plate and Bobbin Area Exposure
Remove the two needle plate screws using your Singer-specific screwdriver. Lift the plate straight upward to expose the feed dogs and shuttle race below. Pull the bobbin case latch to release the case, then lift it out completely. This reveals the critical hook race—the circular track where your bobbin sits—which must be spotless before oiling.
Deep Cleaning Before Oil Application
Never apply oil over debris—this creates abrasive paste that accelerates wear. Use your stiff brush to dislodge lint from:
– Feed dog teeth grooves
– Bobbin case cavity edges
– Shuttle hook surfaces
– Tension disc pathways
Run folded muslin fabric through the top tension discs 5-6 times to extract hidden fibers. If thread is wrapped around the take-up lever mechanism (visible after removing the left faceplate), gently unwind it with tweezers before proceeding.
Precision Lubrication Target Zones

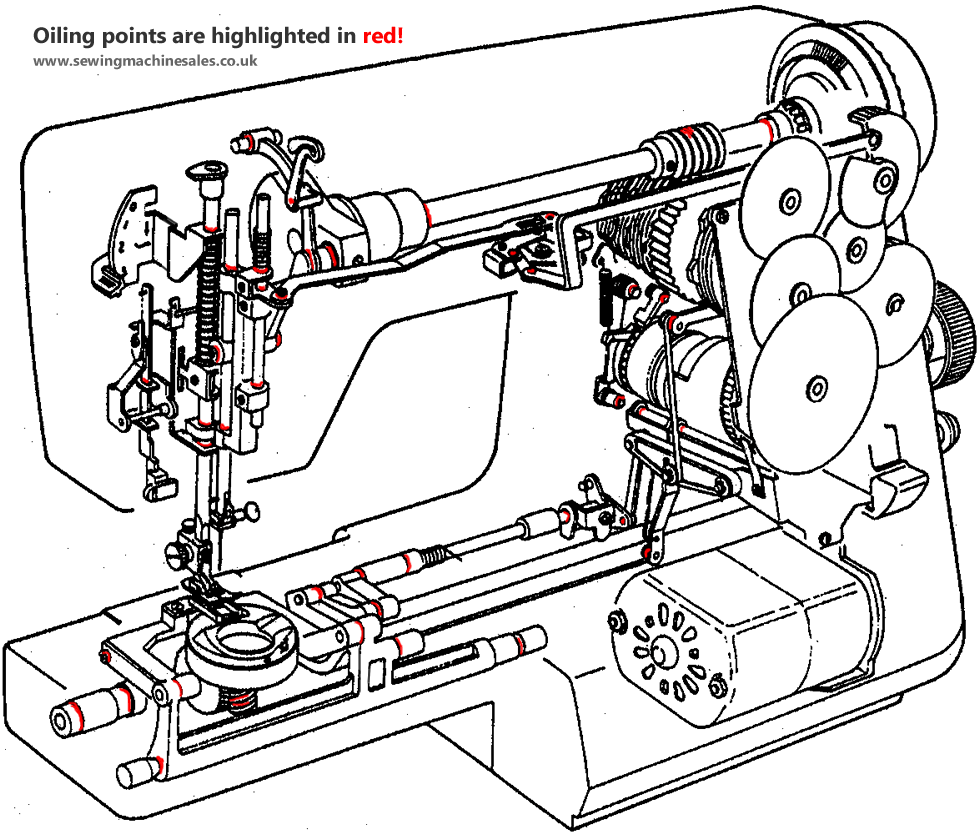
Hook Race Oil Placement Technique
Turn the handwheel clockwise until the hook mechanism stops at the 9 o’clock position. Locate the small depression at the hook race’s center—this single point lubricates the entire rotating assembly. Apply exactly two drops of oil using the needle-tip applicator. One drop lands in the depression; the second coats the hook’s outer rim where it contacts the race. This precise amount prevents oil migration onto fabrics.
Moving Joint Lubrication Sequence
Slowly rotate the handwheel while watching for pivot points. Apply one drop of oil to:
– Needle bar connections (where metal joints flex during up/down motion)
– Thread take-up lever shaft (visible after cleaning wrapped thread)
– Presser foot lifter mechanism (where the bar pivots inside the column)
– Bobbin winder assembly (if accessible on your model)
Hidden Lubrication Points Behind Faceplate
Remove the left-side faceplate by unscrewing its retaining screws. Clean any thread debris from the thread take-up mechanism with your brush. Apply a single drop where the take-up lever connects to the internal drive shaft—this spot often causes squeaking when dry but is missed in casual maintenance.
Exact Oil Application Walkthrough
Hook Assembly Deep Clean Process
1. Position the hook: Rotate handwheel until needle reaches top dead center
2. Release retaining clips: Press both hook cover clips outward simultaneously
3. Remove assembly: Lift out hook race cover and shuttle hook as one unit
4. Clean thoroughly: Wipe all surfaces with microfiber cloth until no residue remains
Controlled Oil Distribution Steps

1. Apply to hook race: Two drops in center depression only
2. Oil shuttle hook: Single drop along outer contact rim
3. Lubricate pivot points: One drop at each visible moving joint
4. Wipe excess immediately: Prevent oil migration using cloth corner
Critical Reassembly Verification
- Hook alignment: Must seat completely with no gaps
- Clip engagement: Both retaining clips snap audibly into place
- Rotation test: Handwheel turns smoothly through 5 full rotations
- Bobbin fit: Case locks securely without wobble
Post-Oiling Performance Validation
Oil Transfer Elimination Protocol
Wipe all fabric-contact surfaces with microfiber cloth:
– Needle plate top and bottom
– Presser foot sole plate
– Bobbin case raceway
– Feed dog tops
Check for residue by placing white paper under the needle and rotating the handwheel 10 times. If oil appears, repeat wiping until paper stays clean.
Fabric Test Stitching Sequence
- Handwheel test: Rotate slowly through 20 stitches listening for smooth operation
- Muslin trial: Sew 15 stitches on scrap fabric at medium speed
- Oil migration check: Inspect fabric underside for any oil spots
- Project fabric verification: Only proceed when test fabric shows zero oil transfer
Performance Quality Indicators
Your successfully lubricated Singer will demonstrate:
– Silent operation (no grinding or squeaking)
– Consistent tension across stitch types
– Effortless handwheel rotation
– No thread breakage during test sewing
Singer-Specific Oil Schedule Guidelines
Usage-Based Lubrication Timetable
- Daily sewers: Oil after every 8-10 hours of machine runtime
- Weekly crafters: Monthly lubrication minimum
- Seasonal users: Every 3 months even with minimal use
Emergency Oiling Warning Signs
Address these issues immediately:
– Handwheel resistance requiring force to rotate
– Metallic grinding during operation
– Frequent thread snapping mid-seam
– Visible smoke from overheated components
Climate Adjustment Factors
Dry environments (below 40% humidity) require 25% more frequent oiling. In high-moisture areas, extend intervals slightly but never exceed 4 months. Always store your machine with silica gel packs to prevent moisture-related corrosion.
Post-Lubrication Problem Solving
Stubborn Stiffness Resolution
If resistance remains after oiling, re-clean the hook race area. Lint trapped under the shuttle hook prevents proper lubrication. Use compressed air at 30 PSI to dislodge debris, then reapply one drop of oil. Never force movement—this can bend precision parts.
Fabric Oil Stain Elimination
Run continuous muslin through the machine for 2-3 minutes at medium speed. This absorbs excess oil without damaging mechanisms. Stop every 30 seconds to check fabric; continue until no oil transfers. Never use paper towels—they leave fibers in critical areas.
Tension System Recovery
If stitches appear loose after oiling, re-clean tension discs. Lint dislodged during maintenance often lodges here. Unthread completely, lift presser foot, and run fabric through discs 8-10 times. Re-thread carefully following your manual’s diagram.
Singer-Specific Safety Protocols
Workspace Setup Requirements
Position your machine on a vibration-free surface with direct lighting. Place a non-slip mat underneath to prevent rolling screws. Keep oil bottles 3+ feet from electrical outlets—sewing machine oil is flammable when atomized.
Precision Part Handling
Handle the shuttle hook like tempered glass—it’s hardened steel that chips on impact. If resistance occurs during reassembly, backtrack immediately. Forcing parts causes alignment damage requiring professional repair. Use magnifying glasses to verify proper seating.
Oil Storage Safety
Store oil upright in original container away from sunlight. Discard any oil that turns amber or develops particles. Contaminated oil introduces abrasives that score metal surfaces permanently.
Model-Specific Lubrication Variations
Finding Your Exact Oiling Diagram
Locate your serial number (typically on a plate near the handwheel). Search online for “[Your Model] oiling diagram”—Singer provides free schematics for all models. For example, serial “8280 ZHC 601” corresponds to a Singer 4423.
Critical Model Differences
- Top-loading bobbins (e.g., Singer 9960): Oil through needle plate opening
- Front-loading bobbins (e.g., Singer 4411): Access via front panel removal
- Vintage mechanicals (e.g., Singer 201): Require additional gear train oiling
When to Call a Professional
Seek expert help if:
– Grinding persists after triple-cleaning and oiling
– Electronic displays malfunction after maintenance
– Oil appears near motor components
– You lack confidence in reassembly steps
Regular lubrication transforms your Singer sewing machine from a source of frustration into a lifelong creative partner. By following this precise how to lube Singer sewing machine protocol every few months, you’ll prevent 90% of common mechanical failures while extending your machine’s life far beyond its expected lifespan. Keep that bottle of clear sewing machine oil handy—your machine’s smooth operation and perfect stitches depend on it. Start your next sewing session with confidence knowing you’ve given your Singer the professional-grade care it deserves.


