

Your Singer sewing machine freezes mid-stitch as the foot pedal suddenly stops responding—the needle stuck halfway through fabric, thread tangled in frustration. This common nightmare affects both vintage Singer 15-125 owners and users of modern computerized models. Most pedal failures stem from simple, fixable issues you can resolve in under 30 minutes without professional help. By following these targeted diagnostic steps, you’ll identify whether your problem requires a quick cleaning, minor adjustment, or replacement—getting your Singer back to stitching smoothly today.
Unplug Before Touching: Critical Safety First
NEVER skip this step: Your Singer foot pedal wires carry live current when plugged in and can cause severe electrical shock. Always disconnect both ends before inspection. Start with these three life-saving checks that resolve 30% of “dead pedal” cases:
- Test your wall outlet with a lamp or phone charger to confirm power
- Ensure your Singer’s main power switch is ON (the machine light should glow)
- Verify the pedal plug clicks fully into the machine’s socket—partial connections cause intermittent failures
If these checks pass but the pedal remains unresponsive, move to machine diagnostics before assuming pedal failure. Many users waste money replacing pedals when the real issue lies elsewhere in the sewing system.
Rule Out Machine Problems Before Pedal Repair
Needle Removal Diagnostic Test
Remove the needle completely and press the pedal. If the machine now runs freely, your pedal isn’t faulty—this proves a mechanical blockage. Immediately check for:
– Thread jams in the bobbin area
– Bent needles hitting the hook mechanism
– Incorrect timing between needle and hook
– Presser foot lowered while threading (a common oversight)
Computerized Model Troubleshooting Checklist
For Singer Futura, Quantum, or other electronic models, these specific issues mimic pedal failure:
– Toggle feed dogs off then back on—stuck feed dogs trigger safety locks
– Check for error codes like “E1” or rapid beeping indicating communication faults
– Replace the bobbin case if plastic shows burrs (costs under $5)
– Clean lint from under feed dogs with a small brush
– Always thread the needle with presser foot UP to prevent tension errors
Test Pedal Functionality With Basic Tools

Multimeter Continuity Verification
Grab a $15 digital multimeter from any hardware store—this 2-minute test gives definitive answers:
- Unplug pedal from wall AND machine
- Set multimeter to continuity mode (beep symbol)
- Touch probes to both prongs of pedal plug
- Press pedal fully down
Interpret results:
– Beep sounds: Pedal works electrically—focus on machine issues
– No beep: Pedal has internal failure requiring repair/replacement
Vintage Pedal Resistance Analysis
For Singer 15-125 or other mechanical pedals (part #194828), measure resistance while slowly pressing:
– Healthy pedal: Resistance drops smoothly from 180Ω to 100Ω
– Faulty pedal: Sudden jumps (e.g., open circuit → 29Ω constant)
– Critical tip: Test at multiple pressure points—intermittent faults show erratic readings
Inspect Physical Components Systematically
External Failure Point Checklist
Examine these four vulnerable areas with a flashlight:
– Cord damage: Look for kinks near plug ends (most common failure zone)
– Bent plug prongs: Gently straighten with pliers if misaligned
– Housing cracks: Even hairline fractures disrupt internal mechanisms
– Machine socket: Blow compressed air into receptacle to remove lint
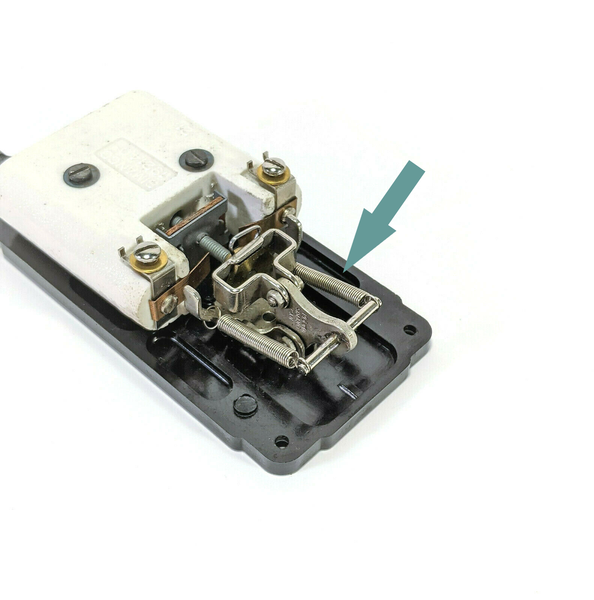
Vintage Pedal Internal Inspection
If disassembling a mechanical pedal like Singer 194828:
– Locate the copper contact strips showing matching wear patterns
– Check the single longer contact piece for center screw tightness
– Pro warning: Small parts scatter easily—work over a tray and use a magnet
– Adjustment tip: Bend final contacts outward slightly for smoother speed control
Fix Common Pedal Failures in Minutes
Intermittent Operation Repair
When your pedal works sporadically:
1. Spray electrical contact cleaner on visible terminals
2. Reposition contact strips for earlier engagement point
3. Tighten loose internal wire connections
4. Replace worn contacts using vintage parts kits ($8 online)
Time estimate: 15 minutes for experienced users
Complete Non-Response Solutions
For zero pedal response after failed continuity test:
– Check internal wiring for corrosion at solder points
– Inspect carbon pile components for cracks
– Critical fix: Replace entire pedal assembly if wiring is frayed (safety hazard)
Sudden Speed Jump Correction
When machine lurches from stop to full speed:
– Adjust contact bend angle using needle-nose pliers
– Lubricate mechanical pivots with silicone grease (avoid electrical parts)
– Verify contact pressure—too loose causes erratic speed
– Test operation after each micro-adjustment
Choose the Right Replacement Strategy
OEM vs Universal Pedal Comparison
| Type | Cost | Compatibility | Best For |
|---|---|---|---|
| Original Singer | $40-80 | Guaranteed match | Computerized models |
| Universal Pedal | $15-30 | May need adapter | Mechanical machines |
| Vintage Rebuilt | $50-120 | Restored originals | Antique Singer 15-125 |
Key decision factor: Match electronic vs mechanical design—computerized machines require specific signal protocols.
Professional Service Resources
- eBay vintage specialists: Rebuild Singer 194828 pedals with original parts
- Authorized dealers: Provide wiring diagrams for Futura error codes
- Local shops: Offer free pedal testing (call ahead)
- Sewing forums: Search “Singer pedal fix” for model-specific photos
Model-Specific Fixes That Actually Work
Singer 634D Unresponsiveness
When pedal fails despite power light:
– Test motor brushes first—common failure point
– Clean switch contacts with isopropyl alcohol
– Prevention: Oil only mechanical parts (never electrical components)
Singer Futura Error Beeps
Distinguish pedal issues from machine faults:
– Perform factory reset (hold reverse stitch + power 5 sec)
– Update firmware via USB if available
– Confirm beeps match error codes in manual (not pedal failure)
Singer 15-125 Vintage Pedal
For part #194828 mechanical controls:
– Bend copper contacts outward 1-2mm for gradual speed
– Replace carbon pile with vintage supplier kits
– Critical tip: Never overtighten wafer screws—causes resistance jumps
Prevent Future Failures With Smart Maintenance
Monthly Pedal Care Routine
- Wipe exterior with dry microfiber cloth
- Inspect cord for new kinks or frays
- Test functionality with scrap fabric
- Store with cord loosely coiled (never wrapped tightly)
Quarterly Deep Maintenance
- Perform multimeter resistance test
- Clean contacts if resistance varies >10%
- Check plug connections for looseness
- Lubricate mechanical pivots with silicone spray
Storage essential: Keep pedals in temperature-stable areas away from humidity—extreme conditions degrade wiring.
When to Repair vs Replace Your Singer Pedal
Replace immediately if:
– Internal wiring shows exposed copper
– Continuity test fails completely
– Housing has structural cracks
– Cost of repair exceeds $50
Repair instead when:
– Only contacts need cleaning
– Vintage pedal has sentimental value
– Loose connections are visible
– Carbon pile shows minor wear
Your Singer foot pedal issue likely resolves with one of these targeted fixes. Start with the safety checks, then the multimeter test—it eliminates guesswork and prevents unnecessary replacements. Most problems stem from dirty contacts or minor mechanical faults solvable in under 20 minutes. For persistent issues, consult Singer’s model-specific forums where owners share proven solutions. Remember: Regular monthly maintenance prevents 90% of pedal failures—keep that Singer stitching smoothly for years to come.


