
Your Juki sewing machine has suddenly stopped working mid-project, and the deadline is looming. You’re staring at tangled threads, skipped stitches, or that dreaded grinding noise that means trouble. Whether you’re a professional tailor or a passionate hobbyist, knowing how to fix Juki sewing machine issues can save your project and prevent costly repair bills. Most common problems can be resolved in under 30 minutes with basic tools and the right approach.
This guide cuts through the confusion with precise, model-specific solutions you won’t find in generic repair manuals. You’ll learn exactly which components to check first, how to diagnose problems in under a minute, and when to attempt repairs versus calling a professional. Stop wasting time on trial-and-error fixes—let’s get your Juki sewing machine back to perfect stitching today.
Identify Your Juki Problem in Under 60 Seconds
The 30-Second Thread Troubleshooting Method
Before diving into complex repairs, perform this rapid diagnostic check that solves 80% of Juki sewing machine issues. Start with thread problems, which account for most sewing machine malfunctions:
- Broken threads: Immediately check your needle for bends, nicks, or dullness—this solves most thread breakage issues
- Bunching underneath fabric: Indicates tension imbalance or timing problems between needle and hook
- Skipped stitches: Usually means your needle is damaged or wrong size for the fabric
- Bird nesting: Occurs when thread isn’t properly threaded through tension disks
Critical visual check: Remove the throat plate and examine the hook area while turning the hand wheel slowly. If the hook isn’t catching the needle thread smoothly, you’ve confirmed a timing issue requiring adjustment.
The Essential 5-Point Pre-Repair Inspection
Complete this quick visual scan before any repair attempt:
- Needle condition: Look for visible damage—bent tips cause skipped stitches and fabric damage
- Bobbin area: Check for thread nests or lint buildup preventing proper rotation
- Tension disks: Inspect for debris between disks disrupting thread flow
- Feed dogs: Verify all teeth are intact and moving properly
- Belt tension: On industrial models, check for cracks or excessive slack
This systematic approach ensures you’re fixing the actual problem rather than wasting time on unnecessary adjustments.
Replace Juki Needles Correctly Every Time
When Your Juki Absolutely Needs a New Needle
Replacing needles is the single most effective maintenance task for Juki machines. Change needles immediately when you notice:
– Broken threads on multiple fabric types
– Visible damage like bent tips or nicks (hold needle against light to spot imperfections)
– Skipped stitches that don’t improve after rethreading
– Fabric damage like snags or holes along seam lines
Needles degrade through normal use—sharpness diminishes after 8-10 hours of sewing, and hitting even a single pin can compromise performance.
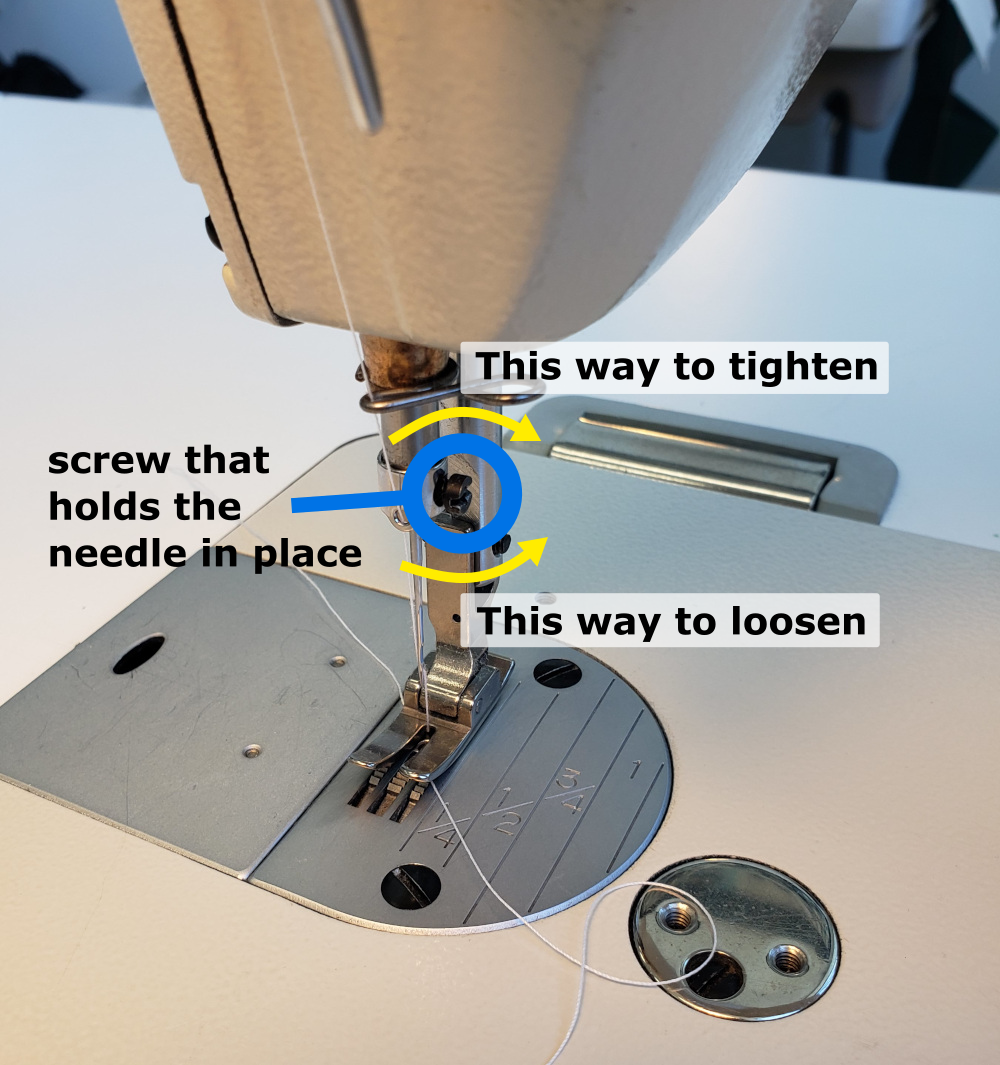
Professional Needle Replacement Technique
Required tools: Small flathead screwdriver, correct needle type for your fabric
- Power down: Turn off and unplug your Juki machine
- Loosen clamp screw: Turn counterclockwise with screwdriver
- Remove old needle: Pull straight down without wiggling
- Insert new needle: Position flat side toward back on most Juki models
- Seat properly: Push needle fully upward until it stops
- Tighten securely: Finger-tight plus quarter-turn with screwdriver
- Verify position: Rotate hand wheel to ensure smooth movement
Pro tip: Keep a labeled needle organizer with your Juki model number visible—different Juki machines require specific needle types that aren’t always interchangeable.
Fix Stuck Bobbin Winders Without Special Tools
Quick Bobbin Winder Diagnosis
Perform this 30-second test before disassembling anything:
– Remove bobbin and attempt to turn winder by hand
– Stiff rotation: Indicates lubrication failure (solves 90% of winder issues)
– Excessive spinning: Suggests worn components needing adjustment
– Grinding sensation: Points to debris buildup or dried lubricant
Lubrication Fix for 90% of Bobbin Problems
Step-by-step solution:
- Remove bobbin: Clear all thread from the area
- Locate pivot point: Find the beveled edge where bobbin screws in
- Stabilize mechanism: Insert flathead screwdriver into beveled edge
- Apply oil: Place one drop of sewing machine oil (not 3-in-1) at pivot points
- Work in lubricant: Rotate winder 10-15 times by hand
- Test function: Should spin smoothly with slight resistance
This simple procedure solves most bobbin winding issues without requiring complete disassembly.
Correct Hook Timing on Your Juki Machine

When Timing Adjustment Is Absolutely Necessary
Don’t attempt timing adjustments unless you’ve confirmed these symptoms:
– Thread consistently fails to catch during stitching
– Severe bird nesting occurs immediately after starting
– Needles break frequently despite proper installation
– Stitch formation is completely absent
Critical warning: Incorrect timing adjustments can cause permanent damage—only proceed if simpler fixes haven’t worked.
Precision Timing Adjustment Protocol
Phase 1: Needle Positioning
– Fully lower needle using hand wheel
– Position needle eye 3/32 inch below shuttle hook point
– Consult your specific Juki model manual for timing marks
– Loosen needle bar clamp if adjustment needed
Phase 2: Hook Alignment
– With needle at lowest position, loosen hook gears
– Set hook-to-needle gap between 0.01-0.16 inches
– Ensure hook point aligns with needle scarf (the flattened side)
– Gradually tighten components while verifying alignment
Final verification: Rotate hand wheel through complete cycle—hook must catch thread smoothly without touching needle at any point.
DIY Repair or Professional Service Decision Guide
Safe Home Repairs You Should Attempt
Handle these common issues yourself to save time and money:
– Needle replacement and thread path clearing
– Bobbin area cleaning and basic lubrication
– Tension adjustments for consistent stitching issues
– Feed dog cleaning and minor mechanical adjustments
Critical Repairs Requiring Professional Help
Call a certified Juki technician for:
– Electronic control board malfunctions
– Motor replacement or electrical issues
– Complex gear train problems
– Timing adjustments if you lack experience
– Any repair covered under warranty
Cost-benefit analysis: Simple maintenance takes 15-45 minutes but prevents $100+ service calls. When in doubt, consult your Juki manual’s troubleshooting section before disassembling components.
Prevent Future Juki Machine Failures
Weekly Maintenance Routine
After every 10 hours of use:
– Clean bobbin area with specialized lint brush
– Apply sewing machine oil to designated points
– Inspect needle for damage before each project
– Test tension on scrap fabric matching your project
Monthly deep maintenance:
– Complete throat plate removal and cleaning
– Thorough feed dog inspection and cleaning
– Full lubrication of moving parts
– Belt tension verification (industrial models)
– Comprehensive needle and thread path check
Pro tip: Keep a dedicated maintenance kit with your Juki model number clearly labeled—different Juki machines require specific parts and lubricants.
Emergency Troubleshooting Flowchart
Machine won’t sew? Follow this sequence:
1. Verify power connection and foot pedal functionality
2. Check for broken needle or thread jams
3. Clear all thread nests from bobbin area
4. Confirm proper bobbin placement and threading
5. Test tension settings on scrap fabric
Thread keeps breaking? Try this:
1. Replace needle with correct size/type
2. Examine thread quality for weak spots
3. Adjust upper tension slightly
4. Check for burrs on thread path components
5. Verify complete threading through all guides
Poor stitch quality? Fix it immediately:
1. Change needle first—solves most issues
2. Completely rethread machine (top and bobbin)
3. Clean lint from hook and bobbin area
4. Adjust tension based on fabric weight
5. Test on scrap fabric before resuming project
Take Action Now: Grab your Juki sewing machine and perform the 5-point inspection immediately—most problems reveal themselves in under two minutes. Bookmark this guide for quick reference when issues arise. Remember that consistent maintenance prevents 90% of sewing machine problems, saving you time, money, and project deadlines. Your Juki machine is designed for reliability—by mastering these essential fixes, you’ll extend its life for years of flawless stitching. Start with the simplest solutions first, and don’t hesitate to consult your model-specific manual for precise measurements and tolerances unique to your Juki sewing machine.


