
Your Brother sewing machine’s feed dogs stubbornly pull fabric backward no matter how you position the reverse lever. This frustrating issue transforms simple sewing projects into time-consuming nightmares as every stitch moves in the wrong direction. Whether you’re hemming pants or working on a quilt, a stuck reverse function brings your creative momentum to a complete halt—until now.
The good news? Most Brother sewing machines stuck in reverse respond well to targeted troubleshooting. This comprehensive guide reveals the exact steps to diagnose and fix reverse mechanism problems without expensive professional repairs. You’ll learn how to identify whether your CS6000i, SE600, XR3774, or other Brother model needs cleaning, lubrication, or minor adjustments.
Why Your Brother Sewing Machine Only Moves Fabric Backward
When your sewing machine keeps pulling fabric toward you regardless of lever position, the reverse mechanism has seized. This common failure point affects nearly all Brother models including CS, SE, XR, and PQ series machines. The root cause usually involves internal components that physically control feed dog direction becoming jammed or misaligned.
How to Confirm Reverse Mechanism Failure
Check for these telltale signs that confirm your reverse function is truly stuck. Run your machine slowly without fabric while watching the feed dogs—these metal teeth should change direction when you engage and disengage reverse. If they consistently move backward, your machine has a reverse mechanism failure rather than a temporary glitch.
Listen carefully for unusual sounds during operation. Grinding noises often indicate internal gear problems, while complete silence when operating the reverse lever suggests disconnected linkage. Note whether the reverse lever feels stiff or moves freely without affecting stitching direction—this distinction determines your repair approach.
Electronic vs. Mechanical Reverse Systems
Identify whether your Brother machine uses a physical lever or electronic controls, as repair methods differ significantly. Traditional models like the XR3774 feature a side-mounted lever you physically push to engage reverse, while newer CS6000i and SE600 models use buttons or touchscreen controls.
Electronic models sometimes respond to simple resets before requiring deeper intervention. If your machine has digital controls, press and hold the reverse button for 5 seconds while powering on to access diagnostic mode. Mechanical models require hands-on component inspection but often have more straightforward fixes.
Immediate Checks for Your Stuck Reverse Mechanism
Before disassembling your machine, perform these critical safety and diagnostic steps to avoid causing further damage. Unplug your Brother sewing machine and remove the needle, presser foot, and bobbin to prevent accidental stitching during troubleshooting. This prevents needle breakage and potential injury while you work.
Manual Lever Movement Test
With the machine powered off, gently move the reverse lever through its full range of motion. The lever should move smoothly without resistance, clicking, or grinding. Note any specific points where movement becomes difficult—this indicates where internal binding occurs. For electronic models, press the reverse button firmly and listen for the expected click or beep.
Pro Tip: Place your finger on the feed dogs while operating the reverse control. You should feel subtle movement changes even without power, revealing whether the mechanism is completely seized or partially functional.
Feed Dog Motion Analysis
Slowly turn the hand wheel toward you while observing feed dog movement. The feed dogs should move in a consistent pattern, changing direction when you engage reverse. If they move erratically or remain stuck in one direction, internal components need attention. Pay special attention to whether the feed dogs lift properly—low feed dogs cause skipped stitches that mimic reverse problems.
How to Remove Lint Jamming Your Brother Machine’s Reverse Function
Lint accumulation causes over 70% of reverse mechanism failures in Brother sewing machines. Thread fragments and fabric fibers build up around critical pivot points, physically preventing the mechanism from disengaging reverse mode. This fix requires careful cleaning of three specific areas.
Needle Plate and Feed Dog Cleaning Process
Use a size 0 or 1 Phillips screwdriver to remove the needle plate screws without stripping them. Lift the plate straight up to avoid bending delicate feed dogs underneath. With the plate removed, use a soft lint brush to clean between feed dog teeth thoroughly, focusing on the rear connection points where the reverse mechanism attaches.
Critical Step: Shine a flashlight at a 45-degree angle across the feed dog area to reveal hidden lint buildup. Pay special attention to the small slot where the feed dogs move forward and backward—this narrow channel traps thread that jams reverse function.
Bobbin Area Deep Cleaning
Remove the bobbin case and clean the surrounding cavity with your lint brush. Thread fragments often wrap around the hook race and connecting rods that control feed direction. Use tweezers to extract stubborn thread pieces you can’t brush away, working from multiple angles to access all surfaces.
Warning: Never use metal tools that could scratch plastic components or damage timing. For persistent lint, use compressed air held upright to avoid moisture spray—but keep the can at least 6 inches from delicate parts.
Proper Lubrication for Brother Reverse Mechanism Repair
Dried lubrication causes many reverse sticking issues, especially in machines stored in dry environments. Proper oiling requires precision—too little won’t free stuck components, while too much attracts more lint. Use only high-quality sewing machine oil, never household alternatives that gum up mechanisms.
Targeted Oil Application Points
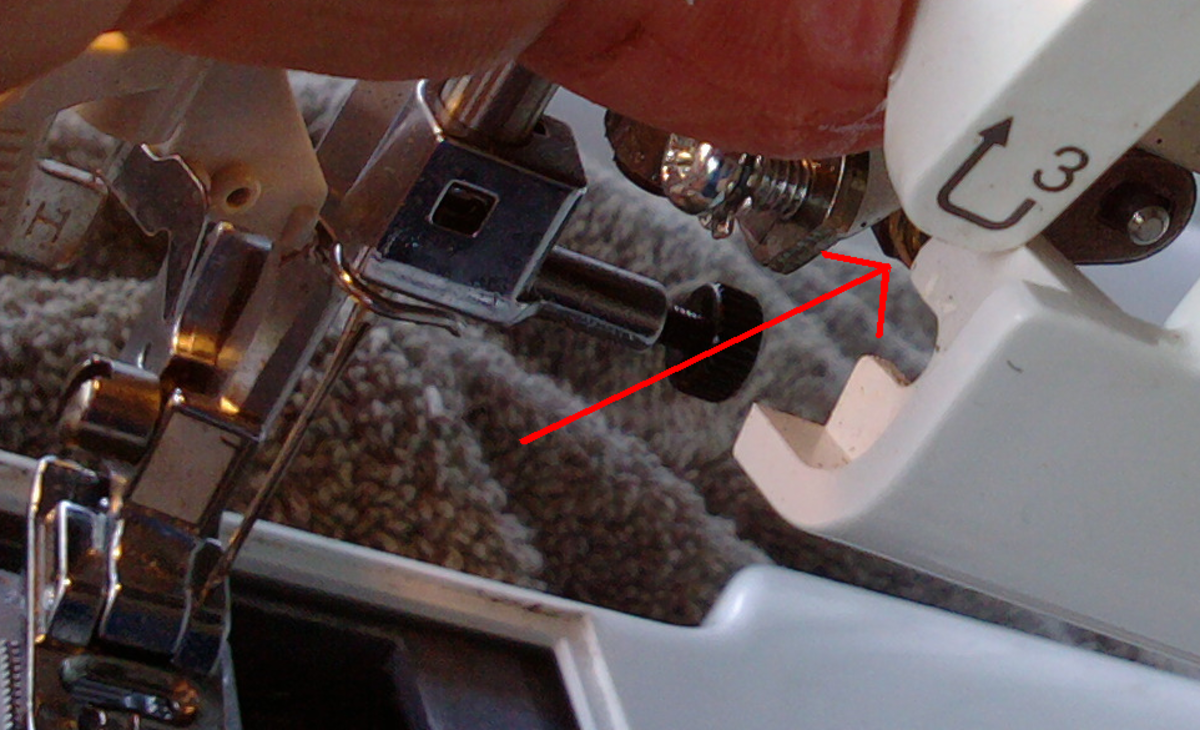
Locate oil points marked in red on your machine or referenced in your manual. For most Brother models, focus on these three critical areas:
– The pivot point where the reverse lever connects to internal mechanisms
– The horizontal connecting rod that transmits lever movement
– Any visible gear teeth engaged during reverse operation
Apply exactly one drop at each location. Excess oil migrates to fabric during sewing, causing stains that ruin projects. After oiling, manually operate the reverse lever 20-30 times to work the lubricant into all moving parts before testing.
Model-Specific Brother Reverse Fixes That Actually Work
Different Brother series require unique approaches based on their mechanical design. Applying generic advice often worsens the problem—these model-specific solutions target the exact failure points for your machine.
CS6000i and CS5055 Front Cover Access
These popular models develop reverse issues from lint buildup behind the front cover. Remove two screws beneath the accessory tray, then gently pry the cover forward from the bottom. Focus cleaning on the vertical lever pivot and horizontal connecting rod—common failure points that jam when dirty.
SE600 and SE1900 Electronic Reset
Embroidery models with touch screens need circuit board resets when reverse sticks. Hold patterns #1 and #7 while powering on to access diagnostic mode. This reveals error codes pinpointing whether the issue is mechanical or electronic. Clean button contacts with 90% isopropyl alcohol on a cotton swab for sticky membrane switches.
XR3774 and PRW Series Lever Adjustment
Traditional lever models feature a small set screw behind the reverse lever that controls engagement depth. Tighten this screw 1/8 turn clockwise using a precision screwdriver—if the lever feels loose, this often fixes sticking without disassembly. Test after each adjustment to avoid over-tightening.
Testing Your Brother Reverse Repair Success
Never assume your fix worked until completing these validation tests. Run your machine without fabric at slow speed first, verifying smooth lever movement and correct feed dog direction changes. Listen for unusual noises indicating remaining binding points.
Fabric Testing Protocol
Use medium-weight cotton for initial testing, creating a forward-reverse-forward stitch pattern. Test at multiple stitch lengths to ensure consistent operation across settings. Gradually increase speed while monitoring for recurring issues—many fixes work at slow speeds but fail under normal sewing conditions.
Pro Tip: Sew continuously for 10 minutes while frequently reversing. This extended test reveals heat-related issues where components bind as the machine warms up—a common problem in high-speed PQ series machines.
Prevent Future Reverse Problems With Smart Maintenance
Prevent recurrence with these targeted maintenance habits. Clean your bobbin area after every project—this single habit prevents 80% of reverse mechanism failures. Replace needles after 8-10 hours of sewing to reduce thread breakage that creates problematic lint.
Weekly Reverse Mechanism Check
During routine cleaning, test your reverse function before reassembling the machine. Operate the lever while watching feed dog movement to catch early binding before it becomes a full failure. Apply one drop of oil to designated points if you sew heavily, but never more—excess oil attracts lint like a magnet.
Critical Reminder: Always use the exact oil type specified in your manual. Brother machines require specialized lubricants that won’t gum up at high speeds—standard sewing machine oil works for most home models, but industrial PQ series machines need high-temperature synthetic grease.
When to Call a Brother Repair Professional
Seek professional help if you notice electrical burning smells or visible gear damage during inspection. Machines under warranty require authorized service to maintain coverage—attempting DIY repairs on electronic models can void your warranty. Persistent issues after multiple cleaning attempts indicate internal gear problems requiring specialized tools.
Cost Insight: Typical reverse mechanism repairs cost $75-150 at authorized service centers. Before paying for service, verify parts availability for your specific model—older Brother machines sometimes have discontinued components that make repairs impractical.
A stuck reverse function rarely indicates catastrophic failure. By following these targeted steps, you’ll restore normal stitching and prevent future issues through proper maintenance. Keep your Brother sewing machine running smoothly with regular cleaning and precise lubrication—your creative projects deserve reliable performance.


