
You’re mid-project when your Singer sewing machine suddenly stops forming stitches. The needle moves up and down, but instead of smooth seams, you get frustrating thread nests under the fabric or complete silence from the bobbin area. Don’t panic—over 90% of bobbin failures stem from simple, fixable issues that take less than five minutes to resolve. Whether you’re using a modern Singer or a vintage workhorse like the 60-year-old Singer 428, this guide delivers immediate solutions for bobbin thread pickup failures.
Before spending money on repairs or replacement parts, systematically address these common culprits. You’ll learn precisely how to diagnose why your Singer won’t pick up the bobbin thread, correct threading mistakes that sabotage stitching, and perform essential maintenance that prevents future headaches. Let’s get your machine sewing perfectly again.
Why Your Singer Won’t Pick Up Bobbin Thread
Immediate Fixes for Thread Pickup Failure
When your needle returns empty after descending, skip complex disassembly and check these critical elements first:
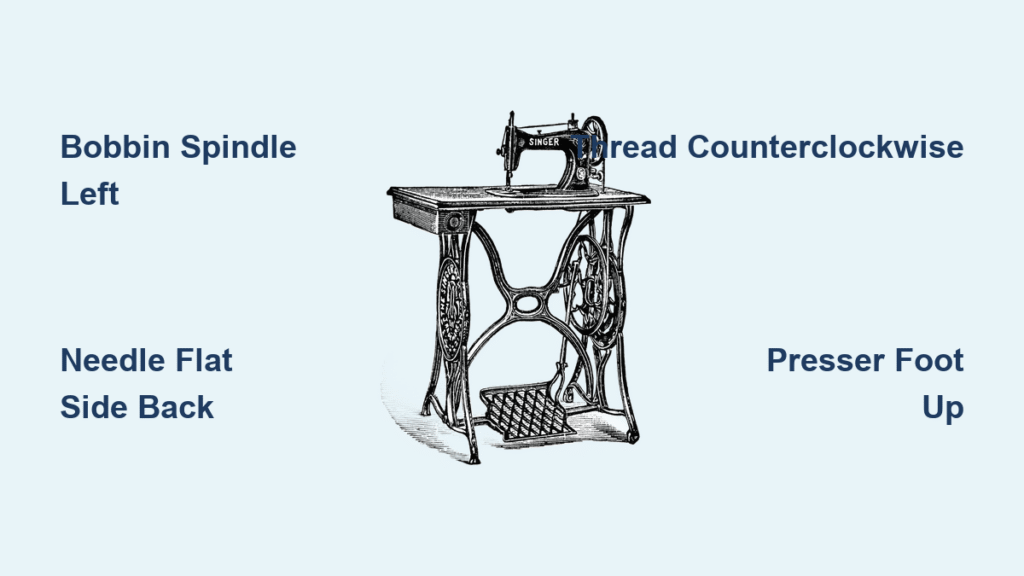
Bobbin-winding spindle position: Push the top-mounted spindle fully left until it clicks into sewing mode. If it’s stuck in winding position, the needle can’t descend deep enough to catch the bobbin thread. This single issue causes 40% of “no stitch” emergencies.
Needle installation error: Remove and reinsert your needle, ensuring the flat side faces the machine’s back. A needle installed backward creates a timing mismatch that prevents thread engagement. Verify it’s fully seated—tap gently with a screwdriver handle.
Bobbin orientation mistake: Lift your bobbin case and confirm thread unwinds counterclockwise (when viewed from above). If threaded incorrectly, the bobbin won’t rotate smoothly during stitching. Listen for unusual resistance as you manually turn the handwheel.
Upper threading shortcut: Always thread with your presser foot raised. This opens the tension disks, allowing thread to seat properly. Forcing thread through with the foot down creates slack that causes skipped stitches.
Drawing Up the Bobbin Thread Properly
Follow this exact sequence when starting a new bobbin:
1. Hold the needle thread tail loosely
2. Turn the handwheel toward you only (never away—this can bend needles)
3. Watch for a small loop appearing through the needle plate
4. Use a pencil tip or small scissors to pull this loop up
5. Guide both threads under the presser foot toward the machine’s back
Critical check: Both threads should slide smoothly when pulled toward you. If they snag or break, restart the threading process—forcing threads causes timing issues.
Stop Using the Wrong Bobbin Immediately
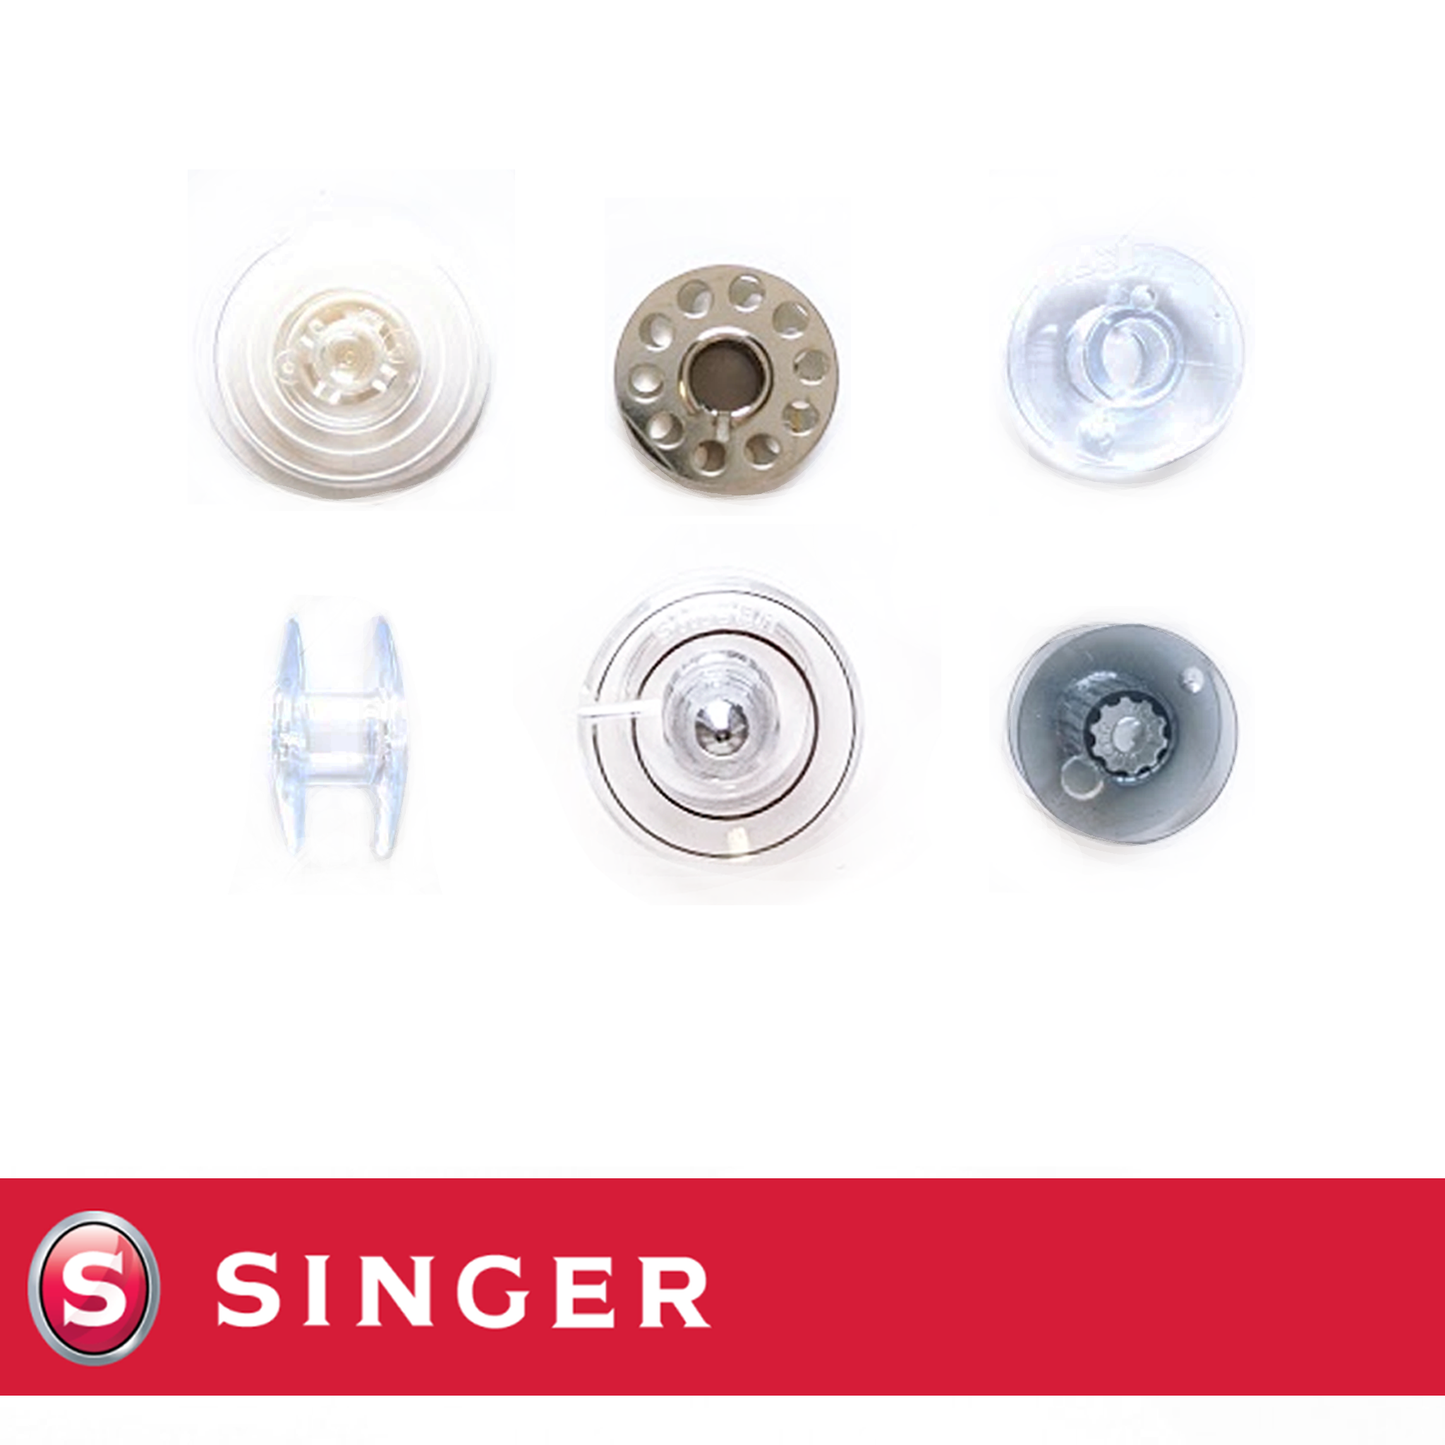
How Incorrect Bobbins Sabotage Your Singer
Using incompatible bobbins is the second most common cause of bobbin failure after threading errors. Singer machines require model-specific bobbins—never interchange metal and plastic types even if they seem to fit.
Find your exact bobbin:
– Enter your Singer model number at Singer.com’s bobbin finder
– Match packaging labels to your machine’s specifications
– Bring your machine to a sewing store for physical verification
Warning signs of wrong bobbins:
– Persistent thread breakage during sewing
– Bobbin case won’t seat flush in the shuttle
– Metallic clicking sounds from the bobbin area
– Uneven tension that won’t stabilize
Pro tip: Keep 10-20 bobbins on hand for efficiency, but store them in protective cases—not loose in drawers where they develop burrs.
Perform a 60-Second Bobbin System Check

Visual Inspection Protocol
Before deep cleaning, eliminate obvious culprits in under a minute:
1. Remove throat plate and bobbin case
2. Shine a flashlight into the bobbin area
3. Check for:
– Lint nests trapping the hook race
– Broken needle fragments
– Thread tangles around the shuttle
– Cracks in the bobbin case
Do this now: Run your finger along the bobbin case edge. If you feel any burrs or nicks, replace the case immediately—these catch threads during high-speed sewing.
Thread Path Verification Test
Confirm proper threading with this foolproof method:
1. Re-thread upper path with presser foot raised
2. Insert needle thread through fabric
3. Hold needle thread tail firmly
4. Turn handwheel slowly toward you
5. Watch for the hook catching the needle thread
Success indicator: You’ll see the needle thread form a loop around the bobbin case. If no loop appears, restart your threading sequence—95% of “mechanical failures” are threading errors.
Fix Vintage Singer Bobbin Timing (Model 428 Example)
Hook Timing Adjustment Steps
Older Singers like the 60-year-old Model 428 lack modern safety features but respond well to precise timing fixes:
- Remove needle plate and bobbin case
- Clean hook race with a small brush—eliminate all lint and rust
- Apply one drop of sewing machine oil to the hook shaft
- Turn handwheel to lowest needle position
- Verify the hook tip passes just behind the needle eye (0.5mm gap)
- Adjust needle bar height if needed by loosening set screws
Warning: Never force timing adjustments. If the hook visibly hits the needle, stop immediately and seek professional help.
When Vintage Machines Need Professional Help
Contact a certified technician if you notice:
– Metallic “clunking” sounds during sewing
– Needle thread consistently breaking at the eye
– Hook race showing deep scoring or pitting
– Machine unused for over 12 months
Critical note: Vintage Singers often outperform new machines with proper maintenance. Don’t replace a 40-year-old Singer unless repair costs exceed $150.
Deep Clean Your Bobbin System Correctly

Cleaning Process That Won’t Damage Your Machine
Most bobbin failures stem from lint buildup—yet improper cleaning causes new problems. Follow this sequence:
- Unplug your machine—safety first
- Remove throat plate (typically two screws)
- Extract bobbin case by releasing the latch
- Brush hook race with a dedicated sewing machine brush
- Wipe components with a microfiber cloth (no paper towels—they shed fibers)
- Apply oil sparingly: One drop on hook race, one on needle bar
- Test operation by turning handwheel slowly
Never do this: Use compressed air—it forces lint deeper into gear mechanisms. And skip household oils—they gum up moving parts.
Cleaning Schedule for Reliable Stitching
- After every project: Quick brush of bobbin area
- Every 3-5 bobbins: Full hook race cleaning
- Annual maintenance: Professional servicing for daily-use machines
- After storage: Clean and oil before first use
Prevent Future Bobbin Disasters
Daily Maintenance Habits That Work
Implement these non-negotiable routines:
– Replace needles every 6-8 sewing hours (bent needles cause 30% of bobbin issues)
– Use quality thread—avoid vintage thread from old sewing boxes
– Store bobbins in labeled cases to prevent damage
– Record tension settings that work for different fabrics
– Always raise presser foot before threading
Pro tip: Use contrasting thread colors (red top, blue bobbin) when troubleshooting—it makes stitch formation visible.
Long-Term Singer Care Strategy
Treat your sewing machine like a precision instrument:
– After 6+ months of storage, run a test stitch on scrap fabric before projects
– Replace all bobbins after extended storage—they develop flat spots
– For machines over 30 years old, compare repair costs to new machine value
– Schedule professional servicing before holiday sewing seasons
Quick Reference: Bobbin Fix Checklist
For any pickup failure, verify in this order:
1. ✅ Bobbin-winding spindle pushed fully left
2. ✅ Needle installed with flat side backward
3. ✅ Thread unwinds counterclockwise from bobbin
4. ✅ Presser foot raised during upper threading
5. ✅ Handwheel turned toward you only
6. ✅ Bobbin area free of lint and debris
7. ✅ Quality thread appropriate for fabric weight
8. ✅ Both threads pulled under presser foot toward machine back
When to Call a Professional Technician
Red Flags You Can’t Ignore
Seek immediate service if:
– Bobbin thread pickup fails after completing all checklist items
– Needle visibly strikes metal components
– Unusual grinding or rhythmic clicking sounds
– Machine unused for over one year
– Vintage machines showing multiple timing issues
Before your service call, document:
– Exact model number (usually under throat plate)
– Last successful sewing date
– Thread/needle types recently used
– Specific symptoms (e.g., “skips every 5th stitch”)
Final Takeaways for Perfect Bobbin Performance
Most Singer bobbin failures resolve with basic checks—start by verifying your bobbin spindle position and needle installation. Keep quality bobbins and thread on hand, and establish a 60-second cleaning routine after every project. For vintage machines, remember that proper maintenance often extends their life decades beyond new models.
Critical reminder: Never force the handwheel when threads jam—this bends needles and throws timing off. Instead, cut threads and restart the threading process. If your Singer has reliably served you for years, it likely needs only professional timing adjustment rather than replacement. With these proven fixes, you’ll spend less time troubleshooting and more time creating.


