
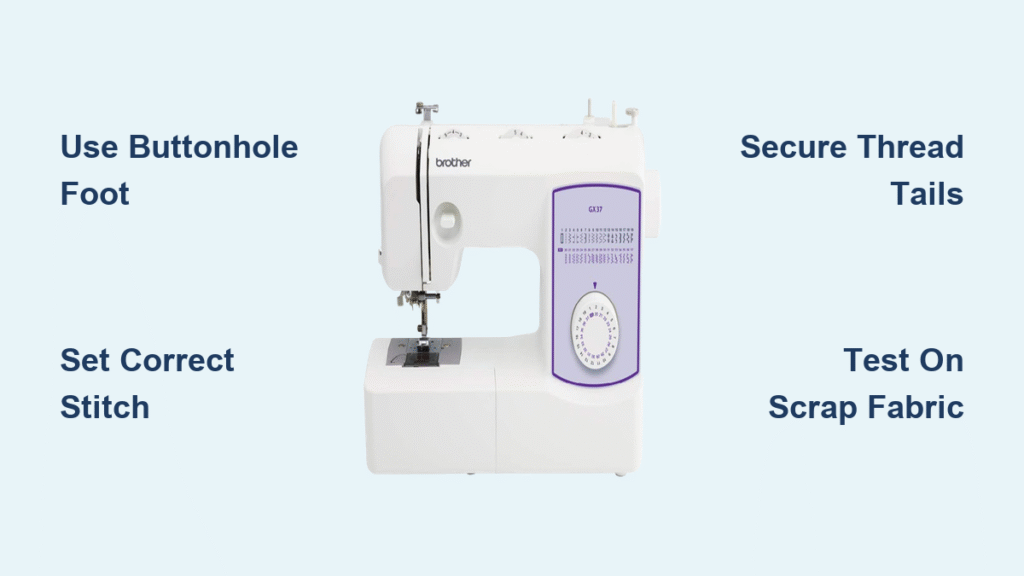
Your handmade shirt is nearly finished, but that crooked buttonhole makes it look amateurish. You’re not alone—many sewists struggle with buttonholes that won’t hold buttons or fray after one wash. Brother sewing machines solve this problem with intuitive features, but only if you use them correctly. This guide reveals exactly how to create flawless buttonholes on your Brother machine, whether you own a budget-friendly CS6000i or advanced SE1900.
Forget guessing settings or wasting fabric on failed attempts. You’ll learn the one-step automatic method that finishes perfect buttonholes in 15 seconds, plus manual techniques for older models. We’ll cover model-specific hacks, troubleshooting for thread bunching, and pro tips for denim and silk. By the end, you’ll cut open professional buttonholes confidently every time.
Brother Models with Buttonhole Features
Your machine’s capabilities determine your approach. Automatic sensor buttonholes (one-step) work on the SE600, CS6000i, SE1900, and XR9550—these sense your button size and sew flawlessly. Manual four-step buttonholes function on any Brother with zigzag capability, including older models like the LB5000.
Critical model differences:
– CS6000i: One-step max 1″ length; dial “30” for buttonhole stitch
– SE600: Touch-screen sensor sizing; 1.5″ max length; includes keyhole option
– SE1900: Saves 10 custom sizes; adjustable stitch density
– SE400/LB5000: Automatic but no sensor; requires manual sizing
Pro tip: Check your manual’s stitch chart—if it shows a rectangle symbol (□), you have automatic capability. No symbol? Stick with the four-step method.
Essential Supplies Setup
Skipping preparation causes 80% of buttonhole failures. Gather these non-negotiable items before starting:
Must-have kit:
– Brother buttonhole foot (SA125 or SA156)
– Actual button for sizing (not a guess!)
– Water-soluble stabilizer (for knits) or tear-away (for wovens)
– High-quality polyester thread (cotton breaks under stress)
– Sharp seam ripper with safety guard
Machine prep in 60 seconds:
1. Snap on buttonhole foot until it clicks into place
2. Thread top and bobbin with matching thread
3. Set tension to 3 (2 for heavy fabrics, 4 for silks)
4. Insert needle: size 90/14 for denim, 70/10 for cotton
5. Place button in foot’s back slider (automatic models only)
Warning: Never skip stabilizer—it prevents fabric distortion that causes skewed buttonholes.
One-Step Automatic Method
This method creates perfect buttonholes in one pass if set up correctly. Your Brother SE600 or CS6000i will handle the entire sequence automatically when you engage the lever.
Mark Fabric for Sensor Accuracy
Draw a horizontal line 1/4″ longer than your button’s diameter (e.g., 7/8″ line for a 3/4″ button). This extra length accommodates button thickness. Place your actual button in the foot’s back slider—the metal prongs press against it to tell the machine the exact size.
Engage Lever for Cycle Activation
Lower the buttonhole lever on the left needle bar until it clicks behind the foot bracket. If it doesn’t click, reposition the foot. Align your marked line under the foot’s center guide. Start with needle down at the bottom mark—this anchors threads.
Monitor the Automatic Sequence
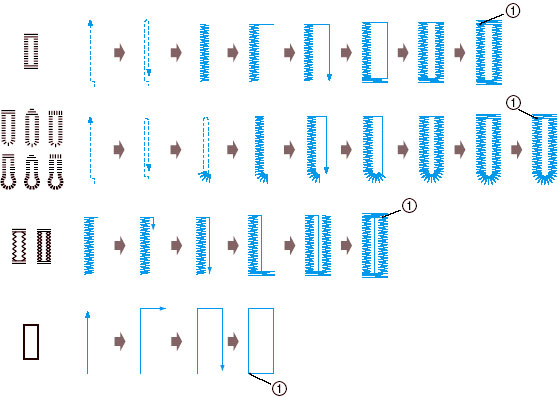
Your machine will execute this precise sequence:
1. Left side (forward at 2.5mm width)
2. Bottom bar tack (5.0mm zigzag for 8 stitches)
3. Right side (backward at 2.5mm width)
4. Top bar tack (5.0mm zigzag)
Stop immediately if threads knot—you likely forgot to lower the lever fully. Restart after clearing the jam.
Manual Four-Step Process
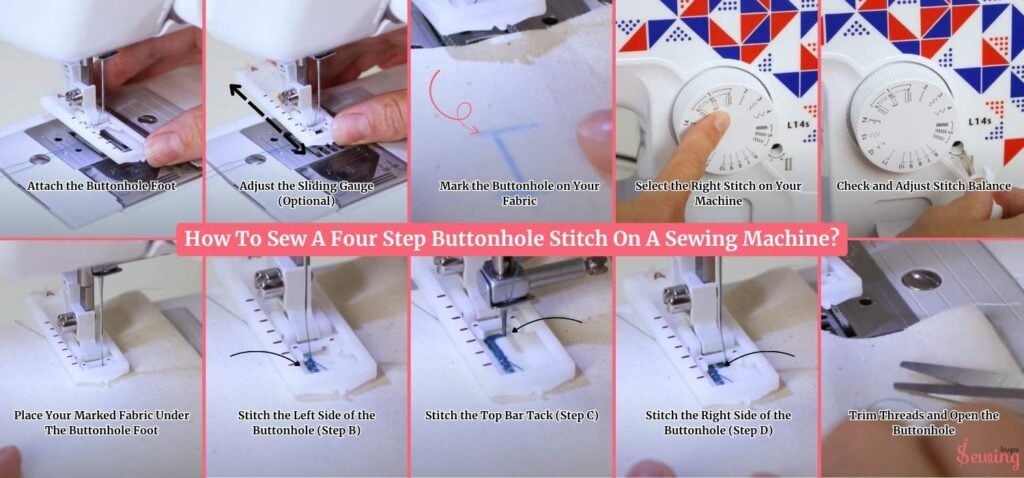
For non-sensor models like the LB5000, use this foolproof zigzag method:
Step 1: Bottom Bar Tack
Set zigzag width to 5.0mm, length to 0.5mm. Sew 8 stitches across the bottom mark. Hold thread tails to prevent tangling. Keep fabric taut but don’t pull—this bar tack bears the button’s stress.
Step 2: Left Side
Narrow zigzag to 2.5mm width. Sew slowly up the left side, aligning fabric edge with the foot’s center mark. Slow speed prevents wobble—use 30% max on thick fabrics.
Step 3: Top Bar Tack
Repeat Step 1 at the top mark. Ensure bar tack width matches the bottom exactly—uneven bars cause weak spots.
Step 4: Right Side
Sew down the right side, mirroring your left side path. Cross-stitch the corners by pivoting needle down at ends for durability.
Model-Specific Settings Guide
Brother CS6000i Precision Setup
Select stitch “30” with foot “A.” Critical adjustment: Hold thread tails for first 3 stitches to prevent bunching. Maximum length is 1″—for larger buttons, switch to manual mode. Test on scrap fabric first; reduce tension to 2.5 if threads pucker.
Brother SE600 Sensor Optimization
Navigate touch screen: “Decorative” → “Buttonhole.” For keyhole buttonholes (ideal for tailored jackets), select the oval icon. The sensor adjusts length automatically—press “Start” after placing the button in the foot. If the machine stops mid-cycle, re-engage the lever firmly.
Brother SE1900 Customization
Save custom sizes via memory function: Sew one buttonhole, then press “Memorize” before cutting. For thick buttons, increase density to 15 stitches/mm. The machine beeps when complete—never force the lever up mid-cycle.
Troubleshooting Common Problems

Skewed Buttonholes on Lightweight Fabrics
Why it happens: Fabric shifts during sewing. Fix: Use water-soluble stabilizer on top—dissolves after washing. For chiffon, sandwich fabric between tissue paper layers and tear away after sewing.
Thread Bunching Underneath
Immediate solution: Reduce top tension to 2.0 and rethread machine with high-quality thread. Prevention: Always hold thread tails for first 3 stitches on automatic models. Replace needle if burrs exist—dull needles shred threads.
Button Won’t Fit Through Hole
Measurement error: Button diameter + 1/8″ = correct length. Quick adjustment: On automatic models, move button slightly forward in foot slider to increase length by 1mm. Test on scrap first!
Professional Buttonhole Techniques
Corded Buttonholes for Suit Jackets
Insert embroidery floss through the foot’s front fork prong. The machine automatically encases cord in stitches for raised edges. Use contrasting floss on blazers for couture flair—ideal for SE1900’s memory function when sewing matching sets.
Denim Buttonhole Survival Guide
Must-do steps:
– Fuse medium-weight interfacing to fabric back
– Use 100/16 needle and reduce speed to 50%
– Place water-soluble stabilizer on top
– Sew with jeans thread (stronger than all-purpose)
Warning: Never skip interfacing—denim buttonholes tear without it.
Cutting Buttonholes Safely
Pin Barrier Method
Place pins perpendicular at both ends. Insert seam ripper at one end, cutting toward center. Stop 1/8″ from pins, then repeat from opposite end. This prevents overcutting—the #1 cause of ruined buttonholes.
Fray Prevention
Apply Fray Check to cut edges immediately. For washable items, use a buttonhole chisel on a wood block for clean, fray-resistant cuts. Always test button fit before applying Fray Check.
Expert Tips for Perfect Results
Fabric-Specific Cheat Sheet
- Silk: 60/8 needle + tissue paper overlay; tension 4
- Fleece: Ballpoint needle; stretch buttonhole stitch
- Leather: Teflon foot; 90/14 needle; hand-walk stitches
Time-Saving Batch Processing
Mark all buttonholes with a chalk wheel first. Use a cardboard template for identical spacing. Chain-sew multiple items: Start one buttonhole, stop at bar tack, move to next fabric piece. Saves 40% time on shirt batches.
Quality Control Checklist
Before cutting:
✅ Slide button through uncut hole (should fit snugly)
✅ Check for skipped stitches at bar tacks
✅ Verify top/bottom bars are identical width
✅ Confirm no thread nests underneath
Mastering buttonholes transforms your sewing from hobbyist to professional. Start every project with a scrap fabric test—adjust tension until bar tacks lie flat and sides are parallel. Remember: The buttonhole lever must click firmly into place for automatic models, and stabilizer is non-negotiable for crisp results. With these Brother-specific techniques, you’ll create buttonholes that withstand years of washing and wear. Your next handmade shirt won’t just fit—it will impress.


