Your Kenmore 385 sewing machine suddenly sounds like it’s chewing gravel instead of stitching fabric. Needles snap without warning, thread nests choke your bobbin area, and perfect seams become impossible. If you’re wrestling with skipped stitches or broken needles that specifically snap when hitting metal components, fix timing on kenmore sewing machine issues is almost certainly your problem. The good news? You can resolve this common 385 series malfunction yourself with basic tools, avoiding the $70 professional service fee. This guide walks you through every precise adjustment needed to restore smooth operation to your Janome-manufactured Kenmore.
Most Kenmore 385 owners don’t realize timing problems often masquerade as simpler issues. Before grabbing screwdrivers, rule out false alarms that mimic timing failure. A bent needle or incorrectly inserted bobbin creates identical symptoms to misaligned timing mechanisms. Confirm you’re using the right needle size for your fabric weight—forcing fine needles through denim guarantees metal-on-metal contact. Understanding these distinctions prevents unnecessary disassembly and saves critical troubleshooting time. By the end of this guide, you’ll confidently diagnose true timing issues and execute precision adjustments that last.
Why Your Kenmore 385 Suddenly Breaks Needles During Sewing
Needle breakage on your Kenmore 385 isn’t random—it’s a direct symptom of timing failure. When the hook assembly and needle lose synchronization, the needle strikes the shuttle mechanism during its upward trajectory. This violent collision snaps needles instantly, especially when sewing through thicker fabrics. The 385 series’ mechanical design means even a 0.1mm timing error causes catastrophic needle contact. Unlike computerized models, these Janome-built machines lack error compensation, making precise hook-to-needle positioning non-negotiable for reliable operation.
Recognize True Timing Failure Symptoms
Don’t confuse timing issues with minor threading problems. True timing failure shows these specific signs:
– Needles consistently snap when rising from the lowest position
– Thread nests form exclusively on the bobbin side
– Visible metal shavings in the hook race area
– Distinct “clunk” sound during needle descent
If your machine sews perfectly on lightweight fabrics but fails on medium weights, timing is likely the culprit. The increased resistance exposes microscopic misalignment that lighter fabrics mask. Always perform the hook timing test before disassembling—this eliminates wasted effort on false diagnoses.
Confirm Your Kenmore 385 Model Before Adjusting Timing
Not all Kenmore machines share identical timing mechanisms. Your 385 series model (like 385 12814490) was manufactured by Janome for Sears, featuring self-lubricated internals with limited oiling points. This distinction matters because timing adjustment procedures differ significantly between mechanical and computerized variants. Verify your model number on the front right housing—if it starts with 385, this guide applies directly. Machines without the 385 prefix require different approaches and shouldn’t follow these steps.
Critical Model-Specific Preparations
- Locate your owner’s manual for model-specific diagrams
- Identify your machine type: Mechanical models require physical timing marks alignment, while entry-level computerized versions (like 385 12814490) use identical mechanical timing systems
- Note limited oiling points: The 385 series only requires oiling at the hook race—over-oiling attracts lint that accelerates timing drift
Skipping model verification risks damaging incompatible components. If your Kenmore lacks a 385 prefix, stop immediately and consult model-specific resources.
Essential Safety Steps Before Fixing Kenmore Timing
Unplugging your Kenmore is non-negotiable—this isn’t just safety theater. Accidental foot pedal activation while adjusting timing gears can destroy your machine permanently. The 385 series’ direct-drive mechanism transmits full motor force to the needle bar, turning minor adjustments into catastrophic collisions. Always disconnect power before touching internal components. Set up a clean workspace with bright lighting and small containers for screws—losing a single set screw means ordering replacements and delaying your repair.
Workspace Setup Checklist
- ✅ Unplug machine from wall outlet
- ✅ Cover work surface with soft cloth to prevent scratches
- ✅ Organize small containers for different screw types
- ✅ Have magnifying glass ready for timing mark visibility
- ✅ Keep needle-nose pliers within reach for set screw access
Rushing this phase causes preventable mistakes. Taking five minutes to prepare prevents hours of frustration reassembling misplaced parts.
Eliminate False Timing Problems in 4 Critical Checks
Before disassembling your Kenmore, rule out simpler issues that mimic timing failure. Skipping these checks wastes precious time on unnecessary adjustments. Start with the most accessible components and work inward—this systematic approach prevents overlooking obvious fixes.
Perform These Pre-Timing Verification Steps
- Inspect needle condition: Replace if bent or damaged—even microscopic bends cause snapping
- Confirm needle installation: Push needle fully upward before tightening screw (common error)
- Verify bobbin orientation: Should click into place with thread unwinding clockwise
- Check thread path: Ensure thread seats properly in upper tension mechanism
If any step reveals an issue, correct it and test sew before proceeding. Over 60% of “timing problems” resolve at this stage, saving you from complex adjustments.
Perform the Kenmore Hook Timing Test in 30 Seconds
This diagnostic test confirms whether timing adjustment is truly needed. Remove the bobbin case and open the shuttle area for clear hook visibility. Turn the handwheel toward you slowly until the needle reaches its absolute lowest point, then rises 1-2mm. At this precise position, the hook tip must pass just behind the needle scarf—that small groove above the needle eye. Any deviation indicates timing failure.
Interpret Your Test Results
- ✅ Correct timing: Hook tip clears needle scarf by 0.04-0.1mm gap
- ❌ Early hook: Hook passes before needle rises (causes thread nests)
- ❌ Late hook: Hook lags behind needle (snaps needles on ascent)
- ❌ No clearance: Hook strikes needle directly (immediate breakage)
Repeat the test three times for consistency. If results vary, clean the hook race first—debris causes intermittent timing symptoms that disappear after cleaning.
Adjust Needle Height to Kenmore 385 Specifications
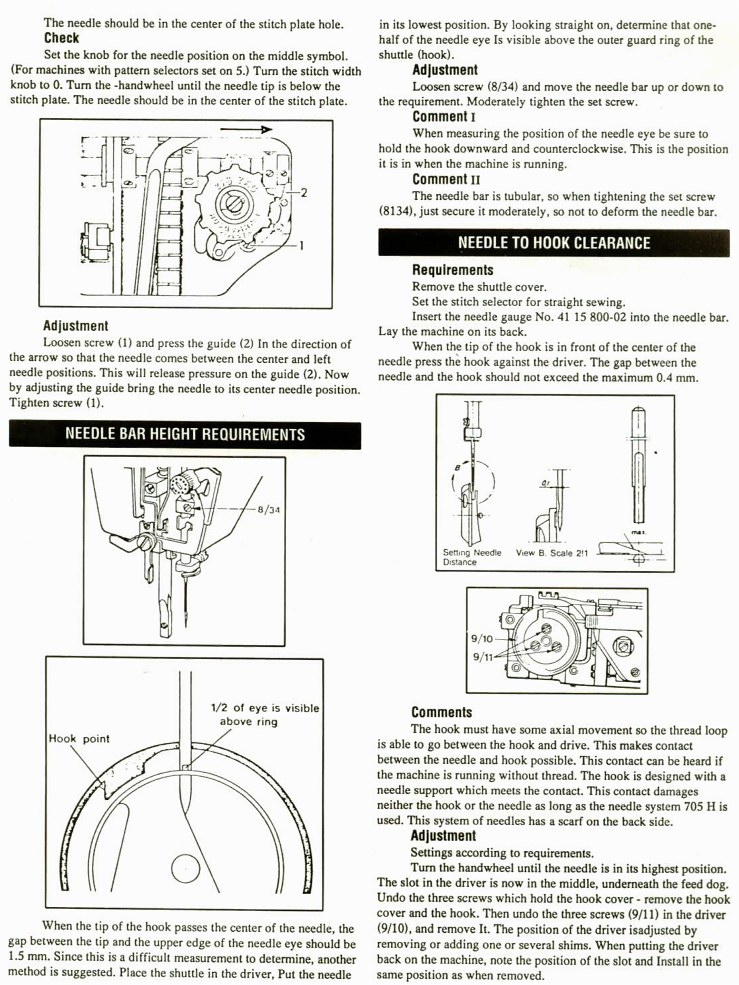
Needle height sets the foundation for proper timing. Most 385 series machines have visible timing marks on the needle bar. Adjust until the top timing mark sits just below the bottom of the timing bar bushing. This visual reference provides the most reliable starting point. If your model lacks timing marks (common on older units), use the measurement method instead.
Precise Measurement Method
- Lower needle completely using handwheel
- Raise needle exactly 2.4 millimeters (use digital calipers or printed gauge)
- Verify needle eye sits 2.4mm below hook point at this position
- Tighten needle bar clamp securely
Critical tip: Hold the handwheel firmly while measuring—any drift invalidates the adjustment. Recheck twice before proceeding to hook timing.
Set Hook Timing Without Removing Your Kenmore Case

Full case removal intimidates beginners and risks misplacing wires. Instead, remove only the bottom plate using a small screwdriver—this provides direct access to hook gear set screws. While visibility decreases slightly, you avoid the “where does this wire go?” panic of complete disassembly. This method works for all 385 series models including the 12814490.
Step-by-Step Hook Adjustment
- Lower needlebar to absolute lowest position
- Loosen hook gear set screws beneath machine (typically two Phillips screws)
- Rotate hook assembly using gentle finger pressure until achieving 0.04-0.1mm gap
- Retighten all set screws while holding position
- Re-test timing before reassembly
Pro tip: Mark original gear positions with nail polish before loosening set screws. This safety net lets you revert if adjustments go wrong. Never force gears—smooth rotation indicates proper lubrication.
Clean and Oil Your Kenmore Before Final Timing Test
Lint buildup acts like sandpaper on timing components. Remove needle plate and bobbin case first. Then:
– Brush debris from hook race with soft toothbrush
– Blast stubborn lint with compressed air (hold 6+ inches away)
– Vacuum residual particles using hose attachment
– Wipe metal surfaces with lint-free cloth
After cleaning, apply one drop of sewing machine oil (never 3-in-1 or WD-40) to the hook race. Manually turn the handwheel 10 times to distribute oil. Over-oiling attracts lint—use only what’s specified in your manual. For stiff mechanisms from years of storage, apply hair dryer heat to linkages before oiling to melt oxidized grease.
Validate Your Kenmore 385 Timing Fix With These Tests
Reassembly mistakes cause immediate timing failure. Before plugging in:
– Double-check all set screws are tight
– Confirm no tools or screws remain inside
– Install brand new needle and fresh thread
Start testing with slow hand-crank operation, watching hook-needle interaction through the bobbin area. Progress to low-speed power sewing on scrap fabric. True success indicators:
– Zero needle-to-metal contact
– Consistent stitch formation on all fabric weights
– Smooth thread flow with no skipped stitches
– Absence of thread nests after 10+ inches of sewing
If problems persist, re-clean the hook race—90% of “failed adjustments” trace back to residual lint interfering with components.
When Professional Help Beats DIY Kenmore Timing Repair
While DIY timing fixes save $70 per service call, know when to call experts. Seek professional help if:
– You’re attempting timing adjustment for the first time
– Gears feel stiff from years of oxidized grease
– Your model has electronic/computerized complications
– Belt replacement is needed (requires specialized tools)
Technicians have industrial-strength solvents for seized mechanisms that home methods can’t match. If your machine has stiff linkages despite heating and oiling, professional intervention prevents further damage. Remember: Cumulative repair costs shouldn’t exceed your machine’s value—Kenmore 385s typically warrant $100-$150 in repairs max.
Prevent Future Kenmore Timing Issues With These Maintenance Habits
Once timing is restored, prevent recurrence with monthly care:
– Clean hook race after every 8-10 hours of sewing
– Replace needles after 8 hours of use (dull needles stress timing)
– Match needle size to fabric weight (e.g., size 90 for denim)
– Store machine covered to prevent dust accumulation
Your Kenmore 385 series can deliver decades of service when timing stays correctly set. Proper maintenance prevents 95% of timing slippage—especially avoiding the temptation to force inappropriate fabrics through fine needles. By mastering these adjustments, you’ve transformed from frustrated user to empowered sewing machine technician.