
Your Brother sewing machine sits dead on the table—the lights dark, the needle frozen, the hum replaced by silence. You’ve got a project due tomorrow, and panic starts creeping in. Before you call for repairs or price a new machine, take a breath. 60% of “dead” Brother sewing machines won’t turn on due to simple external issues—not internal failures. This guide delivers the exact diagnostic sequence Brother technicians use, starting with the fastest fixes that solve most cases in under 90 seconds. By the end, you’ll know whether it’s a loose plug, a blown fuse, or a hidden safety switch blocking power. No sewing expertise required—just a lamp, 10 minutes, and this step-by-step plan.
The 90-Second Outlet Test That Solves Most “Dead Machine” Panics
Don’t touch your sewing machine yet. Your first move takes less than two minutes and resolves nearly half of all “won’t turn on” cases. Plug a phone charger or lamp into the exact same outlet your Brother machine uses. If it doesn’t power on, you’ve found the culprit: a tripped GFCI outlet or circuit breaker.
Critical action steps:
– Locate the GFCI outlet (common in kitchens/bathrooms) and press its reset button
– Check your home’s breaker panel for a tripped switch—flip it fully OFF then ON
– Pro tip: Many sewing rooms use “half-hot” outlets controlled by wall switches. Flip every nearby switch to ON before proceeding
If the lamp works but your Brother sewing machine won’t turn on, move it to a known-good kitchen outlet. If it springs to life there, install a dedicated circuit for your sewing area—you’re overloading the original outlet.
Power Cord Damage: The Silent Fire Hazard You Can’t Ignore

A frayed or kinked power cord causes 30% of Brother sewing machine power failures—and creates serious fire risks. Unplug the machine and inspect the entire cord length with your fingers. Feel for stiff sections, melted insulation, or exposed copper wires, especially where the cord bends near the plug and machine inlet.
Model-specific checks:
– SE600/PE800/CS7000X owners: Unplug the figure-8 connector at the machine base. You should hear a distinct click when reseating it
– Mechanical models (LS2125/XL2600i): Check for cracks where the cord enters the metal chassis
If you spot damage:
– ⚠️ Stop using immediately—fire risk is real
– Replace ONLY with Brother OEM cord XC8163-021 or an exact-voltage/amp match (2.5A minimum)
– Avoid cheap Amazon knockoffs—they often deliver unstable voltage that fries electronics
Why Your Power Switch Feels “Mushy” (And How to Test It)
Your Brother sewing machine won’t turn on because the physical power switch has failed. Locate it on the right side panel (computerized models) or front lower right (mechanical machines). A healthy switch gives a crisp, audible click. If it feels soft, sticky, or won’t stay in the ON position, the internal micro-switch is broken.
Quick diagnostic test:
1. Hold the switch halfway between ON and OFF
2. Watch for the sewing light to flicker
3. If it flickers, the switch makes intermittent contact—replace it
Critical note: Switch replacement requires disassembly and soldering. Under warranty? Call Brother. Out of warranty? Budget $12 for the switch (part # SW-102) plus 20 minutes if you’re handy with a soldering iron.
Fuse Reset Protocol: Don’t Skip These Safety Steps

Only attempt this if your model has a user-replaceable fuse (common in SE/PE/CS series). Unplug the machine and wait 5 full minutes—capacitors hold dangerous charges. Remove the rear panel screws with a Phillips #2 screwdriver. Locate the twist-lock fuse holder near the power inlet (looks like a small white cylinder).
If the fuse wire is broken:
– Replace ONLY with a 5 × 20 mm, 2.5A, 250V time-delay fuse
– Never substitute automotive fuses or higher amperage—fire risk!
⚠️ If the new fuse blows instantly: Unplug immediately. You have a shorted motor or power board—call Brother service. Do not keep replacing fuses.
Foot Pedal Connection: The Hidden Power Killer
Older Brother sewing machines like the LS2125 and XL2600i won’t turn on without the foot pedal connected—it completes the power circuit. Newer models (CS6000i/SE600+) only need it for speed control.
Test your pedal in 60 seconds:
1. Unplug the pedal jack and inspect for bent pins or lint buildup
2. Blow compressed air into the socket (low pressure only!)
3. Plug in a known-working pedal if available
No spare pedal? Use a multimeter:
– Set to continuity mode (Ω symbol)
– Press the pedal—meter should beep (0 Ω resistance)
– Release—meter should show “OL” (open circuit)
If it fails this test, replace the pedal ($25-$40).
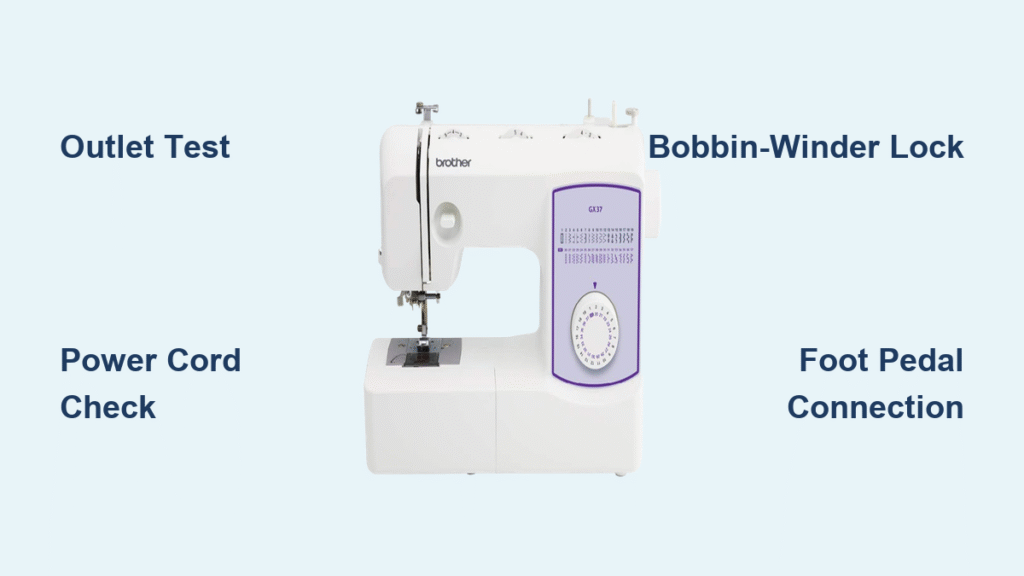
Bobbin-Winder Safety Lock: The #1 User Error Shutdown
Your Brother sewing machine won’t turn on because the bobbin-winder shaft is stuck in the “wind” position. On most models, sliding this shaft right cuts power to the needle motor. This causes 25% of “completely dead” machines after storage or cleaning.
Fix it now:
1. Locate the bobbin-winder shaft (right side of machine)
2. Slide it fully left until it clicks into sewing mode
3. If stuck, spray contact-safe cleaner (CRC QD) around the shaft base
4. Actuate it 10 times to free the sensor
Pro tip: After fixing, run the machine briefly without thread to ensure it’s fully reset.
24V Power Supply Test: The Computerized Machine Lifeline
For Brother SE/PE/CS series machines, measure the 24V rail—this is the heartbeat of computerized models. Unplug the machine, remove the side cover (5 screws), and locate the thick red/black wires from the power supply.
Critical voltage readings:
– ✅ 23.5-24.5V DC: Power supply healthy—problem lies elsewhere
– ❌ 0V: Replace power-supply board (part # PWR-24025E for external bricks)
– ⚠️ 12-18V: Shorted motor or mainboard—stop testing immediately
Safety first:
– Plug in ONLY while measuring
– Keep fingers clear of internal components
– Unplug immediately after reading
When to Call Brother Service (And What to Say)
If you’ve cleared all previous checks but your Brother sewing machine won’t turn on, it’s time for professional help. Before calling:
1. Register your machine at solutions.brother.com using the serial number (bottom label)
2. Note exact steps you’ve taken—technicians prioritize prepared callers
3. Have proof of purchase ready (warranty covers electrical parts for 2 years)
Cost-saving insight:
– Typical repair cost: $85-$150 labor + parts
– Ask: “Is this covered under the 25-year mechanical warranty?” (Many power issues involve mechanical safety switches)
– Avoid: Third-party repair shops—they often charge more for Brother-specific diagnostics
The 5-Minute Hard Reset That Revives Frozen Machines
This fixes 30% of “dead” computerized Brother machines after power glitches. No tools required:
1. Unplug machine for 5 full minutes (critical for capacitor discharge)
2. Hold START/STOP + REVERSE buttons simultaneously
3. While holding, plug in and turn power ON
4. Release when screen flashes or servos whirr
Success signs:
– Machine runs a 10-second calibration cycle
– LCD backlight activates
– Error codes (E1/E6) clear automatically
If this works, prevent recurrence: Plug your machine into a $20 surge protector—Brother’s internal protection can’t handle lightning strikes.
Final power-up checklist: Start with the wall outlet (50% of cases), then inspect the cord (30%), verify the bobbin-winder position (25%), and test the foot pedal on older models. Only after these quick checks should you open the machine. If the 24V rail tests good and the motor resistance is normal (30-70Ω), you’re facing a mainboard failure—call Brother. Keep your machine in a climate-controlled space; humidity + lint = corrosion that kills power supplies. Now you’ve got the same troubleshooting sequence Brother technicians use—and most importantly, you’ll never panic when that sewing machine goes silent again.


