
That rhythmic knocking sound coming from your Brother sewing machine isn’t just annoying—it could signal serious mechanical issues that’ll destroy your projects and cost hundreds in repairs. Whether you’re hearing a light tap-tap-tap or a heavy clunking noise, this guide walks you through exactly what’s happening and how to fix it before permanent damage occurs.
Most knocking noises in Brother machines stem from just five core issues, and 80% are DIY-fixable with basic tools. Let’s diagnose your specific problem and get you back to smooth, quiet stitching today.
Immediate Bobbin Area Troubleshooting
Clear Hidden Thread Tangles in 5 Minutes
Thread buildup inside your bobbin case creates the most frequent knocking noise in Brother machines. This tangled mess forces the bobbin to jump unevenly with each rotation, producing that distinctive rhythmic knocking that worsens when sewing thicker materials.
Start by completely removing your bobbin case according to your specific Brother model’s instructions. Use magnifying glasses if needed to spot tiny thread fragments wedged in the raceway. Gently extract all visible threads with precision tweezers—never use sharp tools that could scratch the plastic. For stubborn debris, apply short bursts of compressed air at a 45-degree angle to dislodge particles without forcing them deeper.
After cleaning, test your bobbin tension by pulling the thread through the case. You should feel consistent, slight resistance—not too loose where thread unwinds freely, nor too tight where it barely moves. Proper tension creates smooth rotation without that telltale knocking sound during operation.
Perfect Bobbin Case Alignment Technique

Your Brother sewing machine’s bobbin case must sit in precise alignment to prevent knocking against the hook assembly. Each Brother model has specific positioning requirements that many users overlook when reinserting the case.
Hold your bobbin case with the thread guide facing upward, then locate the metal guide finger inside the machine. Insert the case by aligning its groove with this finger, applying gentle pressure until you hear a soft click indicating proper seating. If your machine lacks this audible confirmation, rotate the handwheel manually to check for smooth movement—any catching or resistance means the case isn’t positioned correctly.
Test your alignment by sewing on scrap fabric at medium speed. If knocking persists, remove the case and inspect for microscopic plastic burrs along the alignment groove that might prevent perfect seating. A light pass with ultra-fine sandpaper (600+ grit) can smooth these imperfections without compromising structural integrity.
Needle System Knocking Diagnosis
Bent Needle Detection Protocol
Even a barely perceptible bend in your sewing machine needle creates knocking sounds as it deflects during fabric penetration. This problem intensifies dramatically when working with denim, canvas, or multiple fabric layers.
To check for needle bends, remove your current needle and place it on a perfectly flat glass surface. Roll it gently with your finger—if it wobbles or doesn’t roll smoothly, it’s bent and must be replaced immediately. For microscopic inspection, examine the needle tip under magnification for burrs or deformities that create uneven resistance during stitching.
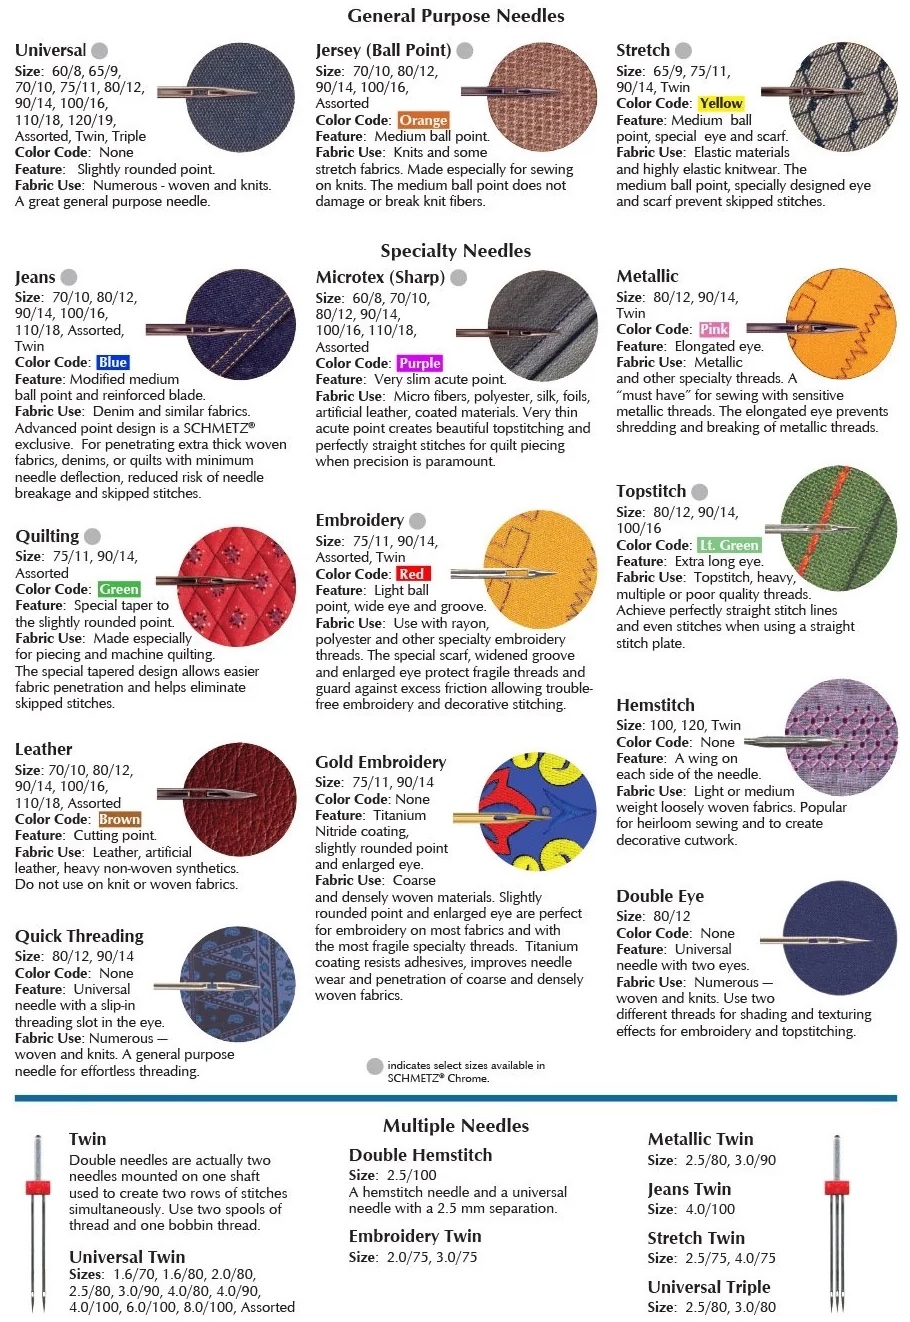
When installing a new needle, always select the appropriate size for your project—use 90/14 for medium-weight fabrics and 80/12 for finer materials. Insert the needle with the flat side facing backward (away from you) and tighten the screw firmly but don’t overtighten, which can warp the needle clamp.
Needle Bar Straightness Verification
A bent needle bar produces consistent knocking that many mistakenly diagnose as timing issues. Unlike needle problems, this knocking occurs even without fabric and persists across all stitch types.
With your machine unplugged, remove both the needle and presser foot. Lower the needle bar to its lowest position using the handwheel, then visually inspect its alignment from multiple angles. Any visible wobble indicates a bent bar. For precise measurement, use digital calipers to check the distance between the needle bar and hook assembly at four points around the rotation cycle.
Professional repair becomes necessary if measurements vary more than 0.5mm. Attempting to straighten a bent needle bar yourself often causes additional damage to surrounding components. Document the exact knocking pattern and consult a Brother-certified technician before proceeding.
Motor and Drive System Knocking Fixes
Belt Tension Calibration Process
Loose drive belts in Brother machines create slapping sounds that closely mimic knocking noises, especially during speed transitions. Proper tension varies by model but follows universal principles.
After removing your machine’s rear cover with the appropriate Phillips screwdriver, locate the drive belt connecting motor to handwheel. Press the belt midway between pulleys—it should deflect approximately 1/4 inch (6mm) under light pressure. Less deflection indicates excessive tension that strains bearings; more suggests dangerous looseness.
Adjust tension by locating the motor mount adjustment screw, usually positioned near the motor base. Turn clockwise in 15-degree increments to increase tension, testing after each adjustment. Never force the screw—if resistance increases suddenly, you’ve reached maximum safe tension. Recheck tension after 30 minutes of operation as belts naturally stretch during initial use.
Motor Mount Failure Identification

Worn motor mounts cause irregular knocking that intensifies with higher sewing speeds. Brother machines use rubber isolators that degrade after 3-5 years of regular use, allowing motor movement that creates distinctive rhythmic knocking.
Inspect mounts by gently shifting the motor with your hand—if visible movement occurs, mounts have failed. Look for telltale signs like cracked rubber, oil seepage, or visible separation between rubber and metal components. Failed mounts often produce knocking that changes pitch with speed variations, unlike consistent mechanical knocking.
Replacement requires matching the exact mount specifications for your Brother model. Generic replacements may fit physically but lack the precise vibration dampening properties. When installing new mounts, tighten bolts to manufacturer specifications—Brother typically recommends 8-10 inch-pounds torque to prevent premature failure.
When to Seek Professional Brother Service
Critical Knocking Warning Signs
Stop sewing immediately and unplug your machine if you notice metal shavings in the bobbin area—this indicates catastrophic internal wear that requires professional intervention. Similarly, if your rotating hook visibly strikes the needle during operation, continuing to sew will destroy both components within minutes.
Other emergency indicators include knocking accompanied by burning smells, sudden loud clunks that stop machine operation, or grinding noises suggesting gear damage. These symptoms point to internal timing failures or broken components that DIY repairs cannot safely address.
Attempting to operate your Brother machine with these conditions risks transforming a $75 repair into a $300+ replacement scenario. Document the exact symptoms with video before visiting a service center to help technicians diagnose the issue more efficiently.
Cost-Effective Repair Decision Guide
For knocking noises under $30, consider these DIY solutions: replace the bobbin case (typically $15-25), change needles regularly, perform basic cleaning, or replace drive belts. These fixes resolve most common knocking issues when performed correctly.
Professional service becomes necessary ($75-200) for timing adjustments, gear replacements, motor coupling repairs, or hook assembly rebuilds. Before committing, request a detailed diagnostic report from the technician outlining exactly which components need attention and their expected lifespan after repair.
When selecting a service provider, verify they regularly work on your specific Brother model. Ask about warranty coverage on repairs—reputable centers offer at least 90 days on labor and parts. For older machines, weigh repair costs against replacement value; if repairs exceed 50% of a new equivalent model’s price, replacement may be more economical.
Preventative Maintenance to Avoid Future Knocking
Weekly Knocking Noise Prevention Routine
Prevent 90% of knocking issues with this 10-minute weekly routine: clean the bobbin area with a soft, dry brush (never canned air that forces lint deeper), replace your needle after every 8-10 hours of sewing, visually check belt tension, and remove visible lint from feed dogs using a small vacuum attachment.
During cleaning, inspect the needle plate for burrs or damage that could cause thread snags. Run your fingernail along the edges—if you feel any roughness, smooth with fine emery cloth. Also check all visible screws for tightness, focusing on those securing the needle bar assembly and presser foot mechanism.
This simple routine catches developing problems before they manifest as knocking noises. Keep a maintenance log noting when you perform each task—this helps identify patterns if knocking does occur, making future diagnosis faster.
Emergency Knocking Noise Mitigation
When you must complete a project despite knocking noises, implement these temporary measures: for bobbin-related issues, switch to factory-wound bobbins which maintain consistent tension, reduce sewing speed to 50% of normal, and use tear-away stabilizer beneath fabric to reduce thread stress.
For needle-related knocking, increase needle size by one increment (e.g., from 80/12 to 90/14) to reduce deflection, use ballpoint needles for knit fabrics to minimize penetration resistance, and decrease upper thread tension slightly. Never continue sewing if knocking intensifies suddenly, needles break repeatedly, or you detect smoke or burning smells.
These stopgap solutions buy limited time—complete your immediate project then address the root cause. Continuing to sew with knocking noises accelerates internal wear, potentially transforming a simple fix into major repair needs.
Regular maintenance prevents most knocking noise issues in Brother sewing machines. Start with the simplest solutions—cleaning, needle replacement, and proper threading—before moving to complex diagnostics. Address small problems immediately to avoid expensive failures, and your machine will reward you with years of quiet, reliable stitching performance.


