
Nothing ruins creative momentum like a sewing machine that skips stitches or jams unexpectedly. Your Kenmore sewing machine works tirelessly to transform fabric into beautiful creations, but hidden lint, dust, and thread fragments accumulate in critical areas you can’t see. This buildup affects stitch quality, causes frustrating thread breaks, and can even damage internal mechanisms over time. Regular cleaning transforms a sluggish machine into one that glides through fabric with precision.
Most sewing problems stem from poor maintenance rather than actual machine defects. This guide delivers professional cleaning techniques specifically designed for Kenmore models. You’ll discover exactly where lint hides, which tools work best, and how often each component needs attention. By implementing these practices, you’ll extend your machine’s life for decades of creative projects while ensuring flawless stitch quality on every project.
Essential Cleaning Tools for Kenmore Machines

Before touching your Kenmore, gather these specific supplies that make all the difference. A small lint brush with natural bristles reaches deep into bobbin cases without scratching metal surfaces. Pipe cleaners bend perfectly around feed dogs and tension discs to remove stubborn debris. Always use high-quality sewing machine oil—never household oil—which properly lubricates moving parts after cleaning without attracting lint.
Your cleaning kit should also include microfiber cloths that remove surface dust without leaving fibers behind. A soft-bristled toothbrush dislodges stubborn lint from hard-to-reach areas without damaging components. Compressed air in short bursts clears debris from the motor compartment without forcing lint deeper. Keep tweezers with fine tips handy to grab thread pieces wrapped around the take-up lever. Finally, maintain a small container specifically for removed screws and parts to prevent loss during disassembly.
Pro tip: Create a dedicated cleaning kit that stays with your machine. Store tools in a labeled container so you’re always ready for maintenance between projects—this eliminates excuses for skipping crucial cleaning sessions.
Daily Maintenance Routine That Prevents 90% of Problems
Start every sewing session with this five-minute routine that prevents most common issues. Wipe the machine’s exterior with a microfiber cloth, paying special attention to the needle plate area where fabric fibers accumulate rapidly. Remove the needle and presser foot to access hidden spaces underneath, then use your lint brush in short, gentle strokes along the feed dogs, moving from front to back.
Check the bobbin area by removing the bobbin case and inspecting for tangled thread or lint buildup on the case’s edges. A quick swipe with your brush prevents problems before they start. Replace the needle with a fresh one appropriate for your project fabric—dull needles create tension issues and poor stitch formation. This simple daily ritual maintains optimal performance and catches potential problems early.
Warning: Never use canned air on the bobbin area while the machine is threaded. This forces lint deeper into mechanisms where it causes more damage.
Deep Cleaning Bobbin Case: The Critical Maintenance Step
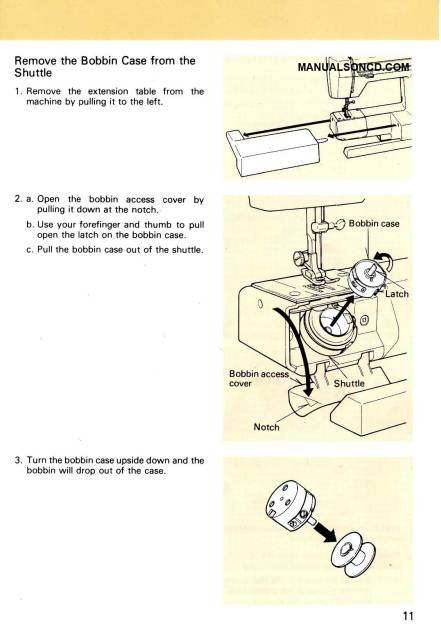
The bobbin case collects the most lint and requires thorough cleaning every 8-10 hours of sewing time. Remove the needle plate by loosening the screws (keep them in your container) and lift out the bobbin case carefully, noting its exact orientation for reassembly. You’ll immediately see a ring of lint around the case’s outer edge and possibly tangled thread beneath.
Use tweezers to remove visible thread pieces first, then clean the bobbin case with your lint brush, focusing specifically on the tension spring and small holes that control thread flow. Hold the case up to light—any remaining debris blocking these holes directly affects stitch quality. Clean the hook race (the metal ring where the bobbin sits) with a cotton swab slightly dampened with sewing machine oil to remove stubborn buildup without damaging surfaces.
Important: Never soak the bobbin case in water or cleaning solution. This removes factory lubrication and can cause rust in metal components.
Feed Dog Cleaning Technique for Smooth Fabric Feeding
Feed dogs grip fabric but also trap lint between their teeth, causing fabric to slip or feed unevenly. Lower them using your machine’s drop-feed mechanism if available. Work a pipe cleaner between each metal tooth, twisting gently to lift embedded fibers without damaging components. For stubborn buildup, use a toothpick or dull needle to carefully scrape away debris.
Clean the surrounding area where feed dogs retract—this space often holds surprising amounts of lint that interfere with smooth fabric feeding. Raise the feed dogs and run your machine slowly without thread for 30 seconds to dislodge remaining particles. Finish by brushing the entire needle plate area from multiple angles to ensure no debris remains.
Quick fix: If fabric isn’t feeding smoothly after cleaning, check that feed dogs are fully raised. Partial engagement causes slipping and uneven stitching.
Tension Disc Maintenance for Perfect Stitches
Thread tension issues often stem from lint between tension discs—a common but easily fixed problem. Unthread your machine completely, raising the presser foot to release tension completely. Wrap a narrow strip of fabric around a pipe cleaner and work it gently between the discs to remove lint without scratching metal surfaces.
Test tension by threading your machine and checking the stitch on scrap fabric. Adjust as needed after cleaning. If problems persist after proper cleaning, the discs may need professional adjustment. Never attempt to disassemble tension mechanisms yourself—this voids warranties and requires specialized calibration tools.
Remember: Always clean tension discs with presser foot up. Closed discs prevent proper cleaning and can bend delicate springs.
Motor Compartment Care for Long-Term Reliability
Unplug your machine before accessing the motor area to prevent electrical hazards. Remove the side panel (usually two screws) on mechanical models. Computerized Kenmore machines may require professional service for internal cleaning—check your manual first. Use compressed air in short bursts, holding the can upright to prevent liquid propellant from spraying onto components.
Focus specifically on the motor’s cooling vents where dust accumulates. Blocked vents cause overheating and premature motor failure. Check the drive belt for wear while the panel is off—cracked or stretched belts need replacement by a technician. Replace the panel securely; loose panels create vibrations that affect stitch quality and can damage internal components.
Caution: Never use liquid cleaners on electronic components. Moisture damages circuits permanently and creates safety hazards.
Oiling After Cleaning: When and Where to Apply
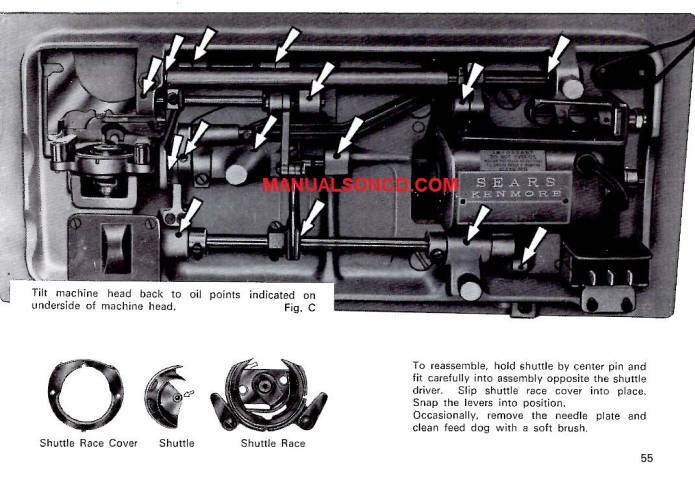
Only specific Kenmore models require oiling—check your manual first before applying any lubricant. Apply one drop of sewing machine oil to each designated point, typically near moving joints and pivot points. The handwheel mechanism often needs attention on older mechanical models. Work the oil in by turning the handwheel slowly toward you to distribute lubrication evenly.
Wipe away excess oil immediately—too much attracts more lint and creates messy stitching problems. Run scrap fabric through the machine to absorb any residual oil that could stain your projects. Modern Kenmore machines often use sealed bearings requiring no lubrication. Over-oiling sealed systems creates messy problems requiring professional cleaning.
Expert note: If your manual is missing, Kenmore’s website offers free PDF downloads for most models using the serial number—this ensures you follow model-specific maintenance procedures.
Storage and Prevention Strategies for Machine Longevity
Store your Kenmore with the presser foot down and needle in the highest position. This protects the needle bar and reduces dust entry into critical mechanisms. Use the original cover or a breathable fabric case—plastic traps moisture causing rust and internal damage. Keep machines away from direct sunlight and heating vents which dry out lubricants and damage components.
Place a small packet of silica gel in the storage area to absorb humidity and prevent rust. Change packets every few months for maximum effectiveness. Clean and oil your machine before long-term storage—this prevents rust and keeps mechanisms smooth. Run the machine briefly every month even when not sewing to maintain lubrication and prevent seized components.
Storage hack: Insert a scrap of fabric under the presser foot when storing. This absorbs excess oil and marks your last thread color for quick reference.
Troubleshooting Post-Cleaning Issues Like a Professional
Machine runs sluggishly after cleaning? Recheck all areas for missed lint, especially the bobbin case and hook race. Verify correct reassembly—misaligned parts create friction and unusual noises. Remove any oil you may have accidentally applied to non-oiling points. A thorough re-cleaning often resolves these issues without professional help.
Strange noises indicate leftover debris or incorrect part placement. Remove the needle plate again and check for trapped thread ends. Ensure the bobbin case sits flush without gaps—this is a common cause of tension problems after cleaning. If problems persist, photograph the issue areas and consult a repair technician. Many problems have simple solutions when caught early.
Quick test: Sew on paper after cleaning. Any skipped stitches or unusual sounds become immediately obvious without fabric variables complicating diagnosis.
Professional Service Schedule for Maximum Machine Life
Schedule professional cleaning annually for machines used heavily (more than 2 hours weekly). Professional technicians access areas impossible to reach at home, including deep internal mechanisms. They also adjust timing, replace worn parts, and recalibrate tension systems. This investment prevents costly repairs later and maintains your machine’s value.
Light users can extend professional service to every 18-24 months. However, seek immediate service if you notice timing issues (thread bunching under fabric), burning smells, or unusual vibrations. These signs indicate internal problems beyond home maintenance capabilities. Keep records of professional service dates for warranty compliance and future reference.
Money-saving tip: Many sewing shops offer discounted “clean and tune” services during slow seasons—usually January and July—when technicians have more availability.
Regular cleaning transforms your Kenmore from a frustrating liability into a reliable creative partner. These techniques prevent 95% of common sewing problems while extending your machine’s life significantly. Make cleaning part of your sewing routine rather than a dreaded chore—your future projects will thank you with perfect stitches every time. Start with the daily maintenance routine this week, then schedule a deep clean for next weekend. Your newly cleaned machine will surprise you with smoother operation, better stitch quality, and renewed enthusiasm for every project you create.


