
That telltale squeak or grinding noise from your Juki sewing machine mid-project can bring your creative flow to an abrupt halt. When your machine starts sounding like a rusty hinge instead of a precision instrument, it’s usually screaming for oil. Proper lubrication isn’t just about silencing annoying sounds—it’s the difference between a sewing session that flows smoothly and one that ends with a costly repair bill.
Whether you’re working on a delicate embroidery piece or stitching heavy denim, knowing exactly where and how to oil your Juki prevents premature wear and maintains stitch quality. This guide delivers the precise oiling process for any Juki model, from home machines to industrial workhorses, ensuring your machine runs like new for years to come.
Choosing the Right Oil for Your Juki Machine
Selecting Juki-Specific Lubrication
Your Juki demands specialized oil—not just any lubricant will do. Juki New Defrix Oil No. 1 remains the gold standard engineered specifically for Juki’s precision components. This clear, light amber oil flows through tiny channels without gumming up over time, maintaining optimal performance even during extended sewing sessions.
When authentic Juki oil isn’t available, look for clear sewing machine oil with ISO VG 22 viscosity rating. The key characteristics to verify: crystal clear appearance, low viscosity, and packaging in small bottles designed for precise application. Always check the label—generic “sewing machine oil” might not meet Juki’s exacting specifications.
Never substitute automotive oils, WD-40, 3-in-1 oil, or cooking oils. These contain detergents and additives that will destroy your machine’s delicate mechanisms, creating a sticky residue that attracts lint and accelerates wear.
Quick Oil Identification Guide
Genuine Juki oil arrives in 60ml bottles with clear Juki branding and specific part numbers. The oil itself appears almost water-clear with a slight amber tint. If your oil looks cloudy, thick, or dark, it’s time for replacement—even if the bottle isn’t empty.
Storage matters too. Keep your oil container tightly sealed in a cool, dark place away from temperature extremes. Replace oil annually regardless of usage—old oil loses its lubricating properties and can actually harm your machine.
Preparing Your Juki for Proper Oiling
Essential Safety Measures Before Starting
Unplug your machine completely from the electrical outlet—this step is non-negotiable. Oil and electricity create dangerous conditions, and accidental activation during oiling can cause serious injury or damage.
Turn the handwheel toward you until the needle reaches its highest position. This opens internal mechanisms for proper oil access. Lift the presser foot to release tension on the feed dogs—this prevents oil from pooling in unwanted areas.
Remove both the needle and presser foot to eliminate obstructions and prevent accidental injury. Place your Juki on a stable, covered surface—an old towel or sewing mat protects your workspace from inevitable oil drips.
Critical Cleaning Before Oil Application
Before adding fresh oil, remove the enemy: lint and debris. Use a dedicated lint brush (never compressed air) to clean:
- Bobbin case and surrounding area—lint buildup prevents oil from reaching moving parts
- Face plate area—behind where the needle bar operates
- Feed dog surface—remove all thread fragments
- Exterior surfaces—wipe with clean, dry cloth
Pro tip: Clean now or pay later. Fresh oil mixing with old lint creates abrasive paste that wears down precision components three times faster than proper maintenance.
Precise Oil Application Points for Maximum Performance
Head Assembly Lubrication Points
Face Plate Access
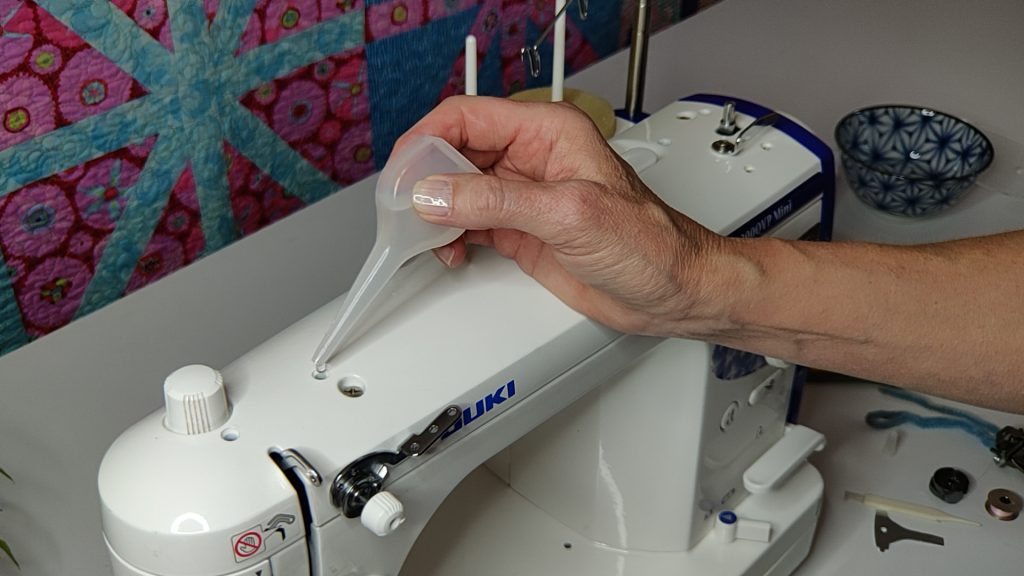
Open the face plate on the left side of your machine. Apply 1-2 drops where the needle bar connects to the linkage mechanism—this reduces the characteristic clicking sound during operation. Oil the presser bar where it disappears into the machine head with a single drop to prevent seizing during fabric feeding.
Locate the take-up lever mechanism—apply a single drop to its pivot point. This simple step prevents thread fraying and ensures consistent stitch formation.
Top Cover Removal
Remove the top cover by unscrewing the thumb screws (usually two). Apply 1 drop at each bearing point where the upper shaft passes through metal supports. Find the thread take-up lever joint—a single drop here prevents thread fraying during high-speed sewing.
Bobbin Area Precision Oiling Techniques
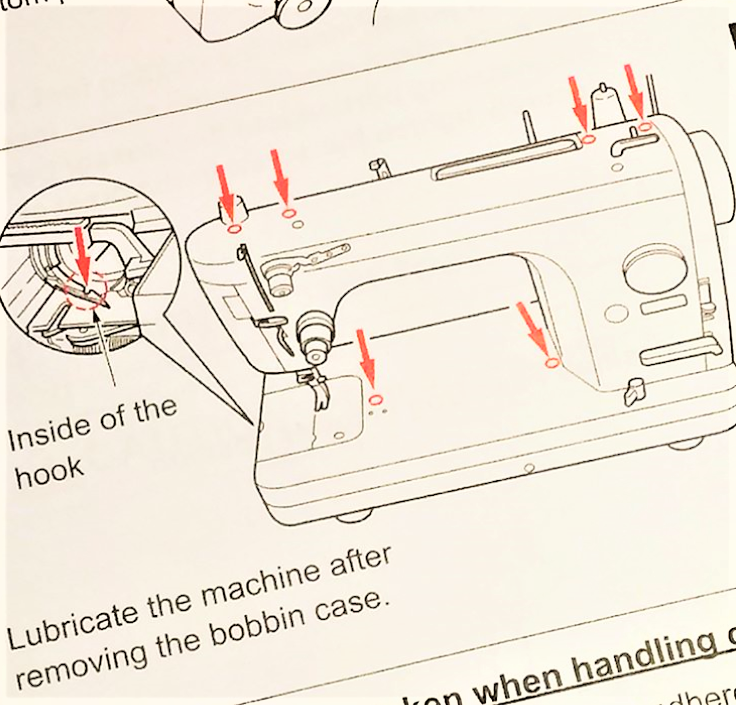
Hook Assembly Focus
Remove the bobbin case and bobbin completely. Apply 2-3 drops directly into the hook race—the circular metal track where the bobbin case sits. Manually rotate the handwheel 5-6 times to distribute oil evenly through the mechanism.
Critical: Wipe away excess oil immediately with a lint-free cloth. Over-oiling here transfers directly to your thread and fabric, causing stains and tension issues.
Shuttle Mechanism
Drop 1-2 drops into the shuttle hook mechanism, ensuring oil reaches the center shaft. This prevents the hook from seizing during high-speed operation. Avoid over-oiling—excess oil will spray onto your fabric during the first few stitches.
Model-Specific Lubrication Requirements
Juki DDL Series: If equipped with knee lifter mechanism, apply 1 drop to its pivot points.
Juki TL Series: Lubricate the thread tension release mechanism—usually found near the tension assembly.
Juki HZL Series: Apply 1 drop to automatic needle threader pivot points if your model has this feature.
Industrial Models: Oil the thread stand base attachment point—often overlooked but critical for smooth operation during extended use.
Step-by-Step Oil Distribution Process
Initial Distribution Method
After applying all required oil drops, turn the handwheel slowly for 10 complete rotations. This manually distributes oil throughout internal channels. Listen for smooth operation—any grinding indicates missed oil points.
Stitch Testing Without Thread
Run your machine without thread for 30-60 seconds at medium speed. This works oil through all moving parts while preventing thread contamination. Watch for oil seepage around needle plate and face plate areas.
Excess Oil Removal Protocol
Use a clean cloth to wipe away any oil that has seeped out. Pay special attention to the needle plate area and bobbin case region. Run scrap fabric through the machine for 2-3 minutes to absorb residual oil that might otherwise stain your first project.
Oil Frequency Guidelines Based on Your Sewing Habits
Light Use Machines (1-3 hours/week)
Oil every 8-10 hours of actual sewing time. Mark your calendar or set phone reminders—consistency prevents premature wear that leads to costly repairs.
Regular Use Machines (3-8 hours/week)
Oil every 4-6 hours of sewing. This frequency maintains optimal performance for most home sewists who work on multiple projects weekly.
Heavy Use Machines (8+ hours/week)
Oil every 2-3 hours of operation. Commercial or prolific sewists should establish daily oiling routines to prevent downtime during critical projects.
Professional/Tailoring Work
Oil daily before starting work. Professional use demands professional maintenance schedules to ensure uninterrupted production.
Troubleshooting Common Oiling Mistakes
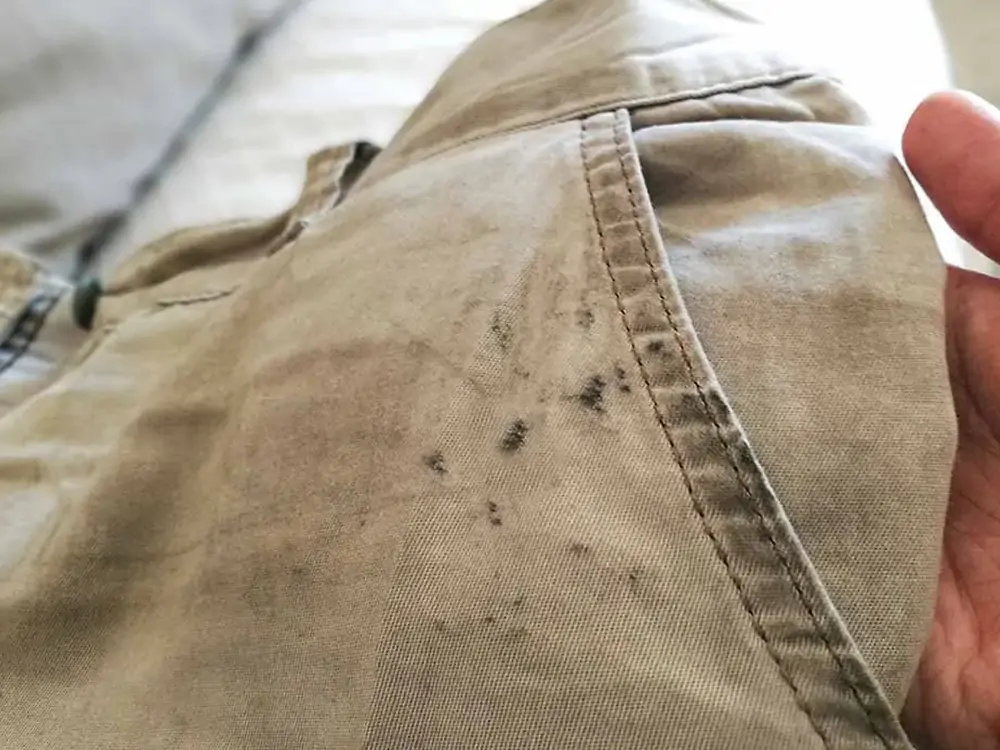
Excessive Oil Transfer to Fabric
Symptoms: Oil stains on fabric, thread discoloration
Solution: Run scrap fabric for 5+ minutes to absorb excess. Reduce oil quantity by 25% next time—less is often more with modern Juki machines.
Machine Runs Rough After Oiling
Symptoms: Unusual noises, thread breakage, skipped stitches
Causes: Insufficient oil distribution, wrong oil type, debris in oil passages
Solutions: Run machine longer on scrap fabric, verify you’re using proper oil, consider professional cleaning if problems persist beyond two oiling cycles.
Oil Not Reaching Critical Areas
Symptoms: Dry spots visible, uneven movement, squeaking in specific areas
Causes: Clogged oil passages, insufficient application
Solutions: Apply oil more liberally to problem areas with a fine-tipped applicator, consider professional service for deep cleaning if the issue continues.
Post-Oiling Care and Final Checks
Immediate Aftercare Protocol
Run your machine on scrap fabric for 2-3 minutes at medium speed. This final distribution step prevents oil transfer to good fabric. Check your sewing surface for oil drips during the first hour of use—wipe immediately if found to prevent staining.
Thread Tension Verification
Re-thread your machine and test tension settings. Fresh oil can temporarily affect thread flow, so adjust tension slightly if needed. Pro tip: Test on similar fabric to your intended project before starting your actual work.
First Project Expectations
Expect slight oil residue on initial projects. This is normal and diminishes quickly. If excessive oil transfer continues beyond 3-4 projects, you likely over-oiled—reduce your application amount next time.
When to Seek Professional Juki Service
Critical Red Flags Requiring Expert Help
- Machine seized even with fresh oil
- Visible rust or corrosion on metal parts
- Oil passages appear completely blocked
- Strange noises persist after two proper oiling sessions
- Machine unused for 2+ years before oiling
Important: Attempting to force a seized machine can cause expensive damage. Professional service costs far less than replacement and ensures your warranty remains valid.
A properly oiled Juki operates with the quiet precision of a Swiss watch. Follow this routine regularly, and your machine will reward you with years of trouble-free sewing. Remember: consistent oiling prevents 80% of common mechanical failures, maintains perfect stitch quality, and keeps your creative momentum flowing without frustrating interruptions. Your next sewing session should be about creating—not repairing.


