
That sinking feeling when your Juki sewing machine suddenly spits out tangled thread or refuses to form stitches? Over 70% of these frustrations trace back to one culprit: incorrectly installed bobbins. Whether you’re hemming curtains or crafting delicate embroidery, a misaligned bobbin derails your project faster than any other issue. Juki’s precision engineering demands exact bobbin placement—deviate by a millimeter, and you’ll battle skipped stitches, thread nests, or complete machine lockups.
This guide cuts through the confusion with step-by-step instructions specifically for Juki domestic and industrial models. You’ll master the critical counterclockwise thread path, identify the non-negotiable click confirming proper installation, and avoid the top three mistakes that sabotage even experienced sewers. No more second-guessing—just flawless stitches from your first bobbin change onward.
Essential Bobbin Requirements
Verify your bobbin type before threading—using incompatible bobbins causes thread jams and damages Juki’s timing mechanism. Most domestic Juki models (like the TL-2000Qi or HZL-F600) require Class 15 bobbins, while industrial machines (such as the DDL-8700) need larger L-style bobbins. Consult your manual’s specifications page; mismatched bobbins won’t seat correctly in the case.
Thread quality directly impacts bobbin performance. Cheap threads shed excessive lint inside the bobbin case, creating tension imbalances that mimic installation errors. Always use high-quality polyester or cotton-wrapped polyester thread matching your project’s weight. For example, 50-weight thread for quilting, 40-weight for embroidery—never mix weights between spool and bobbin.
Wind Bobbin Correctly
Thread the Tension Path Properly
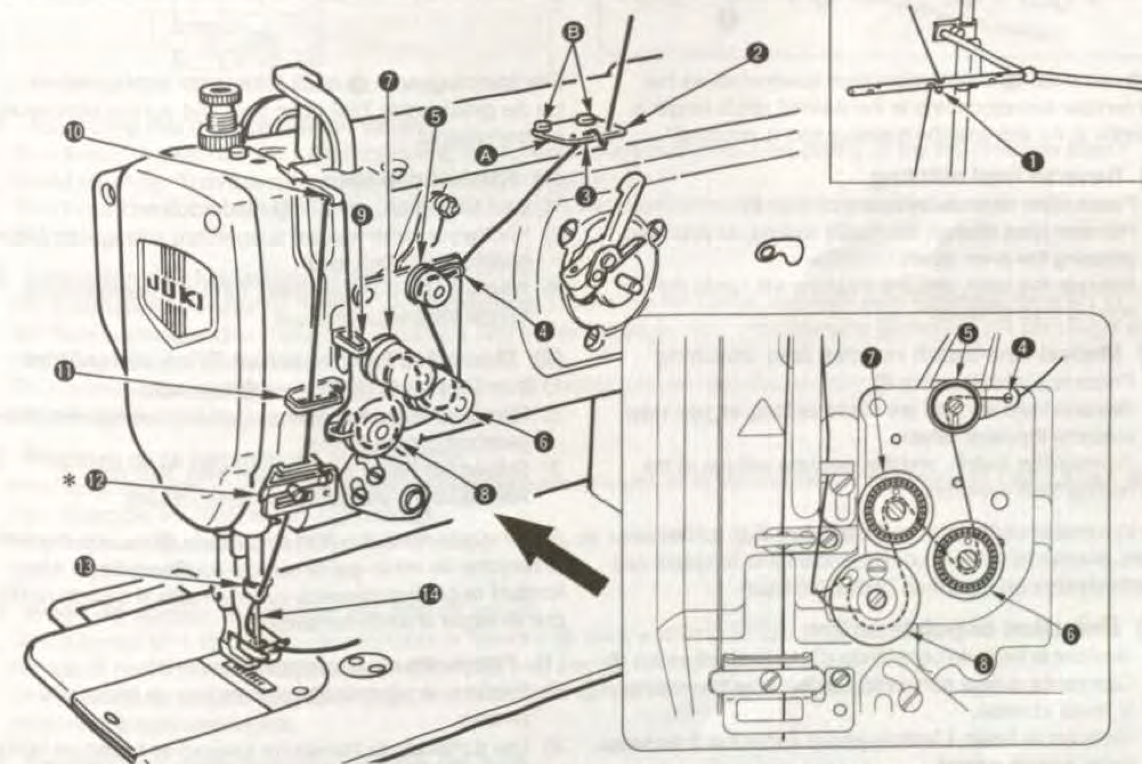
Begin with your thread spool seated vertically on the rear pin. Pull the thread backward through the upper thread guide, then guide it underneath the bobbin tension wheel from back to front. The thread must wrap around the bottom of the tension wheel—not over the top—as this applies consistent pressure during winding. Incorrect routing causes loose, uneven bobbin fills that tangle mid-seam.
Anchor Thread Securely on Bobbin
Insert the thread end through any hole along the bobbin’s outer rim, then wrap it counterclockwise 3-4 times around the bobbin core. This initial winding acts as an anchor—skipping this step lets thread slip during high-speed winding. Hold the loose end firmly with your left hand as you start the machine to prevent slippage.
Engage Winding Mode and Monitor Fill Level
Push the bobbin onto the winding pin until it clicks into place. Slide the entire winding assembly toward the machine’s rear—this disengages the needle drive and activates the bobbin winder. Hold the thread tail taut and press the foot pedal gently for 5 seconds to secure the anchor wraps.
Stop winding immediately when the bobbin reaches 80% capacity. Overfilled bobbins bulge at the edges, causing jams when inserted into the case. The thread should sit flush with the bobbin’s outer rim—never protruding.
Install Bobbin in Case
Position Bobbin for Counterclockwise Rotation
Hold the empty bobbin case in your left hand with the open side facing you. Insert the wound bobbin so the thread pulls toward your left hand in a counterclockwise direction (as shown in your manual’s diagram labeled “C”). This orientation is non-negotiable—reversing it causes skipped stitches and upper thread breaks because the bobbin unwinds against machine mechanics.
Thread Through Case Tension Mechanism
Pull the thread upward through the narrow metal slit at the case’s top (diagram reference “A”). Continue guiding it leftward until it snaps under the small metal latch above the tension spring (diagram “B”). You’ll feel distinct resistance followed by a click as the thread seats under the latch.
Test tension by holding the thread tail 6 inches above the case. A correctly tensioned bobbin will lower slowly 1-2 inches before stopping. If it drops freely, the thread isn’t under the latch; if it won’t move, the tension spring is too tight.
Insert Bobbin Case into Machine
Align Case with Bobbin Holder
Open the slide plate or hinged cover beneath the needle clamp. Locate the circular bobbin holder—its front features a spring-loaded lever. Grip the bobbin case only by its hinged lever (never the metal body), keeping the open side facing you.
Achieve the Critical Click Lock
Insert the case straight down into the holder until the lever clicks forward against the machine housing. Tilted insertion prevents full seating, causing thread nests. The case must sit perfectly flush with no gaps visible around its edge. Gently rotate the handwheel toward you—if the case shifts or wobbles, remove and reinsert it.
Confirm installation by checking the thread path: The upper thread should catch the bobbin thread on the first needle descent. If not, the case isn’t fully seated.
Troubleshooting Common Issues

Bobbin Case Won’t Click Into Place
- Lint buildup in holder groove: Use a small brush to clean debris from the rim where the case seats
- Lever not fully extended: Manually pull the case lever toward you before insertion
- Bent case edges: Run your finger along the case rim—any dents require replacement
Machine Won’t Pick Up Bobbin Thread
- Thread direction error: Remove case and verify thread pulls leftward (counterclockwise)
- Missed tension latch: Re-thread case ensuring thread clicks under metal latch at “B”
- Top thread routing error: Re-thread entire upper path—90% of pickup failures stem from missed tension discs
Uneven Stitch Tension After Installation
- Overfilled bobbin: Unwind excess thread until fill level is 80%
- Incorrect thread weight: Match bobbin thread weight to upper thread (e.g., 50/50)
- Tension spring obstruction: Remove case and check for lint under tension spring
Quick Reference Checklist
Before sewing, verify these critical points:
– [ ] Bobbin type matches Juki model specifications
– [ ] Thread unwinds counterclockwise from left side of case
– [ ] Thread is securely clicked under tension latch
– [ ] Case inserts with audible click and zero wobble
– [ ] No thread loops visible when hand-turning wheel
Maintenance Tips
Clean the bobbin area after every 2 hours of sewing. Remove the case and use a soft brush (not compressed air) to dislodge lint from the holder groove. Built-up debris alters thread tension and accelerates bobbin case wear.
Replace bobbins annually even if undamaged. Microscopic wear on bobbin rims creates inconsistent thread flow, causing subtle tension issues that worsen over time. Store spare bobbins in a dedicated case—loose bobbins develop nicks from contact with other tools.
Test new bobbins before critical projects. Wind a test bobbin and install it while holding the thread tail. The bobbin should rotate smoothly with even resistance—jerky movement indicates a warped bobbin.
Mastering bobbin installation transforms your Juki from a source of frustration into a precision stitching partner. That solid click as the case locks into place isn’t just sound—it’s the promise of uninterrupted sewing. Keep three pre-wound bobbins handy for quick color changes, and you’ll spend less time troubleshooting and more time creating. Remember: in Juki machines, perfection lives in the details, and the bobbin is where every perfect stitch begins.


