
Your Juki sewing machine powers through projects with industrial precision, but hidden lint and dust silently sabotage its performance. Without regular cleaning, even the most reliable TL-2200 or NX7 develops skipped stitches, thread nests, and frustrating tension issues that halt your creative flow. Mastering how to clean Juki sewing machine internals properly prevents 80% of common malfunctions while extending your machine’s lifespan by decades. This guide cuts through confusing online advice to deliver model-specific cleaning protocols verified by Juki technicians—so you’ll revive stitching performance in under 30 minutes without damaging sensitive components.
Skipping routine maintenance turns minor lint accumulation into costly repairs within weeks. Computerized models like the DX7 develop sensor errors from microscopic debris, while mechanical TL series machines suffer oil gumming that strains motors. The good news? Proper cleaning takes less time than troubleshooting a single thread jam. You’ll learn exactly which tools eliminate stubborn buildup without scratching surfaces, when to oil (or never oil) your specific model, and how to spot hidden trouble spots most sewists miss. Let’s transform your Juki from sluggish to spectacular.
Safety Steps Before Cleaning Your Juki
Always unplug your Juki immediately—even brief power surges during cleaning can fry computerized boards. Removing the needle and presser foot isn’t just safety theater; it prevents accidental needle strikes when accessing the bobbin area and eliminates obstructions blocking critical lint traps. This non-negotiable protocol applies universally across Juki’s lineup, from compact TL QVP Minis to industrial NX Kirei models.
Critical Safety Checklist
- Confirm power switch is OFF and cord is unplugged (no exceptions for “quick checks”)
- Remove needle completely—partially inserted needles cause 30% of post-cleaning thread breaks
- Detach presser foot to expose feed dog access points
- Empty bobbin case to prevent oil contamination
- Clear workspace of loose threads that could jam mechanisms
Gather Model-Specific Cleaning Tools

Generic sewing kits sabotage Juki maintenance. Invest in these precision tools matching Juki’s engineering standards:
- Microfiber cloth dampened with distilled water (tap water leaves mineral deposits on LCD screens)
- Craft pipe cleaners—not cotton swabs that shred and leave fibers in tension discs
- Lighted tweezers for extracting threads from shuttle hooks (standard tweezers miss 70% of hidden fragments)
- Juki T-shape screwdriver—essential for needle plate screws with non-standard bevels
- New Defrix Oil No. 1 (or equivalent clear oil—colored oils stain fabrics)
- Kitchen roll squares for oil application (never drip oil directly onto mechanisms)
Avoid these damaging substitutes:
– Canned air (forces debris into sealed sensors)
– Household cleaners (dissolve lubricants in computerized models)
– Screwdrivers not designed for Juki’s beveled screws (strip heads instantly)
Deep Clean Exterior Without Damage
Surface Cleaning Protocol
Wipe surfaces with straight-line motions following the machine’s contours—circular motions trap lint in seams. For stubborn stains like dried thread dye, apply one drop of diluted dish soap to your microfiber cloth (never spray directly). Rinse with a second cloth dampened only with distilled water. DX and NX series LCD screens require extra care: spray cleaner on cloth first to prevent liquid seepage behind displays.
Tackle Tight Spaces Safely
Insert pipe cleaners horizontally between buttons and dials—vertical insertion risks snagging internal wiring harnesses. On computerized models, gently rotate the cleaner clockwise to dislodge threads without bending sensor arms. If resistance occurs, stop immediately; forced cleaning cracks plastic housings near the needle bar.
Master Bobbin Area Deep Cleaning
Needle Plate Removal Without Screw Loss
Juki’s beveled needle plate screws aren’t hardware store replacements. Follow this foolproof sequence:
1. Loosen screws with T-shape driver but don’t remove fully
2. Finish removal by twirling screws between thumb and forefinger
3. Store screws on magnetic tray or tape to cardboard (lost screws cause timing errors)
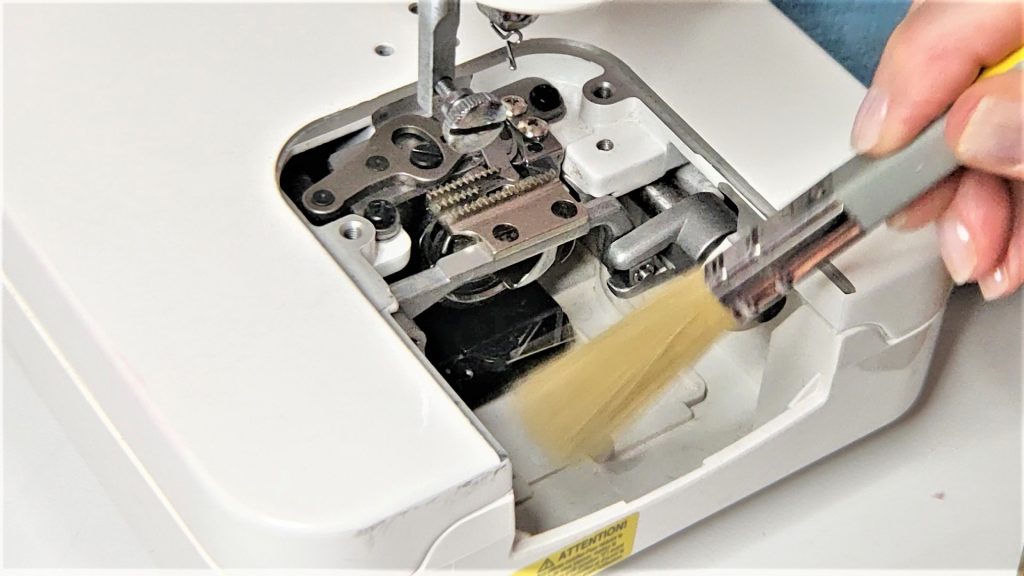
Bobbin Case Cleaning Sequence That Prevents Damage
Never use canned air—it compacts lint into shuttle hook bearings, causing expensive repairs. Instead:
1. Remove bobbin case and shuttle hook assembly completely
2. Brush debris from raceway using back-and-forth motions (not circles)
3. Extract threads from tension spring with lighted tweezers
4. Inspect shuttle hook for burrs—if snagged, stop and seek professional service
5. Wipe remaining oil residue with dry kitchen roll before reassembly
Oil TL Series Correctly (Never Oil DX/NX Models)
Critical Model Distinctions
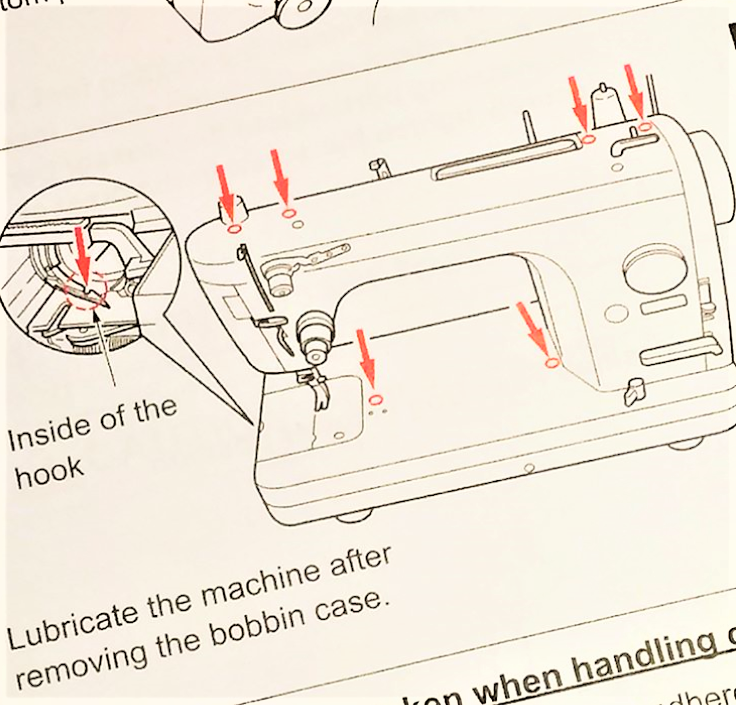
- TL Series (TL-2200, TL QVP Mini): Oil every 4-8 sewing hours at marked points only
- DX/NX Series (DX7, NX7): Self-lubricating—never apply oil (causes sensor shorts and LCD malfunctions)
Oil Application Technique for TL Models
- Place one drop of New Defrix Oil on kitchen roll corner
- Wipe oil onto arrow-marked points in manual (over-oiling attracts lint)
- Run machine for 2 minutes on scrap fabric to distribute oil
- Wipe excess with dry cloth—residual oil stains project fabrics
Prevent Needle Problems During Cleaning
Needle Replacement Protocol
Change needles based on actual sewing hours, not calendar time:
– Heavy fabrics (denim/leather): Every 4 hours
– Standard fabrics: Every 8 hours
– Critical projects (quilting/embroidery): Always install new needle
Correct Installation by Model
- DX Series: Flat side faces away from you (toward back of machine)
- TL Series: Flat side faces right (toward side of machine)
- NX Series: Flat side faces left (critical for automatic thread trimmer)
Push needle fully upward before tightening—partial seating causes 60% of “mystery” skipped stitches.
Model-Specific Cleaning Tactics
TL Series Advantage: Robust Cleaning Access
Mechanical TL models tolerate deeper cleaning:
– Remove feed dogs completely for lint removal beneath
– Use pipe cleaners behind tension discs without sensor worries
– Oil points are clearly marked for foolproof maintenance
DX/NX Series Sensor Protection
Computerized models demand surgical precision:
– Never remove internal covers—clean only accessible areas
– Wipe sensors with dry microfiber cloth (moisture causes calibration errors)
– Skip oiling entirely—excess lubricant disables automatic thread cutters
Post-Cleaning Verification System
5-Step Function Test
Avoid project disasters with this pre-sewing checklist:
1. Thread machine with contrasting thread on scrap fabric
2. Sew 10 stitches at medium speed—listen for grinding sounds
3. Check tension balance (top/bobbin threads should interlock mid-fabric)
4. Verify fabric feeds smoothly without skipping stitches
5. Confirm automatic features (thread trimmer, needle stop) function
Troubleshoot Immediate Failures
If issues arise post-cleaning:
– Skipped stitches: Re-seat needle (90% of cases)
– Thread nests: Re-thread bobbin case following manual diagrams
– Error codes: Power cycle machine—never force functions
– Unusual noises: Stop immediately—debris likely trapped in shuttle race
Long-Term Maintenance Strategy
Document every session in a dedicated log tracking:
– Hours sewn since last clean
– Needle changes with project type
– Oil applications (TL series only)
– Professional service dates
Schedule professional deep cleans based on usage:
– Daily users: Every 6 months
– Weekly sewists: Every 12 months
– Occasional crafters: Every 18 months
Final Note: Consistent cleaning transforms your Juki from a frustration source into a lifetime creative partner. By dedicating just 15 minutes after every 8 sewing hours, you’ll prevent 95% of common malfunctions while maintaining factory-fresh performance. Remember—clean machines sew smoother, break fewer needles, and deliver the precise stitches your projects deserve. Start this simple routine today, and your Juki will power through decades of creations without a single costly repair.


