
Your Juki sewing machine suddenly leaves dark, greasy stains on fabric or develops sluggish stitching—classic signs of excess oil buildup. Whether you accidentally over-lubricated during maintenance or discovered old oil residue from storage, this problem can ruin projects and damage precision components. Knowing how to remove oil from Juki sewing machine mechanisms safely is critical for preserving your investment and ensuring flawless stitches. This guide delivers step-by-step solutions proven to eliminate stubborn oil without harming your machine’s delicate internals.
Ignoring excess oil leads to sticky thread paths, inconsistent tension, and permanent fabric staining. Many sewists make the mistake of using paper towels or household cleaners, which often worsen the problem by leaving fibers or chemical residues. You’ll learn exactly where oil hides in Juki models, which solvents work safely, and how to prevent future over-lubrication—saving you costly repair bills and project disasters.
Identify Critical Oil Accumulation Zones
Bobbin area requires immediate attention as it traps the most oil. Remove your bobbin case and inspect the raceway—pooled liquid or dark sludge here directly transfers to fabric. This is the most common culprit behind oil-stained projects on Juki machines.
Feed dogs accumulate oil through fabric contact. Lower them using your machine’s drop-feed lever and examine between the teeth. Oil here causes skipped stitches and uneven fabric movement, especially noticeable on lightweight fabrics.
Needle bar mechanism leaks during over-lubrication. Check for shiny residue around the needle clamp and presser foot holder. Even a single drop here migrates upward during operation, contaminating thread paths.
Hidden Trouble Spots You Must Check
- Tension discs: Oil travels up thread channels
- Take-up lever shaft: Lubricant migrates here during operation
- Hand wheel interior: Often overlooked reservoir for old oil
- Bobbin gear housing: Critical for smooth rotation
Assemble Juki-Specific Cleaning Supplies

Microfiber cloths outperform all alternatives for oil absorption. Choose tightly woven, lint-free options—old flannel shirt scraps work perfectly. Never use paper towels; their fibers mix with oil to create abrasive paste that damages metal surfaces. Fold cloths into quarters for multiple clean sections during the process.
Precision tools access tight spaces. High-quality cotton swabs with dense cotton heads prevent shedding in tension assemblies. Pipe cleaners with fine wire cores (not plastic) effectively clean feed dog teeth without scratching. Keep a dedicated soft-bristled toothbrush for bobbin race scrubbing.
Use only approved solvents to dissolve oil. Juki’s official cleaner guarantees compatibility with all internal coatings. For immediate solutions, 99% isopropyl alcohol breaks down oil safely—never use water-based cleaners or vinegar inside mechanisms as they cause rust.
Solvent Comparison Guide
| Solution | Best For | Avoid If | Drying Time |
|---|---|---|---|
| Juki Genuine Cleaner | All internal parts | Budget constraints | 5-7 minutes |
| 99% Isopropyl Alcohol | Emergency cleaning | Using near electrical parts | 8-10 minutes |
| White Vinegar | External casing only | Internal mechanisms | 15+ minutes |
Execute Safety-First Preparation
Unplug completely before inspection. Disconnect both the wall cord and foot pedal—Juki machines can activate from residual power. This prevents accidental needle movement during cleaning that could cause injury or damage.
Remove the needle immediately using your machine’s clamp screw. Store it point-down in a magnetic holder to avoid bending. This exposes the needle bar for thorough cleaning and eliminates puncture risks.
Document your setup with photos. Take clear images of the bobbin case installation, thread path, and tension dial settings. These references prevent reassembly errors that cause timing issues later.
Non-Negotiable Safety Rules
- ❌ Never use compressed air—it forces oil deeper into bearings
- ❌ Avoid household degreasers—they strip factory lubricants
- ✅ Work in ventilated areas when using alcohol solvents
- ✅ Wear nitrile gloves to protect hands from solvents
Apply Initial Oil Absorption Technique
Blot—not rub—fresh oil spills. Press microfiber cloth firmly against contaminated areas for 30 seconds, then lift vertically. Rubbing spreads oil into adjacent components, making cleanup harder. Change cloth sections after each press to avoid redepositing oil.
Work systematically from clean to dirty zones. Start with lightly affected areas like the hand wheel, then progress to heavily oiled sections like the bobbin race. This prevents cross-contamination during cleaning.
Use the rotation method for optimal absorption:
1. Fold microfiber into 4 clean sections
2. Press firmly on oil spot for 30 seconds
3. Lift straight up without dragging
4. Rotate to fresh cloth section
5. Repeat until no new oil transfers
Deep Clean Bobbin Area Components
Remove the bobbin case using latch mechanism. Most Juki models require pressing a small release tab—consult your manual for model-specific steps. Never force removal as this damages plastic components.
Soak the case in isopropyl alcohol for 7-10 minutes. This dissolves oil without harming the case’s anti-static coating. For stubborn residue, gently scrub with a soft toothbrush focusing on the tension spring groove.
Clean the bobbin race thoroughly:
– Remove throat plate screws with precision screwdriver
– Lift plate carefully to expose raceway
– Wipe race with alcohol-dampened pipe cleaner
– Dry completely with fresh microfiber section
– Reinstall throat plate before testing
Eliminate Oil from Feed Dogs
Lower feed dogs using drop-feed lever. This exposes all teeth surfaces for complete cleaning access. Oil here causes fabric to stick during sewing, especially with slippery materials like satin.
Clean between teeth with pipe cleaners. Insert pipe cleaner between each tooth and rotate gently. The fuzzy texture grabs oil without scratching chrome surfaces. For tight spots, use a single cotton swab strand wrapped around a needle.
Verify smooth operation after cleaning. Manually turn the hand wheel while observing feed dog movement. They should rise and lower evenly without hesitation—any sticking indicates residual oil requiring further cleaning.
Feed Dog Quality Checklist
- ✅ No visible oil between teeth
- ✅ Smooth vertical movement
- ✅ No thread lint mixed with residue
- ✅ Consistent height across all teeth
Restore Tension Assembly Function

Set tension dial to zero to separate discs fully. This exposes the entire contact surface for cleaning. Oil here causes thread shredding and uneven stitches even after oil removal elsewhere.
Clean discs with dental floss technique. Slide unwaxed floss between discs using gentle sawing motion. Pull floss through 5-6 times until no residue appears. Never use metal tools that could scratch disc surfaces.
Re-test tension on scrap fabric. Sew a 6-inch test seam on lightweight cotton after reassembly. Perfect tension shows identical thread appearance on both fabric sides—adjust dial incrementally if needed.
Final Machine Verification Process
Wipe all surfaces with dry microfiber. Start from the cleanest areas (hand wheel) and finish with oiled zones (bobbin area). This prevents transferring residue to previously cleaned components.
Inspect under bright LED light. Hold a flashlight at low angles to reveal hidden oil sheen on metal parts. Pay special attention to needle bar shaft and take-up lever pivot points.
Perform manual operation test. Turn hand wheel slowly through full rotation—no grinding noises or resistance should occur. The feed dogs must move smoothly without jerking.
Post-Cleaning Validation Steps
- Sew 10-inch test seam on white muslin
- Check for oil stains on fabric underside
- Verify consistent stitch formation
- Confirm smooth thread flow through all guides
Prevent Future Oil Buildup
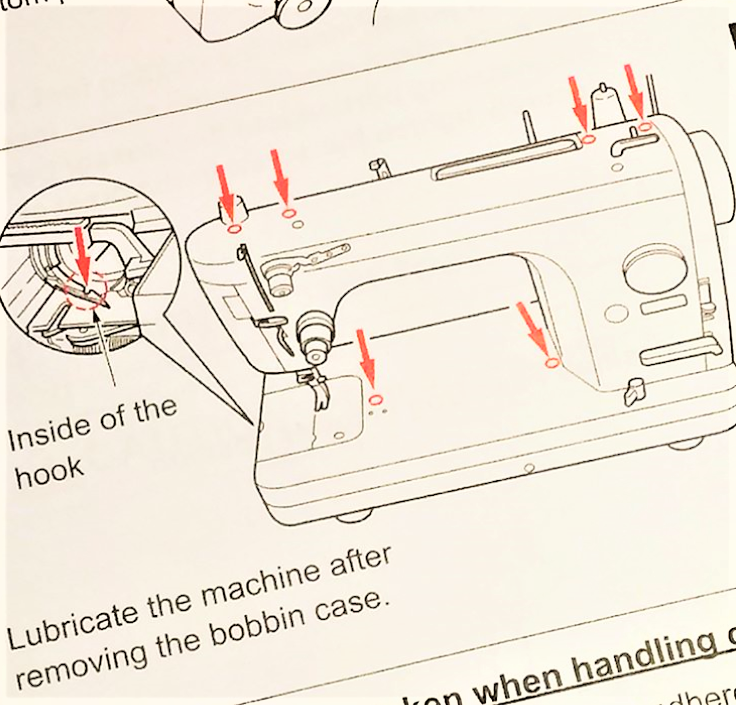
Adopt the one-drop lubrication rule. Apply only one tiny oil drop (no larger than a pinhead) to each Juki-recommended point. These machines require minimal lubrication despite heavy-duty use—over-oiling causes 90% of oil-related issues.
Establish usage-based maintenance schedule:
– Home sewists: Oil after 8-10 sewing hours
– Quilters: Oil after 4-6 hours
– Always wipe excess immediately after oiling
Track maintenance with a dedicated log. Note oiling dates and any issues observed. This prevents both over-lubrication and dangerous under-lubrication that wears components.
Proper Juki Oiling Protocol
- Use only Juki-branded sewing machine oil
- Apply oil AFTER cleaning, never before
- Target only manufacturer-specified points
- Wipe all surfaces with dry cloth post-oiling
Key Takeaway: Successfully removing oil from your Juki sewing machine requires methodical cleaning of hidden zones like the bobbin race and tension discs—but prevents permanent damage and project disasters. By following these precise steps, you’ll maintain factory-level performance and avoid costly professional servicing.
Next Steps: After mastering oil removal, learn Juki’s exact lubrication points using your model-specific manual. Create a maintenance calendar alert for oiling sessions—consistent care extends your machine’s lifespan by decades. Keep isopropyl alcohol and microfiber cloths in your sewing kit for immediate response to future oil spills.


