
Your Brother sewing machine suddenly refuses to feed fabric properly, leaving you with frustrating skipped stitches and uneven seams that ruin your latest project. The feed dogs—the small metal teeth beneath your needle plate that should be gripping and advancing your fabric—are likely jammed with lint, thread, and dust. When these critical components seize up, your machine becomes nothing more than an expensive paperweight, halting your creative flow and threatening deadlines.
This guide provides a complete Brother sewing machine feed dog repair solution specifically for the BM3700 model, though these techniques apply to most Brother machines. You’ll discover exactly how to diagnose feed dog problems, safely access the mechanism, and restore smooth fabric feeding through proper cleaning and lubrication—all without costly professional repairs. Whether you’re a hobbyist or professional sewer, these steps will get your machine back in action quickly.
Why Your Brother Sewing Machine Feed Dogs Stop Moving
Fabric Doesn’t Advance During Stitching
When your feed dogs fail, you’ll immediately notice fabric refusing to move forward as you sew. Instead of smooth, consistent feeding, the material bunches up under your presser foot or requires you to manually pull it through—a clear sign your feed dogs aren’t performing their essential job. This problem often starts subtly with occasional skipped stitches before progressing to complete feeding failure, especially when working with thicker fabrics that demand more mechanical power from the feed dog mechanism.
Visible Feed Dog Movement Issues
Check your feed dogs’ motion by turning the hand wheel slowly while watching the needle plate area. Healthy feed dogs should rise above the plate surface during each stitch cycle, creating visible teeth marks on your fabric as they grip and advance it. If the teeth remain completely stationary, only partially emerge, or move erratically, obstruction is almost certainly present. Pay special attention to whether the feed dogs move when you manually turn the hand wheel—if they don’t, the blockage is severe and requires immediate cleaning.
Abnormal Sounds During Operation
A properly functioning Brother sewing machine produces a smooth, rhythmic sound as feed dogs oscillate in sync with the needle. When they become obstructed, you might hear grinding, clicking, or complete silence from the feed dog area—unmistakable warning signs that demand attention. Never ignore these sounds, as continued operation with jammed feed dogs can cause additional damage to your machine’s timing mechanism and potentially bend the feed dog assembly itself.
Essential Safety Steps Before Feed Dog Repair
Complete Power Disconnection Protocol
Turn your machine’s power switch to “off” and disconnect the foot pedal from its side port before starting any repair work. This critical step prevents accidental activation while you’re working with internal components and eliminates electrical hazards near moving parts. Never skip this safety measure—even a momentary foot slip on the pedal while your fingers are near the feed dogs could cause serious injury or machine damage.
Component Removal in Correct Sequence
Follow this precise order for safe disassembly:
1. Remove the needle: Hold it firmly while turning the needle set screw counterclockwise until loose. Keep the needle in your hand throughout the process—dropping it inside the machine creates additional complications.
2. Extract the bobbin case: Grip the bobbin case cover with two fingers and slide it backward gently to expose the hook area beneath.
3. Release the presser foot: Press the black button at the back of the presser foot lever until the attached foot releases and drops off.
How to Access Your Brother Sewing Machine Feed Dogs

Bed Cover Removal Technique
Slide the bed cover away from the machine body to fully expose the feed dogs. On the BM3700, this cover typically moves backward with a gentle pull—never force it if it doesn’t move easily, as this could indicate you’ve missed a securing mechanism. With the cover removed, you’ll have clear access to the feed dog assembly and surrounding areas where lint accumulates.
Identifying Problem Areas
With the feed dogs exposed, immediately look for the most common trouble spots:
– Lint packed between feed dog teeth
– Thread wrapped around the mechanism’s base
– Dust bunnies interfering with movement
– Debris clogging the feed dog channel
Pro Tip: Shine a flashlight at a low angle across the mechanism—this highlights shadows where debris hides in crevices you might otherwise miss.
Complete Feed Dog Cleaning Process
Debris Removal Best Practices
Use a small stiff brush to loosen compacted lint from between feed dog teeth, working in the direction of natural movement rather than against it. Tweezers prove invaluable for removing stubborn thread pieces wrapped around the mechanism’s base—grip threads gently to avoid breaking them and leaving fragments behind. Start at the front of the feed dogs and work methodically backward, ensuring complete debris removal from each tooth and surrounding area.
Critical Areas Requiring Extra Attention
Pay special attention to these high-risk zones:
– Pivot points where the mechanism connects to the machine body (collects the most lint)
– Feed dog channel beneath the teeth
– Gear teeth that drive the oscillating motion
– Spring mechanisms that control feed dog height
Warning: Never use metal tools like screwdrivers to dislodge debris—this can scratch or bend delicate components. Stick to plastic or nylon tools designed for sewing machine maintenance.
Verification Testing After Cleaning
After initial cleaning, manually turn the hand wheel to observe feed dog motion. Continue cleaning until the teeth move freely through their full range without catching or hesitation. Test thoroughly—if you still feel resistance, more debris remains hidden in the mechanism. Properly cleaned feed dogs should move smoothly with minimal effort when turning the hand wheel.
Proper Lubrication for Smooth Feed Dog Operation
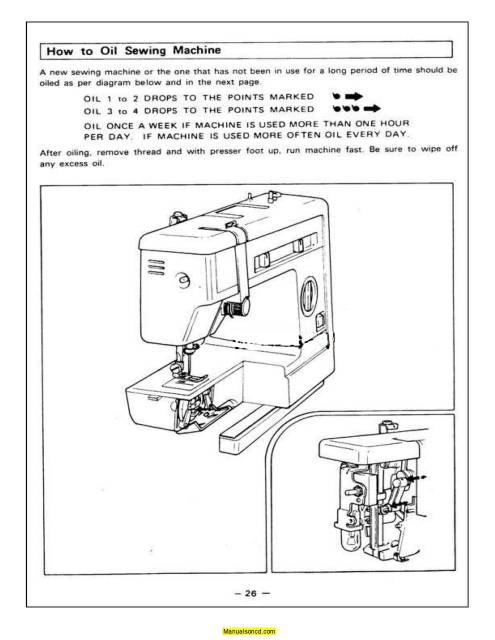
Strategic Oil Application Points
Apply exactly two drops of sewing machine oil—one drop on each side of the feed dog mechanism where it connects to the machine body. Never over-oil, as excess lubricant can transfer to fabric during sewing and create unsightly stains on your projects. Use only high-quality sewing machine oil—not household oils like WD-40, which can damage rubber components and attract more lint.
Oil Distribution Technique
Turn the hand wheel clockwise for three complete rotations to distribute oil evenly throughout the mechanism. This action works lubricant into pivot points and ensures smooth operation. After distribution, wipe away any visible excess oil with a microfiber cloth—this step is crucial to prevent oil transfer to future fabric projects.
Reassembly and Function Testing
Component Replacement Sequence
Replace parts in reverse order of removal with these precise steps:
1. Slide the bed cover back into position until it clicks securely
2. Insert the bobbin case cover and slide it forward until it locks
3. Attach the presser foot by sliding it up onto the lever until it clicks
4. Insert the needle with flat side toward the back and tighten the set screw firmly
Critical Function Verification Test
Before sewing actual projects, perform this essential test:
– Place a piece of scrap fabric under the presser foot
– Lower the presser foot and take 5-6 stitches at slow speed
– Observe fabric movement—it should feed smoothly without manual assistance
– Check stitch quality for consistency and even tension
If problems persist, repeat the cleaning process—90% of feed dog issues resolve with thorough cleaning and proper lubrication.
Preventing Future Brother Sewing Machine Feed Dog Problems
Maintenance Schedule for Longevity
Clean feed dogs after every major project or 8-10 hours of sewing time to prevent debris accumulation. Create a maintenance log in your sewing notebook to track cleaning intervals—this simple habit extends your machine’s life significantly and prevents unexpected breakdowns during important projects.
Fabric Preparation Strategies
Always clean fabric before sewing to reduce lint transfer to your machine. For problematic fabrics like fleece, flannel, or minky, use a lint roller on the wrong side before cutting pieces. Pro Tip: Keep a small vacuum with a brush attachment nearby to quickly remove loose fibers from your work area before they migrate into your machine.
When to Seek Professional Brother Sewing Machine Repair
Recognizing Beyond-DIY Problems
If feed dogs remain sluggish after thorough cleaning and lubrication, internal mechanical problems may exist. Watch for these red flags:
– Feed dogs move unevenly (higher on one side)
– Visible damage to feed dog teeth
– Complete lack of movement despite hand wheel rotation
– Unusual grinding noises after cleaning
Electrical Issue Diagnosis
Verify feed dog issues aren’t related to motor problems by testing other machine functions. If the needle bar moves but feed dogs remain static despite cleaning, electrical issues beyond DIY repair scope may be present. Never attempt electrical repairs yourself—this requires specialized tools and knowledge to avoid safety hazards.
Your Brother sewing machine’s feed dogs work tirelessly beneath every seam, gripping and advancing fabric through countless projects. By following these cleaning and maintenance steps, you’ll restore smooth operation and prevent future feeding problems. Regular attention to these small but mighty components ensures your machine remains ready for whatever creative project comes next—no expensive repair bills required. Keep this guide handy for your next maintenance session, and enjoy frustration-free sewing with properly functioning feed dogs.


