

Your Brother sewing machine hums along beautifully—until it doesn’t. Threads bunch, stitches skip, and that once-smooth operation turns into a grinding protest. Like any precision instrument, your Brother needs regular TLC to deliver flawless results. This comprehensive guide walks you through proven maintenance routines that keep your machine purring like new, prevent costly repairs, and extend its lifespan for decades of creative sewing.
Whether you own a basic mechanical Brother or a top-of-the-line computerized model, these step-by-step procedures work across the range. You’ll learn exactly what to clean, when to oil, and how to spot problems before they become expensive disasters. Consistent Brother sewing machine maintenance takes just minutes but pays off in reliable performance and years of uninterrupted sewing.
Daily Quick Cleaning for Flawless Stitching
Start your Brother sewing machine maintenance routine with essential daily checks that take just two minutes but prevent most common issues. Begin with the power off and needle in its highest position—the safest starting point for cleaning. Always remove the needle first to prevent accidental pricks while you work on the machine.
Needle Plate and Bobbin Area Cleaning Steps
Wipe the needle plate thoroughly after each project using the small brush included with your machine. Never use sharp objects that could scratch delicate surfaces. Slide the flathead screwdriver under the plate’s front edge while supporting it to prevent dropping screws inside the machine. Brush downward between the feed dogs following the teeth direction—this removes lint without forcing it deeper into the mechanism.
Check your bobbin area carefully for tangled threads or accumulated lint. Lift the bobbin case straight up after opening the cover, noting its exact position for correct reinstallation. A quick visual inspection of your needle is crucial—replace it if bent, dull, or after 8 hours of sewing time. This simple Brother sewing machine maintenance habit prevents skipped stitches and broken threads.
Solving Thread Bunching Immediately
When thread bunches underneath your fabric, clean the bobbin area first before rethreading. Most tension problems stem from lint buildup rather than actual tension issues. For skipped stitches, verify your needle is inserted fully with the flat side facing back—this tiny detail makes all the difference in stitch formation. These immediate fixes through proper Brother sewing machine maintenance save you hours of frustration and wasted fabric.
Weekly Deep Cleaning Procedure for Smooth Operation
Set aside 15-20 minutes each week for thorough Brother sewing machine maintenance that keeps internal components free of lint and properly lubricated. This regular attention prevents the slow degradation that leads to major repairs down the road. The process follows a specific sequence to ensure you don’t miss critical areas or accidentally damage components.
Step-by-Step Disassembly for Cleaning
Begin by removing the presser foot and needle, storing them safely to avoid loss. Next, take out the bobbin case using your model’s specific mechanism—most Brother machines use a front-loading system where you pull the lever and lift straight up. Unscrew the needle plate carefully, keeping screws in a small dish to prevent loss. For deeper cleaning, remove the bobbin race cover if your model allows this, revealing the hook assembly beneath.
Targeted Component Cleaning Techniques
Focus your cleaning efforts on the hook race and shuttle area using a cotton swab dipped in sewing machine oil. Rotate the handwheel slowly to access all surfaces of the hook race. For the bobbin case, remove the bobbin and use compressed air to blow out stubborn lint, checking the tension spring for damage or lint accumulation. When cleaning feed dogs, brush vigorously between teeth but avoid liquids on computerized models where moisture could seep into electronics. This targeted Brother sewing machine maintenance keeps your machine operating at peak performance.
Precise Lubrication for Long-Term Reliability
Proper lubrication is perhaps the most misunderstood aspect of Brother sewing machine maintenance. Many sewers either over-oil their machines or avoid oiling altogether, both causing significant damage over time. Using the correct oil type and applying it to precise locations makes all the difference in your machine’s longevity.
Critical Lubrication Points and Technique
Only use dedicated sewing machine oil—never household oils that can gum up delicate mechanisms. Brother specifically recommends SA-156 oil or equivalent lightweight, clear oil. Apply one drop only to the hook race under the bobbin case, one drop to the needle bar mechanism (accessible by removing the needle plate on some models), and one drop where the take-up lever connects to the needle bar.
Follow this precise oil application sequence: clean each point thoroughly first, apply one drop only, run the machine on scrap fabric for 30 seconds to distribute the oil, then wipe away any excess with a lint-free cloth. Over-oiling is worse than under-oiling—excess oil attracts more lint and can seep into electronic components on computerized models, causing expensive damage.
Troubleshooting Common Brother Machine Problems
When issues arise, systematic Brother sewing machine maintenance diagnostics help you identify and resolve problems quickly. Most common sewing machine troubles stem from simple maintenance oversights rather than mechanical failures. Understanding these patterns saves you time, money, and frustration.
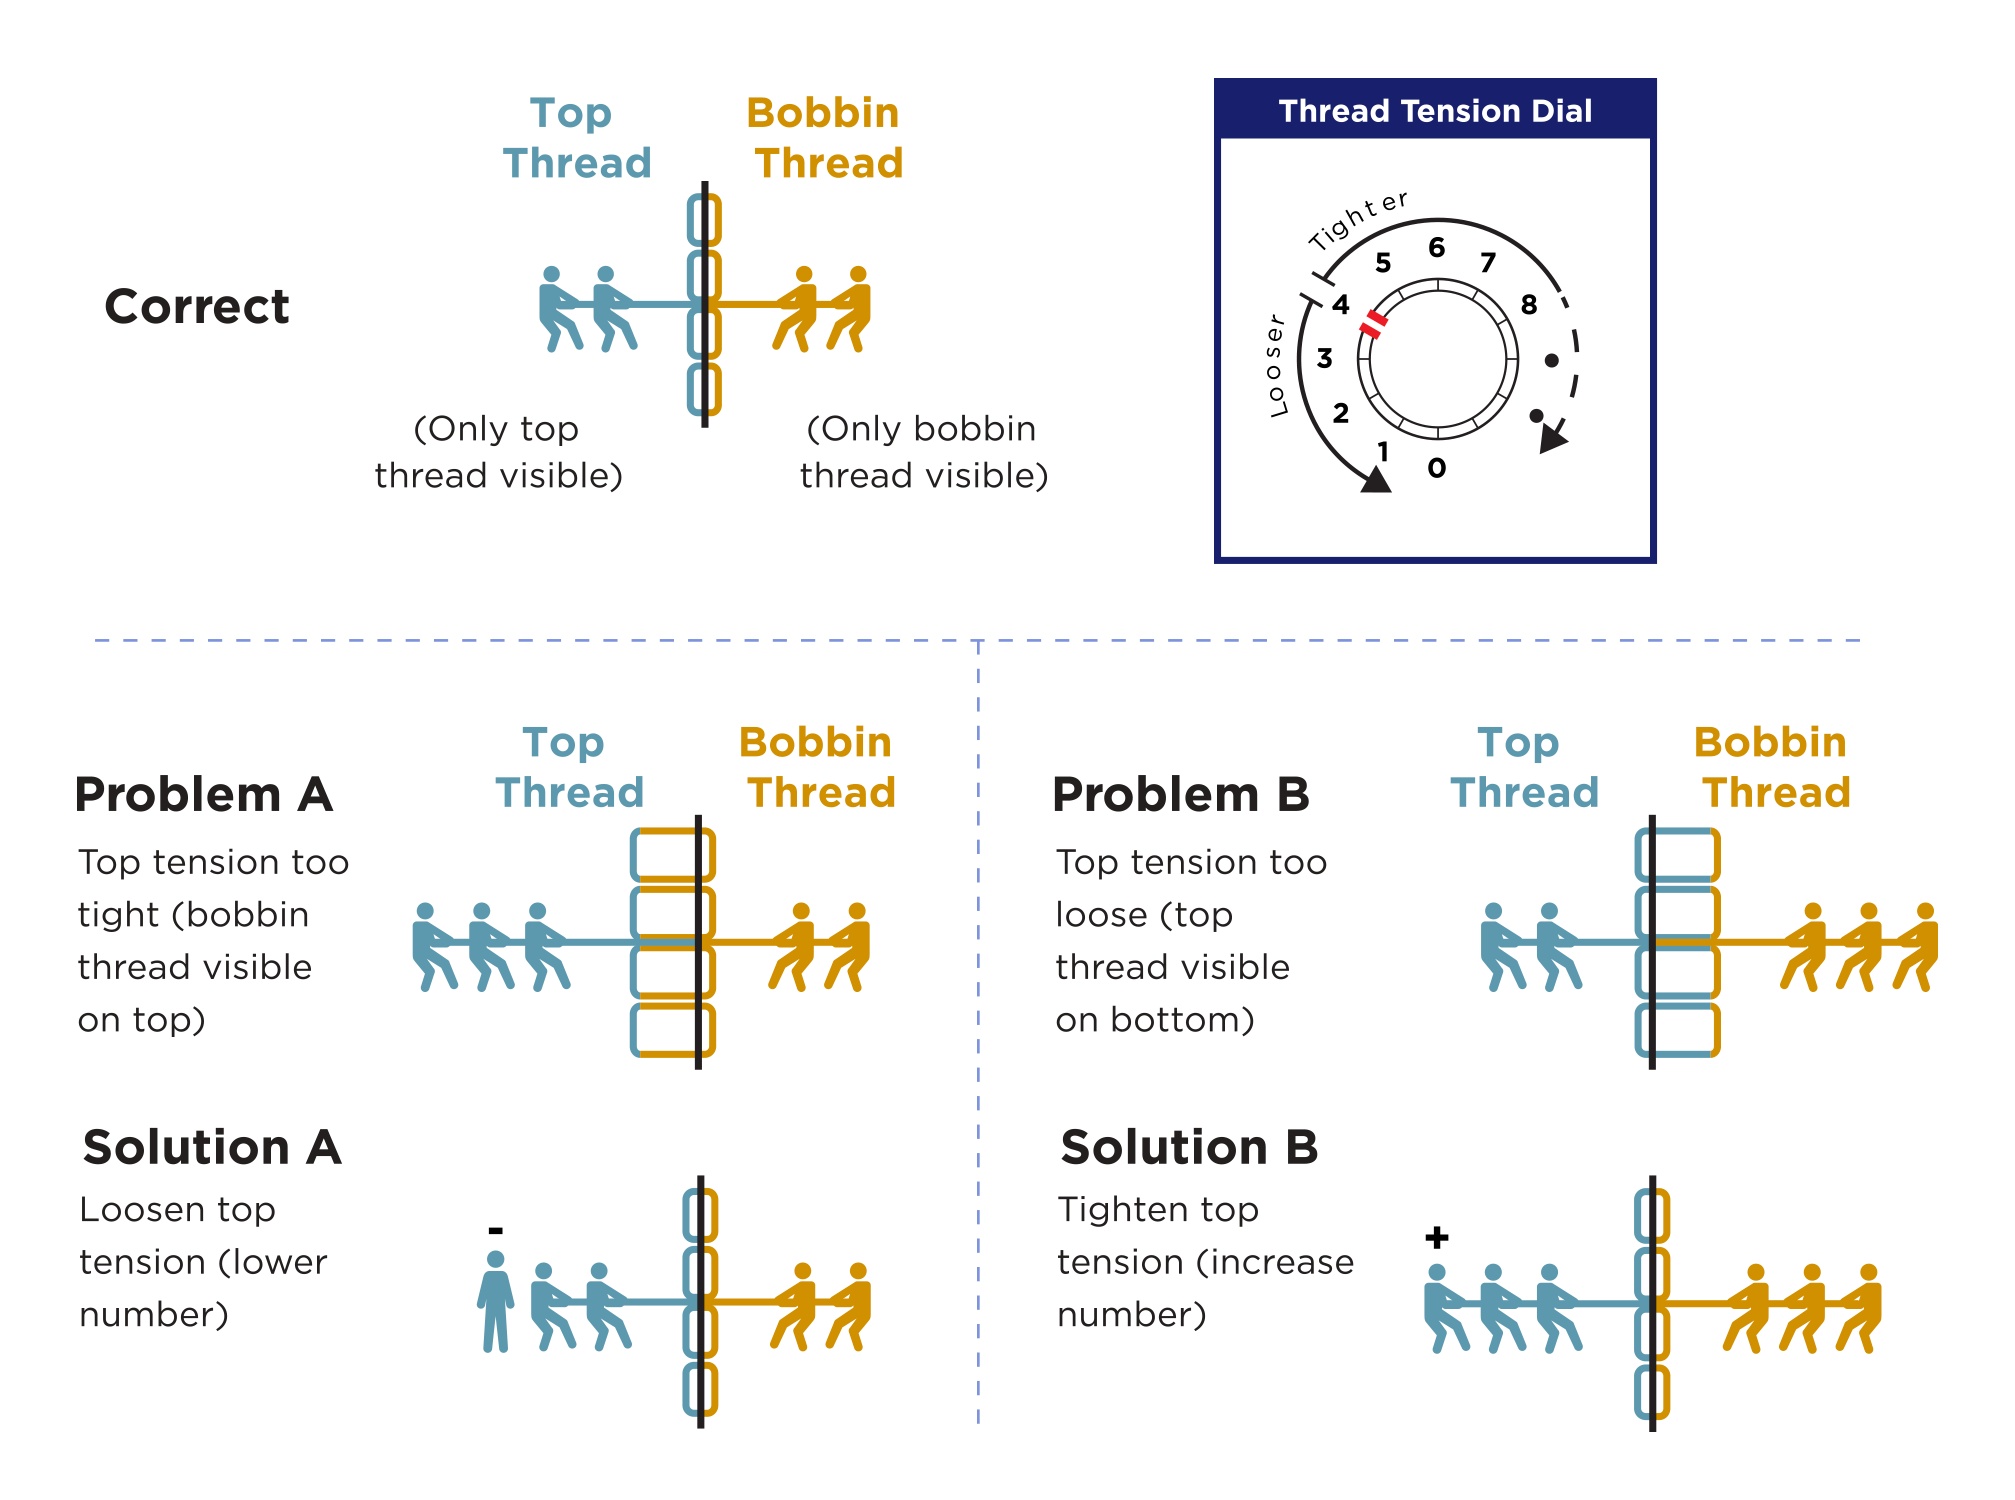
Tension Problems and Solutions
Loops on top or bottom fabric, thread breaking, and uneven stitches typically indicate tension issues. Begin by completely rethreading both needle and bobbin—most tension problems stem from incorrect threading rather than actual tension settings. Verify your needle size matches your thread weight, as mismatched components cause tension inconsistencies. Clean tension discs using folded muslin fabric pulled through while tension is engaged. Reset tension to factory settings (usually 4-5) as your starting point before making adjustments.
Feed Dog Troubleshooting Guide
When fabric doesn’t advance properly, check your feed dog position first—ensure they’re up for regular sewing and not accidentally lowered for darning. Clean thoroughly between feed dog teeth where lint buildup prevents proper fabric movement. For uneven feeding, adjust presser foot pressure according to fabric thickness and verify you’re using the appropriate presser foot for your fabric type. These Brother sewing machine maintenance checks solve most feed-related issues without professional service.
Computerized Model Error Codes Decoded
Brother computerized models display specific error codes that pinpoint problems quickly. E1 typically indicates a thread jam in the bobbin area requiring immediate cleaning. E3 means the needle is hitting the needle plate, often from incorrect installation or a bent needle. E6 signals motor overload from sewing through excessively thick fabric layers. Addressing these issues through proper Brother sewing machine maintenance prevents further damage and gets you back to sewing faster.
Strategic Parts Replacement Schedule

Following a proactive parts replacement schedule as part of your Brother sewing machine maintenance routine prevents sudden failures during important projects. Knowing when to replace components before they fail completely saves you from mid-project disasters and extends your machine’s overall lifespan.
Needle Replacement Protocol
Replace needles when visibly bent or damaged, after 8 hours of cumulative sewing time, when switching between significantly different fabric types, or if you hear a “popping” sound while sewing. Install needles with the flat side facing back on most Brother models, pushing up fully until seated, then tightening the screw firmly without over-torquing. This simple Brother sewing machine maintenance habit prevents countless stitching problems.
Bobbin Case Inspection Routine
Regularly inspect your bobbin case for tension spring damage, scratches on the case surface, and ensure the bobbin spins freely inside. Clean lint from the tension adjustment screw area during each cleaning session. Replace the bobbin case if you notice visible damage, experience consistent tension problems after thorough cleaning, or hear clicking sounds from the bobbin area that cleaning doesn’t resolve.
Storage and Long-Term Care Strategies
Proper storage practices complete your Brother sewing machine maintenance regimen, protecting your investment when not in use. How you store your machine significantly impacts its readiness for your next sewing session and its long-term reliability.
Ideal Storage Position and Conditions
Never store your Brother sewing machine with the needle down—this can bend the needle bar over time. Always remove the needle and store it separately, lower the presser foot to protect feed dogs, cover with a proper dust cover or case, and store in a climate-controlled environment away from humidity extremes. In humid climates, run your machine weekly for 5 minutes to prevent internal rust. Before long-term storage, clean thoroughly, oil all points, remove all thread and bobbins, and place mothballs nearby (not inside) for natural fiber protection.
Professional Service Indicators and Resources
Knowing when to seek professional help completes your Brother sewing machine maintenance knowledge. Some issues require factory-trained technicians with specialized tools and genuine parts. Internal timing problems where the needle hits the bobbin case, electronic issues on computerized models, motor running without needle movement, loud grinding sounds from internal gears, and repeated thread breakage after thorough troubleshooting all indicate the need for professional service.
Use Brother’s official dealer locator at brother-usa.com to find authorized service centers. These certified technicians offer factory training, genuine Brother parts, warranty maintenance capabilities, and model-specific expertise that general repair shops cannot match. Investing in professional service when needed extends your machine’s life far beyond what DIY maintenance alone can achieve.
Consistent Brother sewing machine maintenance prevents 90% of common problems. Start today with a simple quick clean—remove your needle plate and brush away accumulated lint. Notice the immediate improvement in stitch quality and machine sound. Build these habits gradually, and your Brother will become your most trusted creative partner for decades of sewing enjoyment.


