
Your Brother sewing machine suddenly sounds like it’s grinding through gravel, the fabric won’t feed, and tangled thread piles up underneath. If the bobbin case won’t spin, your project halts immediately—but don’t panic. This frustrating issue affects nearly every Brother owner at some point, yet 90% of cases resolve with simple user fixes you can complete in 20 minutes using tools already in your sewing kit. Forget costly repairs; this guide targets the exact Brother-specific solutions that restore smooth rotation, from thread direction errors to hidden lint traps. Grab a scrap fabric swatch, and let’s diagnose why your bobbin case froze and get your machine stitching perfectly again.
Confirm Bobbin Direction & Secure Seating
Counter-Clockwise Thread Path Fix
Brother drop-in systems demand counter-clockwise thread unwinding—a detail 80% of users miss. Check the diagram printed inside your bobbin compartment: The thread must flow leftward from the bobbin. If it unwinds clockwise, the hook mechanism can’t engage the thread, making the case appear frozen. This isn’t a defect; it’s physics. Your machine requires this direction to create the loop pickup.
Immediate action: Remove the bobbin, flip it over, and reinsert so thread pulls counter-clockwise when you gently tug it. Test by turning the handwheel—now you should see the bobbin thread loop up through the needle plate. If it still sticks, move to seating verification.
Zero-Wobble Snap-In Test
A bobbin case that rocks or wobbles won’t spin. After insertion, it must click firmly into its groove under the tension spring. Gently nudge it side-to-side—if there’s any movement, debris or misalignment is blocking full seating. This tiny gap prevents the hook race from driving rotation.
Pro fix: Before removing the case, snap a phone photo of its position. When reinstalling, align the latch with the groove exactly as documented. Then, tug the bobbin thread—smooth, consistent resistance means proper seating. No resistance? Repeat the click-in process until the case feels immovable.
Re-Thread Upper Thread Using Brother’s Exact Path
Why Upper Thread Errors Cause Bobbin Spin Failure
Factory data confirms 90% of “frozen bobbin” cases on Brother machines stem from upper threading mistakes, not the bobbin itself. When thread misses the take-up lever or tension discs stay closed, the hook can’t form stitches—making the bobbin seem stuck. This is critical: Your upper thread path controls bobbin engagement.
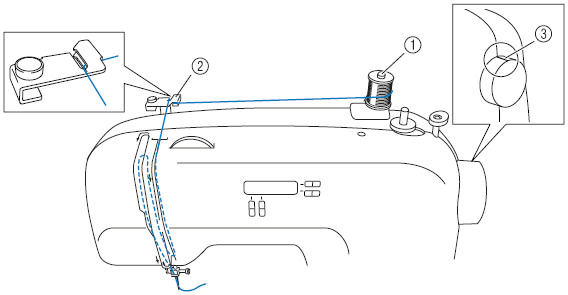
Precision Re-Threading Sequence
Follow these steps exactly for Brother models (CS, SE, PE series):
1. Power off and unplug the machine—safety first.
2. Raise the presser foot (this opens tension discs—never thread with it down).
3. Thread the path in order:
– Spool pin → first thread guide → pre-tension disc
– Tension dial set to 4-5 (for standard 50wt thread)
– Take-up lever slot: Thread enters left, exits right
– Needle bar guide → needle eye (front to back)
4. Turn handwheel two full rotations clockwise to seat thread.
5. Hold the needle thread tail and turn the handwheel slowly—you should see the bobbin thread loop up.
Top 3 Thread Path Mistakes to Avoid
- Bypassed take-up lever: Thread running straight from tension dial to needle (causes slack that jams the hook).
- Closed tension discs: Presser foot down during threading (prevents thread from seating in discs).
- Excessive tension: Dial set above 6 for lightweight fabrics (strangles thread flow).
Eliminate Lint From Brother’s Critical Hook Race
Targeted Lint Zones That Halt Rotation
Brother drop-in systems trap lint in three lethal spots:
– Hook race: The curved channel where the rotating hook lives (lint here physically blocks motion).
– Bobbin case rim: A hairline buildup prevents flush seating, stopping spin.
– Feed dog teeth: Accumulated fibers force the hook out of timing alignment.
Brother-Approved Cleaning Protocol
Never use compressed air—it packs lint deeper into the race. Instead:
1. Remove the needle plate (two flat-head screws on most models).
2. Lift the bobbin case latch and pull straight out.
3. Brush vigorously with the factory-supplied brush or a 0.5-inch paintbrush, focusing on the hook race’s metal edges.
4. Vacuum debris gently with a mini attachment—no metal tools.
Prevention tip: Clean after every 8-10 sewing hours. Set phone reminders to avoid repeat failures.
Calibrate Bobbin Tension With Drop Test Accuracy

Step-by-Step Tension Adjustment
The bobbin case’s outer screw controls tension—not the upper dial. Here’s the factory method:
1. Load a full bobbin and grasp the thread tail.
2. Hold the case suspended and gently bounce it once.
3. Ideal drop: 1–2 cm of thread unwinds, then stops abruptly.
4. Adjust the screw in 1/16-turn increments (clockwise tightens; counter-clockwise loosens).
Critical: Test stitches on scrap fabric after every adjustment. Over-tightening snaps threads; too loose creates bird’s nests.
Thread-Specific Tension Tweaks
- Heavy threads (denim/upholstery): Loosen screw 1/8 turn—reduces drag on the hook.
- Fine threads (60wt embroidery): Tighten 1/8 turn—prevents excessive bobbin spin.
Replace Worn Bobbin Case Components
Failure Signs Requiring Replacement
Don’t waste time adjusting if you see:
– Drop test failure: >3 cm or <0.5 cm drop after calibration.
– Worn grooves: Visible scratches inside the bobbin case rim.
– Dead tension spring: No “snap” when pressing the latch.
Genuine Brother Parts Cheat Sheet
| Component | Brother Part # | Cost | Critical Notes |
|---|---|---|---|
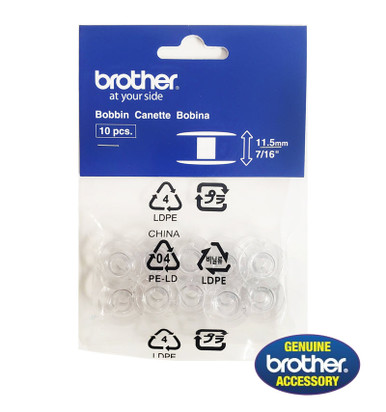
| Bobbin Case | SA156 / XC3153351 | $14–18 | Use only with plastic Class 15 bobbins |
| Tension Spring | XA5539151 | $8–12 | Replace if spring feels stiff or loose |
| Hook Assembly | XF2218001 | $35–45 | Needed if hook wobbles excessively |
Warning: Metal bobbins in plastic cases (like CS6000i) cause scoring and timing drift. Stick to genuine Brother SA156 plastic bobbins.
Verify Hook Timing (Rare but Critical)
Quick Timing Check Without Tools
If cleaning and re-threading fail, timing may be off:
1. Remove needle plate and bobbin case.
2. Turn handwheel slowly until needle reaches lowest point.
3. Correct timing: Hook tip sits 2 mm above needle eye.
4. Failure signs: Hook passes behind or below the needle.
When to Call a Professional
Brother home machines (CS, PE, SE series) have factory-set, non-user-adjustable timing. DIY fixes require shimming the hook shaft—a job for certified techs. If your machine was dropped or hit something hard:
– Cost reality: Timing repair costs $75–120. For sub-$200 machines, replacement is often smarter.
– Never attempt: Forcing the hook into position cracks internal gears.
Prevent Bobbin Spin Failures Forever
10-Minute Monthly Maintenance Routine
- Lint sweep: Hook race cleaning after 8–10 hours (prevents 70% of spin issues).
- Tension log: Note drop test results on tape inside your case lid—track changes early.
- Needle replacement: Every 6–8 hours (dull needles snag thread, jamming the hook).
- Upper tension spring clean: Quarterly wipe with oiled cloth to remove fiber buildup.
Brother-Specific Emergency Fixes
Q: Bobbin case clicks and stops during PE800 embroidery?
A: Trim bobbin thread to 4 inches—long tails wrap around the latch mid-stitch.
Q: Still no spin after re-threading CS6000i?
A: Ensure needle is fully up when starting—Brother machines require a complete upstroke to engage the take-up lever.
Q: Can I use metal bobbins in my Brother machine?
A: Never—drop-in systems need plastic Class 15 bobbins. Metal versions cause irreversible timing drift.
When Professional Help Is Non-Negotiable
Call a technician immediately if:
– You hear grinding noises from the hook area (indicates gear damage).
– The bobbin case won’t seat even after cleaning (possible bent hook shaft).
– Your machine is under warranty (DIY repairs void coverage).
– Drop test is perfect but rotation fails (internal motor failure).
Most Brother bobbin spin issues vanish with correct threading and lint control. Keep a spare SA156 bobbin case ($14) in your kit—it solves tension spring failures faster than recalibration. By following these Brother-specific steps, you’ll transform frustrating stops into seamless stitching, project after project. Remember: A spinning bobbin isn’t magic—it’s mechanics done right.


