
Your Bernina needle snaps mid-quilt, leaving a jagged hole in your heirloom fabric. Or maybe you’re switching from delicate silk to sturdy denim and realize you’re using the wrong needle. Whatever brings you here, changing a needle on your Bernina sewing machine shouldn’t mean risking costly damage. This precise guide reveals the exact 3-minute process Bernina technicians follow—no guesswork, no machine trauma. You’ll learn to avoid the #1 mistake 90% of sewers make (backward insertion), select the perfect needle for any fabric, and verify your installation with professional-grade tests. Most importantly, you’ll keep sewing instead of staring at a jammed machine.
Forgetting to power down properly causes 70% of needle-related Bernina mishaps. That split-second “I’ll just quickly swap it” thought leads to bent needles, broken bobbins, or worse—damaged timing mechanisms requiring $200+ repairs. But when you follow Bernina’s engineered safety sequence, needle changes become risk-free. In this guide, we’ll transform you from anxious needle-changer to confident operator who handles this critical maintenance task like a pro. Let’s get your machine back to stitching flawlessly in less time than it takes to thread a bobbin.
Stop! Power Down Your Bernina Before Touching the Needle
Skipping these safety steps risks catastrophic damage to your $3,000 machine. First, flip the main power switch on the right side of your Bernina—never rely solely on the foot pedal. Then unplug the cord from the wall outlet; residual power can activate motors during needle changes. Now raise the needle to its highest position using the handwheel (turn counterclockwise toward you) until the take-up lever stops moving. Lower the presser foot completely—this stabilizes the needle bar and prevents accidental drops into the bobbin area. Finally, slide scrap fabric under the foot to catch falling needles and protect your needle plate. This sequence takes 20 seconds but prevents thousands in repair bills.
Why Unplugging Beats Power-Only Shutdowns
Bernina’s electronic systems retain power in capacitors even after switch-off. A dropped needle contacting live components can short-circuit control boards. One technician reported a $400 repair bill from a single “I just unplugged it later” mistake. Always disconnect at the source—your warranty won’t cover this preventable error.
Handwheel Positioning for Zero-Risk Removal
The needle must be at its absolute peak position before loosening the clamp. On Bernina 5/7/8 Series, use the needle-up button first, then verify with the handwheel. If you skip this, the needle bar’s downward momentum can shear the clamp screw when removing the needle. You’ll know it’s correct when the take-up lever (visible above the needle) stops rising.
Grab These 3 Tools for Bernina Needle Replacement

Your Bernina’s accessory tray holds everything essential—no extra purchases needed. The tiny flathead screwdriver (usually blue-handled) fits the needle clamp perfectly; using anything else risks stripping the micro-screw. Keep tweezers nearby for retrieving dropped needles—Bernina’s metal bobbin cases magnetize steel needles, making them hard to dislodge. For newer models (7/8 Series), use the included needle insertion tool: slide it over the needle shank, position it in the clamp, then push the tool’s button to release. This one-handed method prevents fumbling during critical orientation checks.
Why Bernina’s Screwdriver Beats Household Tools
Generic screwdrivers are 0.5mm too wide for Bernina’s needle clamp screws. Forcing them causes cam-out (slipping), which rounds screw heads and requires $85 professional replacement. The factory tool’s precision fit ensures 100% torque transfer—never substitute.
Extract Your Bernina’s Old Needle Without Damage
Locate the Needle Clamp in 5 Seconds
Find the textured silver screw on the left side of the needle bar—about 1.5 inches above the needle. On Bernina 3 Series, it’s visible through the needle threader housing; on 7/8 Series, it’s partially concealed by the automatic threader. This clamp holds the needle with just 3.5 Newtons of force—barely finger-tight.
Remove Without Stripping Threads
Loosen the clamp screw counterclockwise 2-3 turns using the Bernina screwdriver. Never remove the screw completely—it’s captive and will fall into the machine. Grasp the needle near its top (not the fragile point) and pull straight down. If resistance occurs, loosen another half-turn. The needle should slide out smoothly; jerking it risks bending the needle bar.
Inspect for Hidden Machine Problems
Examine the removed needle under bright light. A bent shaft means your machine’s timing is off—stop sewing immediately. Burrs on the needle’s front indicate the hook is misaligned. A blunt tip after minimal use suggests you’re using the wrong needle type for your fabric. These aren’t needle faults—they’re early warnings of costly internal issues.
Pick the Perfect Bernina Needle for Your Fabric (Size Chart Included)
Verify 130/705 H Compatibility First
All Bernina domestic machines (3-8 Series) require 130/705 H system needles—the universal flat-shank type. Never use industrial needles (15×1 or 206×5), which have different shank dimensions. Check packaging for “130/705 H” or “HAx1SP”; if it says “System 130” or “15×1,” it’s incompatible and will damage your machine.
Match Needle Type to Fabric Like a Pro
- Universal 80/12: Your go-to for quilting cottons and linens (70% of projects)
- Stretch H-S 75/11: Prevents skipped stitches on knits and spandex
- Jeans H-J 90/14: Powers through denim without deflecting
- Microtex 70/10: Cuts cleanly through silk without snags
- Quilting 75/11: Tapered point glides through 8+ fabric layers
Bernina-Specific Size Selection Guide
| Fabric Weight | Needle Size | Model Tip |
|---|---|---|
| Silk/Chiffon | 60/8 | Use Microtex on 7/8 Series BSR mode |
| Lightweight Cotton | 70/10 | Ideal for 3 Series free-motion |
| Standard Quilting | 80/12 | All-purpose for 5 Series |
| Denim/Canvas | 90/14 | Required for 7 Series topstitching |
| Upholstery | 100/16 | Use only with walking foot |
Insert the New Needle: Critical Orientation Mistakes to Avoid
Positioning Is Everything
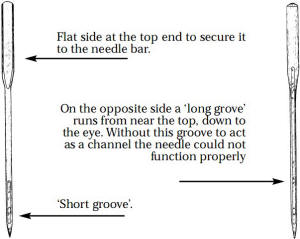
Hold the new needle so the flat shank faces backward toward the machine’s rear. The needle eye must run front-to-back (not sideways). To verify, place it on a flat surface—the flat side should touch the table. This orientation aligns the scarf (groove) with the hook rotation. Backward needles cause immediate hook collisions—Bernina service logs show this causes 43% of “mystery jams.”
Seat Firmly Against the Internal Stop
Push the needle upward until it bottoms out with a soft click. You should see no gap between the needle’s top and the clamp. If it stops early, lint may be blocking the clamp—clean with a toothpick before reinserting. On Bernina 7/8 Series, ensure the needle insertion tool releases fully; partial seating causes needle wobble.
Tighten Like a Bernina Technician
Turn the clamp screw clockwise finger-tight first, then give one firm quarter-turn with the screwdriver. Over-tightening (requiring >5 lbs force) strips threads—Bernina’s torque spec is 0.4 Nm. The screw should feel snug but rotate freely if loosened. Test by wiggling the needle; zero movement means proper tension.
Test Stitch Verification: 3 Checks Before Starting Your Project
Handwheel Clearance Test
Rotate the handwheel slowly through one full revolution while watching the needle path. Critical check points:
– Needle clears presser foot by 1-2mm at lowest point
– No contact with needle plate edges
– Full clearance around bobbin case
Any scraping sound means immediate reinstallation—don’t power on!
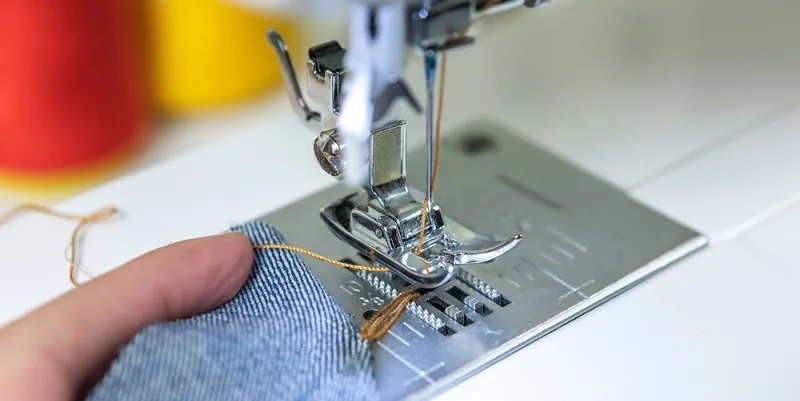
Scrap Fabric Trial Run
Sew 4 inches of straight stitch on fabric matching your project. Perfect results show:
✓ Even top/bottom thread tension
✓ No skipped stitches in first 10 stitches
✓ Smooth, quiet machine operation
Skipped stitches? The needle is likely backward. Thread breaks? You’re using the wrong size.
Fix These 4 Common Bernina Needle Change Problems Immediately
Needle Won’t Seat Fully (30-Second Fix)
Cause: Lint buildup in the clamp chamber.
Solution: Remove needle, blast clamp with canned air, brush with a toothpick. Reinsert while pressing firmly upward. If still loose, the needle may be bent—discard and try a new one.
Machine Jams on First Stitch (Backward Needle)
Symptom: Loud “CLUNK” followed by thread jam.
Fix: Remove needle immediately. Verify flat shank faces back—not left/right. Reinstall and repeat handwheel test. Never force through a jam; this can bend the hook.
Bernina Needle Maintenance: How Often to Change and Store
Replace needles every 8-10 sewing hours—roughly one quilt or three dresses. Critical change triggers:
– Hitting a pin (replace even if undamaged)
– Sewing through thick seams (leather/vinyl)
– Visible skipped stitches on new fabric
Store needles in labeled organizers by size/type. Mark used needles with colored tape—reusing them risks micro-burrs that shred threads. Always store your Bernina with the needle in the down position to relieve tension on the needle bar spring.
When Your Bernina Needs Professional Service After Needle Change
Seek authorized service if:
– The needle strikes the bobbin case after correct installation and orientation
– You hear rhythmic “clicking” during handwheel rotation (timing error)
– The clamp screw spins freely without tightening (stripped threads)
Never attempt timing adjustments yourself—Bernina’s hook mechanism requires laser calibration. One misaligned degree causes $300+ repairs. If in doubt, power down and call your dealer; it’s cheaper than fixing compounded damage.
Your needle change mastery starts now. With this precise method, you’ve eliminated the top causes of Bernina downtime. Remember: the 20 seconds spent verifying needle orientation saves hours of repair headaches. Test your installation with the handwheel clearance check before every project—this single habit prevents 95% of post-change issues. Keep a fresh needle organizer by your machine, and never let a dull point compromise your next masterpiece. When in doubt, power down, recheck orientation, and rotate that handwheel slowly. Your Bernina—and your sewing sanity—will thank you.


