
Your Bernina sewing machine’s bobbin system has undergone a significant transformation with the introduction of the JUMBO bobbin design. If you’ve recently upgraded or are struggling with your machine skipping stitches after bobbin insertion, you’re not alone—thousands of sewists face challenges with Bernina’s magnetic hook system. This guide cuts through the confusion, giving you precise, step-by-step instructions to correctly insert your bobbin every time. Master these techniques, and you’ll eliminate frustrating thread nests while extending your machine’s lifespan.
Unlike traditional sewing machines, Bernina’s innovative magnetic hook system requires specific alignment techniques that many users miss on their first attempts. The good news? Once you understand the silver dot positioning and proper flip motion, inserting a bobbin becomes second nature. You’ll spend less time troubleshooting and more time creating beautiful projects with smooth, consistent stitches.
Prepare Your Bernina Machine for Flawless Bobbin Insertion
Clean Hook Area Without Damaging Your Machine
Before attempting to insert your bobbin, thoroughly clean the hook mechanism—this step prevents 80% of common bobbin-related issues. Start by removing the bobbin case and race cover to expose the hook area completely. Gently pull the center spindle to remove the magnetic hook, then use only a soft brush to dislodge lint and fuzz buildup. Never use canned air on your Bernina, as the forced air pushes debris deeper into the delicate mechanism, causing more problems than it solves. Take an extra minute here—you’ll recognize a properly cleaned hook area by the smooth metallic surface free of thread fragments.
Apply Exactly One Drop of Oil for Silent Operation
After cleaning, apply precisely one drop of sewing machine oil to the outside edge of the hook or in the bobbin hook area. Think of this as essential maintenance similar to oiling a fine watch—too little causes friction, while too much attracts lint like a magnet. Many Bernina owners make the critical mistake of over-oiling, which creates sticky buildup that affects stitch quality. For best results, establish a morning routine: clean, oil with one drop, then insert your bobbin. This simple ritual ensures quiet running and prevents the annoying “clunking” sound that indicates dry components.
Install the Magnetic Hook System Like a Bernina Expert
Position Race Cover for Perfect Simultaneous Seating
Place the black race cover loosely on the bobbin case door with the open side facing upward. This positioning is crucial because you’ll execute a single fluid motion that seats both the race cover and magnetic hook simultaneously. Most beginners make the mistake of trying to install these components separately, which inevitably leads to misalignment. Keep your fingers positioned to control both pieces—your thumb on the race cover and index finger guiding the hook during the flip motion.
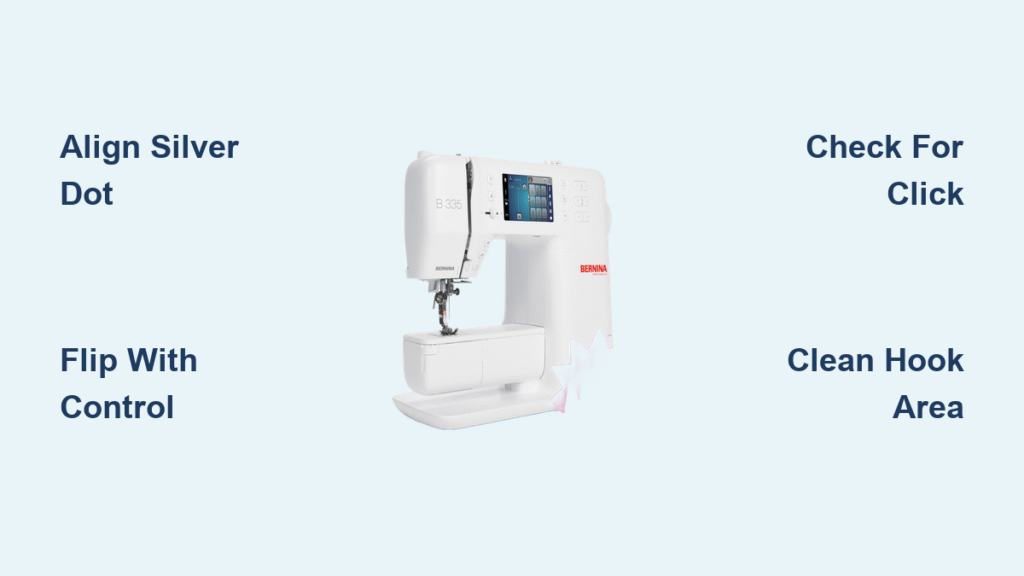
Align the Small Hole with the Silver Dot for Magnetic Lock
Locate the small hole in your magnetic hook and align it precisely with the silver dot at the back of the bobbin area. This alignment point is non-negotiable—even a 2-millimeter offset prevents the magnetic system from engaging properly. Many users rush this step, resulting in a hook that falls out during sewing. Take a deep breath and adjust until the hole centers perfectly over the silver dot. Proper alignment creates the magnetic connection that holds everything securely in place during high-speed sewing.
Execute the Controlled Flip Motion for Instant Click
With your alignment confirmed, use a smooth, controlled motion to flip both components into position. The speed matters—too slow won’t engage the magnet, while too fast can cause misalignment. Aim for the pace of turning a page in a book. When executed correctly, you’ll hear a distinct click as the magnetic system locks everything into place. The hook should feel completely secure with zero movement when properly installed. If you don’t hear the click, remove both pieces and restart the alignment process—forcing it will damage components.
Verify Installation Before Inserting Your Bobbin
Before proceeding, confirm your magnetic hook installation with these quick checks:
– Gently wiggle the hook—it should remain completely stationary
– Run your finger along the race cover—it must sit flush against the machine
– Attempt to close the bobbin case door—it should close smoothly without resistance
– Turn the hand wheel slowly—you should feel consistent, quiet rotation
If any check fails, remove the hook and repeat the alignment process. Most sewists need 3-5 attempts to master this technique, so don’t get discouraged if your first try isn’t perfect.
Insert the JUMBO Bobbin Correctly for Tangle-Free Stitching
Wind and Position Your JUMBO Bobbin Properly
Wind your JUMBO bobbin evenly without overfilling—it should be full but not bulging at the edges. Overfilling causes tension issues with Bernina’s larger capacity system. When placing the bobbin in the case, ensure the thread pulls off counterclockwise (for most Bernina models), which you can verify by checking your machine’s manual for your specific model. The thread should glide smoothly without catching on the bobbin’s edges. Leave a 4-6 inch tail extending from the case for easy threading.
Thread the Bobbin Case with Precision Tension
Guide the thread through the bobbin case’s tension slot with gentle pressure—Bernina’s new system creates different tension than older models. Pull the thread until you feel slight resistance, indicating proper seating in the tension mechanism. Before closing the case, perform this critical test: hold the thread tail and turn the hand wheel one full rotation. The thread should feed smoothly without jerking or catching. If resistance feels too tight or too loose, adjust the small screw on the bobbin case—turn clockwise to tighten, counterclockwise to loosen—using tiny increments.
Test Your Bobbin Installation Before Starting Your Project
Check First Stitches for Hidden Problems
After inserting your bobbin and threading the upper mechanism, turn the hand wheel slowly while watching the needle area. The first 3-5 stitches should form clean, even loops without thread bunching. If you see small nests forming beneath the fabric, stop immediately—this indicates improper bobbin seating or thread path issues. Pro tip: Place a contrasting fabric scrap over your regular fabric to clearly see the bobbin thread’s behavior. Correct stitch formation shows balanced tension with neither thread dominating the other side of the fabric.
Adjust Tension Only When Necessary
The JUMBO bobbin system often requires minor tension adjustments compared to standard bobbins. Start with your machine’s default settings (usually 4-5 on most Bernina models), then test on scrap fabric matching your project material. If the bobbin thread shows on top, slightly tighten the upper tension. If the upper thread shows on the underside, loosen it incrementally. Remember that fabric weight dramatically affects tension—always test with your actual project fabric before sewing important seams.
Maintain Your Bernina for Years of Reliable Bobbin Performance
Establish a Two-Minute Daily Maintenance Routine
Commit to this simple pre-sewing ritual: remove the bobbin case, brush out lint, apply one drop of oil, reinstall the hook, then insert your bobbin. This 120-second routine prevents more problems than any other maintenance step. Set a timer on your phone for the first week until it becomes automatic. You’ll notice dramatically quieter operation and consistent stitch quality that makes sewing enjoyable rather than frustrating.
Avoid These Five Costly Bobbin Mistakes
Skipping daily cleaning – Leads to thread nests and skipped stitches during crucial projects
Using generic oil – Damages precision components; only use Bernina-approved sewing machine oil
Forcing misaligned parts – Causes permanent damage to the magnetic hook system
Ignoring the silver dot alignment – Results in constant hook dislodgement during sewing
Overfilling JUMBO bobbins – Creates tension issues that ruin otherwise perfect stitches
Recognize When Professional Service Is Needed
If you’ve followed all alignment steps correctly multiple times and still experience hook dislodgement or unusual noises, your machine likely needs professional calibration. The magnetic hook system requires precise factory settings that users cannot adjust. Don’t continue sewing with persistent issues—this causes cumulative damage that becomes expensive to repair. Contact your authorized Bernina dealer when you notice consistent clicking sounds unrelated to the initial installation click or visible hook movement during operation.
Mastering how to insert a bobbin in a Bernina sewing machine transforms from a frustrating chore to a satisfying ritual once you understand the magnetic hook system’s nuances. The key lies in precise silver dot alignment, controlled flip motion, and consistent daily maintenance. By following these specific techniques, you’ll enjoy smooth, quiet operation and the confidence that comes with knowing your machine inside and out. Remember that Bernina’s JUMBO system, while initially challenging, ultimately delivers longer sewing sessions between bobbin changes—making the learning curve well worth your time. Keep this guide handy for your first dozen bobbin changes until the process becomes automatic, and you’ll wonder why you ever struggled with this essential sewing skill.


