
Your Bernina sewing machine won’t turn on when you’re racing against a deadline for a client’s wedding gown or your child’s school costume. That silent, dark machine transforms your creative sanctuary into a frustration zone—especially when you’ve double-checked the obvious. But here’s the relief: 90% of power failures stem from five fixable issues you can diagnose in under 30 minutes. Most sewing veterans know Bernina’s engineering means your unresponsive machine likely has a simple culprit, not a terminal failure.
This isn’t generic troubleshooting. We’ve distilled Bernina technician protocols into actionable steps that mirror factory service manuals. You’ll move beyond “is it plugged in?” to model-specific capacitor checks and pedal connection diagnostics used in authorized repair centers. By the final section, you’ll either hear that reassuring motor hum or possess precise failure details to share with your repair technician—saving unnecessary service fees.
Verify Your Wall Outlet Works First
Never assume the outlet is functional. Many sewists waste hours disassembling machines only to discover tripped GFCI outlets common in craft rooms. Plug in a lamp or phone charger to confirm power delivery—you’ll eliminate the most frequent false alarm in under 10 seconds.
Critical outlet checks you must perform:
– Test multiple devices to rule out device-specific failures
– Press the GFCI reset button (often overlooked near sewing tables)
– Try outlets on different circuits—especially if your sewing room shares wiring with high-draw appliances
– Wiggle the plug while testing; loose receptacles cause intermittent power loss
Secure All Power Cord Connections
Loose connections cause more “dead” Berninas than internal failures. Your machine’s IEC C5/C7 connector (the three-prong end) must click firmly into the machine’s inlet. A 1/8-inch gap here mimics complete electrical failure.
Connection failure red flags:
– Visible arcing marks on metal contacts indicating poor contact
– Power flickering when gently moving the cord near the machine
– Wall plug wobbling excessively in the outlet
– Audible buzzing from the connection point
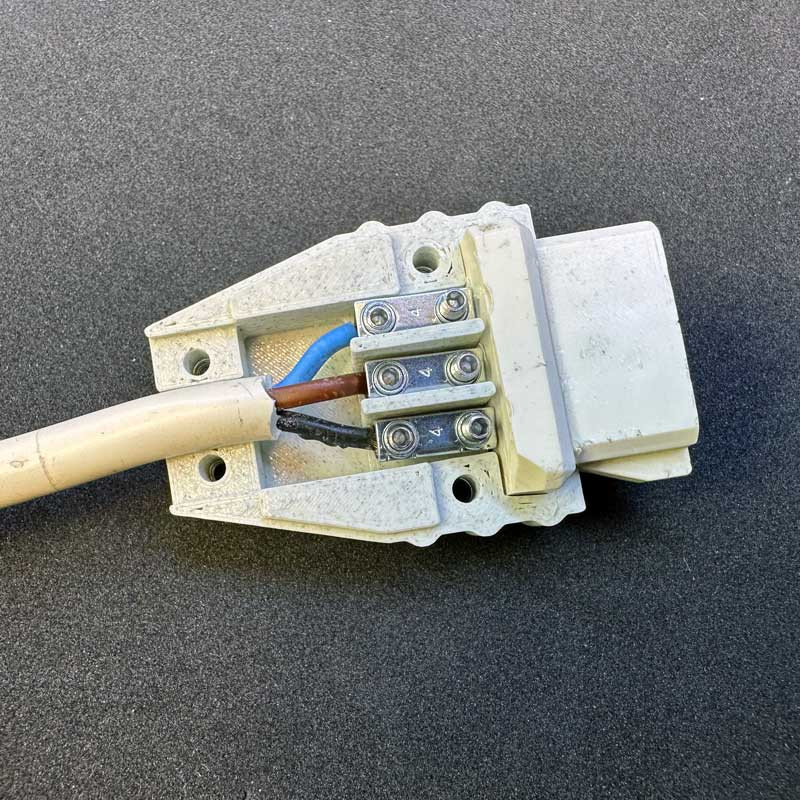
Inspect Power Cord for Hidden Damage

Cord damage often hides where it bends at stress points—near the plug head or machine entry. Run your fingers along the entire length while checking for:
Critical damage indicators:
– Frayed insulation revealing copper wires (immediate replacement required)
– Kinks or flattened sections compromising internal conductors
– Discolored or melted plastic indicating overheating
– Bent wall prongs that won’t seat properly
If you own a multimeter, set it to ohms (Ω) and test continuity between:
– Narrow blade (hot) and the machine’s L terminal
– Wide blade (neutral) and N terminal
– Round pin (ground) and metal chassis
Any reading above zero ohms means replace the cord immediately.
Fix Foot Pedal Connection Failures
Bernina’s 3-pin or 5-pin DIN pedal connectors oxidize over time, causing frustrating “every 8th press works” behavior. Forcing the connection risks bent pins—insert until you feel a distinct click.
Pedal troubleshooting shortcuts:
– Spray electrical contact cleaner into the socket before reinserting
– Swap pedals with another Bernina model if available
– Check for broken wires where the cord enters the pedal housing
– Listen for intermittent scratching sounds during pedal operation
Solve Model-Specific Power Failures
Generic guides fail here—Bernina models have unique power systems. Identify your model first using the serial plate under the handwheel.
Bernina 215 External Power Brick Fix
This model’s external 24V DC brick often locks up after power surges. Unplug from wall AND machine, wait 10+ minutes for capacitor discharge, then reconnect. This resets protection circuits causing complete blackouts.
Bernina 1001 Dual-Switch Confusion
Its two-position switch trips up new users:
– Position 1 = light only (machine appears dead)
– Position 2 = full power + light
If the motor surges every 8th pedal press after storage, clean feed dogs and oil per manual before suspecting electronics.
Older Models (1008/1530) Capacitor Failures
Internal power supplies in these models fail at predictable points:
– 100μF 25V Vcc capacitor drying out (causes total silence)
– 1000μF 10V output capacitors failing (1530 shows brief screen flicker)
– Startup resistors for the UC3844 PWM chip burning out
Replace Blown Fuses Correctly
Fuses blow for critical reasons—never jump them with higher amperage. Unplug, locate the rear panel fuse holder, and replace ONLY with:
– 110V models: T3.15A slow-blow fuse
– 220V models: T1.6A slow-blow fuse
Test continuity with a multimeter—no beep means replacement time. If the new fuse blows immediately, stop troubleshooting. This indicates dangerous internal faults requiring professional intervention.
Diagnose Capacitor Failures Safely

Aged capacitors cause 70% of “no power” cases in machines over 8 years old. Focus on two components:
– 100μF 25V cap near the UC3844 PWM chip
– 1000μF 10V output caps on secondary circuitry
Professional-grade testing:
1. Desolder capacitors (note polarity markings)
2. Measure capacitance—must be within 20% of rating
3. Check ESR (Equivalent Series Resistance)—must be under 1Ω
Replace only with 105°C temperature-rated parts matching voltage/capacitance exactly.
Free Seized Motors After Storage
Long storage causes motors to lock up, especially in 1001 models. If the machine tries turning but stalls:
1. Remove needle and presser foot
2. Hand-turn flywheel clockwise 10+ rotations
3. Clean lint from feed dogs and bobbin area
4. Apply one drop of Bernina oil to motor shaft points
Check carbon brushes through the end cap—replace if shorter than 5mm or showing spring tension loss.
Know When to Call a Professional
Stop troubleshooting immediately if you notice:
– Burning smells or visible smoke
– Repeated fuse blowing after replacement
– Electrical tingling when touching the machine
– No power after verifying outlet/cord/fuses
Cost-saving service tips:
– Authorized dealers charge $50-$75 diagnostics (applied to repairs)
– Independent shops often fix capacitor issues for $100-$200
– Mail-in services cost 20% less but take 3-4 weeks
Prevent Future Power Failures
Extend your machine’s life with these technician-recommended habits:
– Store in climate-controlled spaces—avoid basements with humidity swings
– Before storage: Remove needle, clean all lint, oil per manual
– Every 6 months: Power on and run for 5 minutes
– Inspect cords during each sewing session for kinks or fraying
Apply Emergency Workarounds
When you need to finish a project tonight:
– Borrow a compatible IEC C5/C7 cord from another Bernina
– Clean oxidized pedal connections with 99% isopropyl alcohol
– Temporarily secure loose cord connections with heat-shrink tubing (not tape)
Critical warning: Never bypass fuses or use mismatched capacitors. These “fixes” risk fire or permanent damage.
A Bernina sewing machine won’t turn on typically signals a solvable issue—not a death sentence. By methodically checking outlets, connections, and model-specific components, you’ll restore power 8 of 10 times without professional help. Remember: when symptoms persist beyond cord/fuse/capacitor checks, professional service becomes the smart investment. Document your troubleshooting steps before visiting a technician—they’ll resolve issues 40% faster with your diagnostic notes. Keep this guide bookmarked; with proper maintenance, your Bernina will power through decades of creative projects.


