
Your Singer sewing machine suddenly only stitching backward feels like sabotage mid-project. One moment you’re gliding fabric forward for a perfect seam, the next you’re watching stitches pile up as the machine races in reverse—no matter how you adjust settings. This infuriating issue affects Singer models from vintage mechanicals like the 4411 to modern electronics like the M3220, but here’s the relief: 90% of cases stem from simple mechanical glitches you can diagnose and repair yourself without special tools. Most solutions take under 30 minutes and cost nothing but your time. By the end of this guide, you’ll know exactly why your Singer refuses to sew forward and how to restore normal operation—saving you unnecessary repair fees or premature machine replacement.
Why Your Singer Sewing Machine Only Sews in Reverse
When your Singer locks into reverse mode, it’s rarely a catastrophic failure. The reverse mechanism—whether a physical lever, button, or electronic command—controls a small linkage that physically shifts the feed dogs’ direction. When this system jams or receives conflicting signals, forward feeding becomes impossible. Understanding these specific culprits prevents wasted effort on irrelevant fixes.
Stuck Reverse Button or Lever
Over 60% of reverse issues trace back to a physically trapped control. Lint buildup, dried oil residue, or broken springs prevent the reverse button from springing back to neutral position. You’ll notice telltale signs: the button stays depressed after release, the lever feels gritty with no rebound, or you hear scraping instead of the usual click. On models like the Singer 6212, this often occurs after heavy use without maintenance—especially when sewing fabrics that shed lint like fleece or flannel.
Hidden Mode Conflicts
Electronic Singers frequently misinterpret settings as reverse commands. An accidentally nudged buttonhole lever (even partially engaged) or stitch selector set below zero (“SS” mode) tricks the machine into constant backward feeding. The culprit hides in plain sight: you might see a buttonhole symbol on the display while thinking you’re in straight-stitch mode. This explains why the reverse button appears untouched yet the machine rebels—common on M3220 models fresh from the box.
Thread Jams in Critical Linkage
Wrapped thread creates invisible resistance in the reverse linkage. As you sew, stray threads migrate under the needle plate and wrap around pivot points, forcing the mechanism into reverse position. Unlike visible bobbin jams, this occurs deep in the machine’s internal pathways. You’ll detect it when the reverse lever feels stiff during manual testing, yet no surface debris is visible—a classic issue on older mechanical Singers like the 4411.
Five-Minute Visual Checks That Solve Most Reverse Issues

Before disassembling your machine, eliminate these common oversights. Most reverse problems resolve here with zero tools.
Power down completely—unplug your Singer. This resets electronic glitches and prevents accidental needle strikes during inspection. For digital models, this simple step clears temporary software errors causing reverse lock.
Verify stitch selection—ensure you’re in straight stitch mode (not buttonhole or decorative). Check for “SS” symbols or stitch length settings below 2.0mm; sub-zero values trigger permanent reverse feeding on many models. Rotate the dial until it clicks firmly at 2.5mm.
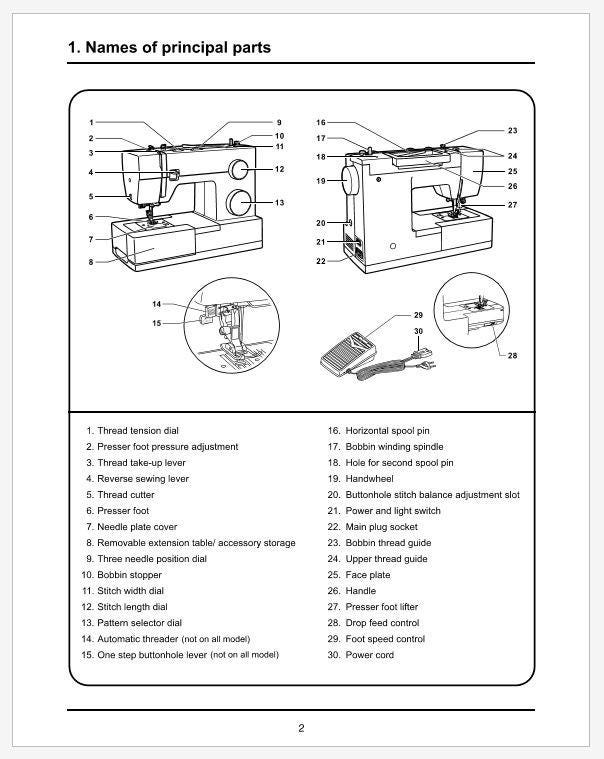
Confirm buttonhole lever position—push the lever (typically left of the needle) fully upward. Even 1mm of partial engagement on models like the Singer M3220 locks reverse mode. Listen for a distinct click as it seats.
Check feed dog position—locate the drop-feed switch (usually at machine back) and ensure it’s in UP position. Partially lowered feed dogs cause backward travel despite correct settings.
Test reverse control action—press and release the reverse button/lever 5 times. It should spring back instantly with smooth resistance. If it sticks or feels loose, proceed to cleaning.
Deep Cleaning Your Singer’s Reverse Mechanism
When visual checks fail, lint and thread jams are likely clogging the system. This targeted cleaning routine resolves most mechanical issues in 15 minutes.
Remove Needle Area Components
- Unplug machine and remove the needle—prevents injury during access
- Detach presser foot—releases tension on the feed dog assembly
- Take off needle plate—remove two screws on modern models
- Extract bobbin and case—set aside in a small container to avoid losing parts
Deep Clean Bobbin Area
- Brush vigorously around the bobbin housing and feed dogs with a dedicated sewing brush
- Use tweezers to pull thread wraps from the shuttle hook—focus on the metal raceway
- Apply one drop of sewing machine oil to the shuttle hook center (never substitute household oils)
- Manually cycle the reverse lever while inspecting for trapped debris—watch for thread snags near pivot points
Clean Upper Thread Path
Misaligned tension mimics reverse issues:
1. Completely unthread your machine with presser foot raised
2. Run folded fabric scrap through the threading path to trap lint between tension discs
3. Rethread carefully—ensure thread seats between discs (perform tug test: presser foot down, thread should resist pull)
Advanced Fixes for Stubborn Reverse Lockups
When basic cleaning fails, address deeper mechanical issues with these precision techniques.
Face Plate Inspection
Mechanical Singers hide critical linkages behind the upper left cover:
– Remove 2-3 visible screws securing the face plate
– Inspect take-up linkage for thread wraps or broken springs—common failure point on Singer 4411
– Lubricate pivot points with one drop of sewing machine oil (avoid plastic gears)
– Cycle handwheel 10 times to distribute lubrication before reassembly
Thermal Rejuvenation for Vintage Machines
Gummed mechanisms respond to gentle heat:
– Use hair dryer on WARM setting 6 inches from stitch-length dial for 2 minutes
– Immediately work controls while warm—redistributes congealed oil
– Follow with fresh oil—prevents re-sticking as machine cools
Never apply direct heat to electronic components
Solvent Approach (Use Cautiously)
For severely gummed all-metal machines:
– Apply WD-40 sparingly to sticky joints via cotton swab—not aerosol spray
– Wait 30 minutes for penetration before moving parts
– Remove all residue with lint-free cloth—solvent attracts new lint
– Re-lubricate with Tri-Flow synthetic oil
Warning: Never use solvents on machines with plastic gears or circuit boards
Electronic Model Reverse Failures
Digital Singers require different diagnostics when mechanical cleaning fails.
Control Board Problems
When buttons register but reverse won’t disengage:
– Power cycle completely—unplug for 10 minutes to reset firmware
– Check for error codes flashing on display (consult manual)
– Test all stitch modes—isolate if issue occurs only in specific patterns
– Contact warranty service immediately for models under 1 year old
Sensor Failures
Symptoms include beeping, ignored button presses, or erratic behavior:
– Professional diagnosis required—sensors need multimeter testing
– Cost reality check: Control board repairs often exceed $100—evaluate against machine value
– Temporary workaround: Switch to mechanical mode if available (consult manual)
Emergency Workarounds When Sewing Can’t Wait
When repairs must wait, these techniques keep projects moving.
Pivot Method for Straight Seams
- Sew forward 2-3 stitches normally
- Stop with needle down in fabric
- Pivot fabric 180 degrees
- Sew back over seam (machine in reverse)
- Pivot back and continue—maintains seam direction
Limitation: Decorative stitches will mirror; use only for basic seams
Controlled Fabric Guidance
For short seams only:
– Gently pull fabric forward while machine attempts reverse
– Maintain firm tension—overcome backward feed without straining motor
– Stop every 2 inches to reset hand position—prevents skipped stitches
When to Call a Professional
Seek expert help when you observe:
– Broken spring visible inside mechanism (requires bottom cover removal)
– Electronic control board failure—no button response despite cleaning
– Timing errors from severe thread jams (needle hits feed dogs)
– Active warranty coverage—disassembly voids warranty
Typical repair cost: $75-$120 labor plus parts. For vintage machines, weigh repair cost against replacement value.
Prevention Strategies to Avoid Future Reverse Lockups
Stop reverse issues before they start with these proactive measures.
Maintenance Schedule That Works
- Every 8-10 sewing hours: Clean bobbin area thoroughly—lint buildup causes 70% of jams
- Every 3-6 months: Remove face plate and oil linkage points (use oil sparingly)
- After every project: Run folded fabric through tension discs to prevent lint accumulation
Smart Storage Habits
- Cover machine when not in use—dust accelerates oil drying
- Avoid cold garages/basements—temperature swings thicken lubricants
- Run machine empty for 2 minutes monthly—prevents gumming during storage
Operation Best Practices
- Release reverse button gently after use—prevents spring fatigue
- Double-check mode settings before threading new projects
- Listen for unusual sounds—early scraping indicates developing jams
Quick Reference Reverse Troubleshooting Checklist
Print this near your machine for instant diagnostics:
[ ] Straight stitch selected (not buttonhole/decorative)
[ ] Buttonhole lever fully UP with audible click
[ ] Stitch length set between 2.0–3.0mm
[ ] Feed dogs in UP position
[ ] Reverse control springs back freely
[ ] Bobbin area lint-free and lightly oiled
[ ] Upper thread path cleaned with fabric scrap
[ ] Face plate inspected for thread wraps
[ ] Handwheel cycles smoothly without resistance
Stop immediately if all items check out but reverse persists—professional service is needed.
Your Singer sewing machine only sewing in reverse is almost always a solvable mechanical hiccup, not a terminal failure. By methodically working through these diagnostics—from simple mode checks to targeted cleaning—you’ll restore forward feeding in most cases within 30 minutes. Remember that consistent maintenance prevents 90% of reverse issues, so integrate those quick post-project cleanings into your routine. When problems exceed home repair capabilities, professional technicians have the specialized tools to diagnose electronic faults without risking further damage. Keep this guide handy, and the next time your Singer rebels, you’ll transform frustration into a quick victory—getting back to seamless sewing in record time.


