

That gorgeous 1950s Singer you scored at the estate sale won’t stitch a seam. The handwheel won’t budge, the motor hums but nothing moves, and you’re wondering if this vintage beauty is destined for decoration duty. Before you panic or call an expensive repair service, know this: most vintage Singer issues stem from simple problems you can fix at home with basic tools and patience. Your grandmother’s machine isn’t broken—it’s just been neglected.
This vintage singer sewing machine troubleshooting guide walks through the most common problems—from completely dead machines to thread disasters—and gives you step-by-step fixes that actually work. Whether you’re dealing with a frozen Featherweight 221 or a stubborn Model 66, you’ll learn exactly what to check, clean, and adjust to get stitching again. These machines were engineered to last generations; most issues come from dried lubricants and accumulated lint, not mechanical failure.
Power Failures: Why Your Vintage Singer Won’t Turn On
Toggle Switch Trap That Stumps Beginners
Your vintage Singer sits silent with no motor hum or light glow. Before assuming electrical failure, locate the small toggle switch near the power cord socket—often accidentally bumped during transport. This tiny switch is the #1 culprit behind “dead” machines at garage sales. Flip it firmly to the ON position and listen for the motor’s faint hum.
If the switch is on but nothing happens, test the outlet with another appliance. Vintage Singer motors draw more power than modern electronics and can trip breakers without visible indication. Next, gently wiggle the power cord where it enters the machine—frayed wires inside the insulation cause intermittent failures that mimic dead machines. Replace damaged cords with modern three-prong versions for safety while maintaining proper voltage.
Light Glows But Needle Stays Frozen
When the light works but the motor stays silent, check if the bobbin winder is engaged—a small push-in lever on the machine’s right side. This often gets accidentally activated during storage. Push the bobbin winder knob outward until it clicks into place. This simple step frees the motor to power the needle mechanism instead of the winder. If the machine still won’t run, verify the handwheel isn’t frozen (covered in the next section).
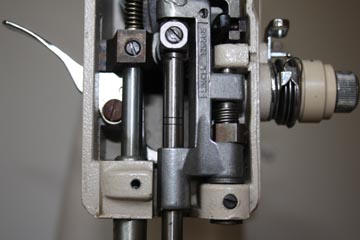
Frozen Handwheel: The #1 Vintage Singer Headache
Gummed-Up Gears That Stop Everything
A completely stuck handwheel ranks as the most common frustration for vintage Singer owners. After decades of sitting, old oil transforms into sticky varnish that locks gears solid. Never force the wheel with pliers—you’ll bend the needle bar and create expensive damage.
Start by removing the needle, throat plate, bobbin, and presser foot to reduce resistance. Apply 3-5 drops of fresh sewing machine oil (never 3-in-1 household oil) to three key spots: the handwheel shaft bushing at the machine’s left end, the motor pulley bearings, and the take-up lever joint. Let the oil penetrate for 12-24 hours, then gently rock the handwheel counter-clockwise only—the direction that raises the needle.
If movement returns but feels gritty, remove the bottom cover and add one drop of oil to the large gear and hook shaft. Persistent freezing after lubrication signals hardened grease deeper in the gear train—time for professional servicing. Machines unused for 15+ years typically need complete disassembly to remove varnished lubricants.
Belt Slippage That Kills Needle Movement
When the handwheel spins freely but the needle won’t move, check the motor belt. Open the side panel and verify the belt sits properly on both the motor pulley and handwheel. The belt should deflect 1/8-1/4 inch when pressed midway between pulleys. Adjust the motor mount screws to achieve proper tension—looser belts slip, tighter ones strain the motor.
Vintage Singer belts often dry-rot during storage. Replace cracked or stiff belts with modern rubber equivalents (Singer part #100294 for most models). Proper tension is critical: too loose and the machine loses power at high speeds; too tight and you’ll wear out motor bearings prematurely.
Bobbin Thread Pickup Failure: The Silent Stitch Killer
Hook Timing That Prevents Stitch Formation
You thread perfectly, lower the needle, but no bobbin thread appears. The hook—the rotating piece that grabs the needle thread—might be out of sync. Remove the throat plate and bobbin case. Turn the handwheel until the needle reaches its lowest point. Continue turning slowly until the needle rises 2mm—at this exact moment, the hook point should pass behind the needle.
If timing appears correct but pickup still fails, clean the hook area thoroughly. Lint buildup creates invisible barriers that prevent thread loops from forming. Use a small brush to remove debris, then add one drop of oil to the hook race center. For stubborn cases, check for burrs on the hook tip—polish gently with 600-grit emery cloth if thread snags.
Needle Installation Errors That Break Stitches
Wrong needles cause mysterious failures. Vintage Singers need specific needle systems: most use 15×1 needles (flat shank), but the 301 and 319 models require 206×13 (round shank). More importantly, needle length matters—use 1⅞ inch (47mm) needles, not the shorter 1¾ inch (42mm) versions sold for modern machines.
Insert needles with the flat side facing the back on Models 66, 99, and 201. On Featherweight 221s, the flat side faces left. A needle inserted backwards or upside-down won’t form stitches no matter how perfectly everything else works. Always replace needles after hitting a pin—they bend microscopically and cause skipped stitches.
Thread Breakage Nightmares: Why Your Vintage Singer Keeps Snapping Thread

Brittle Thread That Self-Destructs
Old thread breaks constantly. Vintage cotton or rayon thread becomes brittle with age, snapping at the slightest tension. Replace antique spools with quality polyester thread—your stitches will hold better and the thread won’t shred. Avoid metallic or decorative threads on vintage machines—they create excessive drag.
Check needle sizing too. A size 18 needle trying to pass through delicate silk thread causes breakage, while a size 9 needle struggles with upholstery thread. Match needle size to fabric: 9-11 for delicate fabrics, 14 for cotton, 16-18 for heavy materials. The thread diameter should fill 40-60% of the needle eye.
Hidden Tension Problems That Snap Thread
Tension set too tight breaks thread faster than any other issue. Reset your upper tension dial to 3-4 for general sewing. Test by lowering the presser foot and gently pulling the thread—it should offer moderate resistance, not feel like you’re trying to break wire.
Clean lint from tension discs by raising the presser foot (this opens the discs), then running folded fabric through the thread path. Thread wrapped around the take-up lever creates hidden snags that mimic tension problems. Always rethread completely with the presser foot up to ensure proper tension disc engagement.
Bird-Nesting Under Fabric: The Tangled Thread Emergency
Top Thread Tension Failures That Create Thread Balls
Thread loops or “bird-nesting” under fabric scream tension problems. The top thread isn’t seated between tension discs. Rethread with the presser foot UP—this opens the discs so thread slides completely into place. Lower the foot and test tension by gently pulling the thread—it should require moderate force.
For vintage Singer models, verify your bobbin direction. Class 66 bobbins (used in Models 66, 99, 201) must rotate counter-clockwise when pulled. Insert backwards and thread bunches immediately. Class 15 bobbins (Models 15, 221, 301) have different orientation—check your manual for specific threading direction.
Lint Buildup That Triggers Nesting
Remove the throat plate and bobbin case after every 3-5 bobbins to prevent lint accumulation. Use a small brush or pipe cleaner to clear debris—compressed air can drive lint deeper into mechanisms. Pay special attention to the hook race area where lint traps thread during rotation.
Essential Cleaning Schedule to Prevent Vintage Singer Failures
Daily Maintenance That Saves Hours of Repair
Brush lint from the bobbin area after every 3-5 bobbins. Remove the throat plate and bobbin case, then use a small brush to clear debris. For stubborn buildup, use tweezers to extract thread bits without damaging components. Always oil after cleaning—dry parts wear faster.
Annual Deep Cleaning for Long-Term Reliability
Once yearly, oil all moving parts: needle bar, take-up lever, presser bar spring, feed dog joints, and hook race. Apply just one drop per point—excess oil attracts lint. Add grease (Lubriplate 105) to gears under the bottom cover every 5-10 years. Machines unused for decades need professional servicing to remove hardened grease and replace worn parts.
Six-Point Garage Sale Diagnostic Before You Buy
Handwheel Test: Your First Red Flag
Before purchasing any vintage Singer, turn the handwheel counter-clockwise only—it should move smoothly without grinding. Forcing clockwise can damage timing. If the wheel sticks, factor in 30-60 minutes of oil penetration time before declaring the machine unusable.
Needle Motion Verification: Prevent Costly Repairs
Watch the needle travel up/down without hitting the presser foot or throat plate. Misaligned needles indicate bent needle bars or timing issues that require professional adjustment. On properly functioning machines, the needle should clear all components with at least 1/16″ clearance.
Reviving a vintage Singer sewing machine rewards you with decades of reliable stitching power. These machines were built to last generations—most problems stem from neglect, not design flaws. Start with the simplest fixes first: oil the handwheel, clean the bobbin area, and check needle installation. Your grandmother’s Singer will purr back to life, ready to create everything from quilts to curtains with the same precision it offered fifty years ago. With proper maintenance, your vintage Singer will outlast modern machines by another 50 years.


