You’re halfway through a beautiful sewing project when you flip your fabric over to discover a tangled mess of loops and slack threads underneath—while the top side looks perfectly neat. This frustrating scenario affects nearly every Singer sewing machine owner at some point, but here’s the good news: loose stitches on your Singer sewing machine are almost always fixable with simple adjustments that take less than 10 minutes. The key is understanding what those messy bottom stitches are telling you about your machine’s tension balance.
This common issue isn’t random—it’s your Singer machine’s way of signaling a specific problem that’s easily diagnosed and corrected. Unlike mysterious mechanical failures, loose bottom stitches follow predictable patterns that point directly to the solution. Whether you’re working with a vintage Singer model or a modern computerized machine, the fundamental tension principles remain the same.
Why Your Singer Machine Forms Loose Bottom Stitches
Loose stitches on your Singer sewing machine almost always indicate an imbalance where your upper thread tension is too weak to properly pull the bobbin thread into the fabric layers. When the top thread lies flat and neat while the underside forms loops or “bird’s nests,” your machine is sending a clear message: the upper tension needs tightening. This imbalance happens because the top thread isn’t creating enough pull to bring the bobbin thread up into the fabric sandwich.
Critical Symptoms to Watch For
- Top thread forms perfectly straight, tight stitches while the bottom shows slack
- Loops appear only after several stitches have been formed
- Problem develops suddenly after previously normal operation
- Persists despite apparent threading corrections
The golden rule to remember: bottom loops equal top tension issues. As experienced technician Martyn Lloyd explains, “Bottom loops equal top tension and vice versa… that’s all there is to it.” This simple diagnostic principle means you should always start with upper tension adjustments when facing loose bottom stitches.
Precise Upper Tension Adjustment for Singer Machines

Most loose stitches problems on Singer sewing machines resolve with a simple tension dial adjustment—no tools required. The tension dial controls how tightly the upper thread feeds through your machine’s tension disks, and even a slight misadjustment creates visible stitch imbalance.
Locate and Optimize Tension Settings
Find your tension dial—typically numbered 1-9 on the front or side of your Singer machine. Turn the dial toward higher numbers (closer to 9) to increase tension. Make tiny adjustments of just 0.5-1 number at a time, testing after each change. Never jump multiple numbers at once, as this makes it difficult to find the precise setting your fabric requires.
Effective Testing Method for Loose Stitches
- Cut a scrap piece of fabric identical to your project material
- Sew 4-5 inches of straight stitch using normal settings
- Carefully examine both sides of the stitching
- Make a 0.5-number adjustment and test again
- Continue until both sides show balanced, interlocking stitches
Pro tip: Before making adjustments, mark your normal tension setting with tape. This gives you a reference point to return to if needed. Most Singer machines perform best between 3-5 for standard fabrics, but your ideal setting depends on fabric weight and thread type.
Singer-Specific Re-threading Process to Fix Loose Stitches
Even experienced sewers make threading mistakes that create tension imbalances. The most common error? Threading with the presser foot down. This prevents the tension disks from opening properly, resulting in improperly seated thread that causes loose bottom stitches.
Step-by-Step Re-threading for Perfect Tension
- Remove all thread completely from your Singer machine
- Raise presser foot to open the tension mechanism
- Follow the threading path precisely as shown in your manual
- Listen for the click as thread seats properly in tension assembly
- Lower presser foot before beginning to sew
Critical Thread Path Checkpoints
- Thread passes through every guide in exact sequence
- Thread sits properly between tension disks (not on top or beside them)
- No wraps around spool pin or catching on rough edges
- Bobbin thread pulls smoothly from case without resistance
Warning: Skipping even one thread guide creates tension problems. If your Singer machine has a built-in needle threader, verify the thread still passes through all guides after using this feature.
Quick Lint Removal to Restore Tension Balance

Lint accumulation—especially after quilting or working with batting—causes 30% of persistent loose stitch problems on Singer machines. A 15-year-old Singer 7412 may harbor surprising amounts of debris in hidden tension areas that disrupt smooth thread flow.
5-Minute Tension Area Cleaning
- Remove needle plate using the appropriate screwdriver
- Brush feed dogs thoroughly with a small, stiff brush
- Take out bobbin case and clean surrounding cavity
- Check tension spring area for hidden lint buildup
- Apply one drop of sewing machine oil to moving parts
Pro tip: Hold a flashlight at an angle to spot lint you might otherwise miss. Pay special attention to the tension disk area—this is where most tension-disrupting lint hides. After cleaning, run a piece of unwaxed dental floss through the tension disks to remove any remaining fibers.
Needle Replacement Protocol for Stitch Quality
A worn or bent needle creates inconsistent stitch formation that mimics tension problems. On Singer machines, needle issues cause 25% of what users mistakenly diagnose as tension problems. A dull needle creates tiny snags that disrupt the smooth interlocking of threads.
Singer Needle Replacement Guidelines
- Replace every 6-8 hours of actual sewing time
- Match needle type precisely to fabric (ballpoint for knits, sharp for wovens)
- Verify needle size matches thread weight (thicker thread needs larger eye)
- Install with flat side facing back on Singer machines
Quick Needle Quality Test
Hold the needle point-up and roll it on a flat surface. Any wobble indicates bending that will cause ongoing tension problems. Also examine the needle point under magnification—any nicks or burrs will disrupt stitch formation.
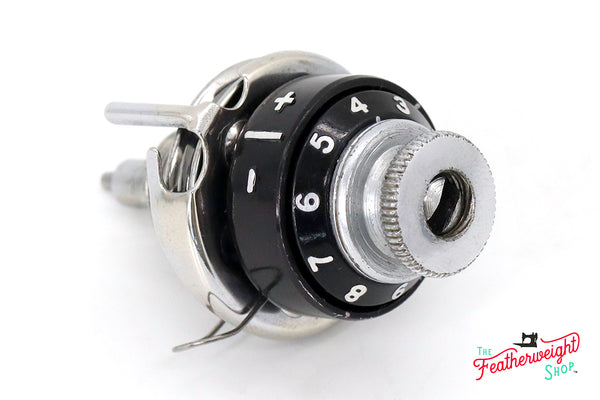
Bobbin Verification to Eliminate Tension Confusion
While bottom looseness usually indicates upper tension issues, bobbin problems can contribute to overall stitch imbalance on Singer machines. The key is verifying proper bobbin function without confusing it with upper tension problems.
Singer Bobbin Troubleshooting Steps
- Confirm bobbin rotates counter-clockwise when pulling thread (Singer standard)
- Verify case clicks firmly into proper seating position
- Check thread flow for consistent resistance—not too tight or loose
- Inspect for visible damage to bobbin case or tension spring
Critical tip: Wind your bobbin at consistent speed—variations create uneven tension. When inserting, ensure the thread tail is 2-3 inches long and properly positioned in the bobbin case tension spring.
Diagnose Persistent Loose Stitch Problems
When standard fixes don’t resolve your Singer machine’s loose stitches, deeper issues may exist—particularly in older models like the 15-year Singer 7412. These problems require systematic troubleshooting rather than random adjustments.
Advanced Troubleshooting Sequence
- Check take-up spring for proper thread control (should move freely)
- Verify feed dog movement for even fabric advancement
- Examine presser foot pressure adjustment for fabric thickness
- Test with different thread to eliminate material quality issues
- Check needle height for potential timing problems
When Professional Service Is Needed
- Tension adjustments have zero effect on stitch quality
- Visible damage to tension assembly components
- Unusual noises during sewing operation
- Timing appears off (needle hitting bobbin case)
- Problems persist after thorough cleaning and adjustments
Warning: Forcing tension adjustments beyond normal range (1-9) can damage your Singer machine’s tension assembly. If you need settings outside this range, something else is wrong.
Pre-Project Tension Testing Protocol
Never start a new sewing project without testing your tension settings on scrap fabric identical to your project material. This simple 2-minute step prevents hours of seam ripping later when loose stitches appear.
Effective Tension Validation Method
- Cut 6×6 inch scrap of your actual project fabric
- Layer with interfacing or stabilizers if applicable
- Sew 4 inches of straight stitch at normal speed
- Check both sides for balanced tension appearance
- Test zigzag stitch for comprehensive evaluation
Fabric-Specific Tension Adjustments
- Lightweight fabrics: May need tension reduction of 0.5-1 number
- Heavy fabrics: Often require increased tension (0.5-1 number higher)
- Stretch materials: Use ballpoint needles and test stretch stitches
- Multiple layers: Recalibrate tension for added thickness
Prevent Future Loose Stitch Problems
Establish these maintenance habits to prevent 90% of tension problems from developing in your Singer sewing machine. Consistent care keeps your machine running smoothly and eliminates most loose stitch issues before they start.
Daily Maintenance Routine
- Cover machine when not in use to prevent dust accumulation
- Dust bobbin area with soft brush after each project
- Check needle condition before starting any sewing session
- Test tension on scrap fabric with every new project
Quality Materials That Prevent Loose Stitches
- Use high-quality thread matched to fabric weight
- Ensure thread consistency between top and bobbin positions
- Store thread properly to prevent tangling or degradation
- Replace old or sun-damaged thread immediately
Pro tip: Keep a tension test swatch book with samples of different fabric-thread combinations and their ideal tension settings for quick reference on future projects.
Loose stitches on your Singer sewing machine almost always indicate insufficient upper thread tension—start with the tension dial adjustment before exploring other solutions. Most issues resolve within 10 minutes through proper re-threading, tension adjustment, and quick cleaning. When problems persist despite these methods, professional service may be needed for worn tension components or timing issues. Remember: your machine’s messy bottom stitches aren’t random—they’re precise indicators pointing directly to the solution. By following these systematic troubleshooting steps, you’ll transform frustrating loose stitches into perfectly balanced seams every time.


