
Your Kenmore sewing machine suddenly refuses to advance fabric mid-project. Fabric bunches under the presser foot, stitches shrink to pin-size, and you’re forced to yank material through by hand. This frustrating issue affects models like the 385.1764180, 158.1690, and Ultra Stitch 8, but you can diagnose and fix most kenmore sewing machine not feeding fabric problems with the right approach. This guide walks you through exact steps to restore proper fabric feeding across all major Kenmore model ranges.
Symptoms That Point to Feed System Failure
Before diving into repairs, match your exact symptoms to these documented patterns to pinpoint the problem:
Fabric only moves when pulled manually – Model 385.1764180 shows this issue after 4-5 hours of continuous use, often mid-project with no visible thread jam. The feed dogs lift but fail to pull fabric backward through the stitch cycle.
Feed dogs lift but don’t pull backward – Model 158.1690 exhibits only ¼-inch oscillation where dogs visibly move forward and backward but never drop below the needle-plate surface. This prevents the critical “grab-and-pull” cycle needed for proper feeding.
Dogs rise but never move forward – Model 13453 Ultra Stitch 8 loses the forward stroke entirely while maintaining upward movement. The internal drive appears intact, yet the fabric doesn’t advance with each stitch.
Failure after stitch change – Model 385.1764180 often quits feeding after switching back from stretch stitch to straight stitch, even when all external settings return to original values. This electronic model’s stitch length setting directly controls feed dog movement.
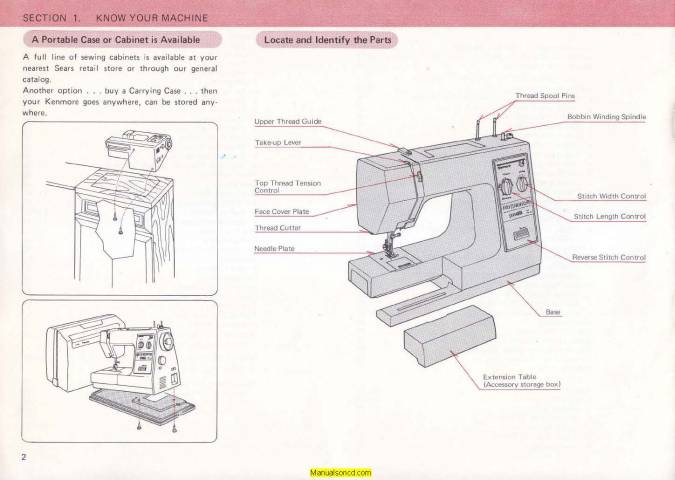
How to Confirm Feed Dog Malfunction
The dime test – Place a U.S. dime on your needle plate. When functioning properly, feed dog teeth should protrude 0.8-1.0mm above the plate—just touching or slightly exceeding the dime’s thickness. If teeth don’t reach this height, your feeding issue stems from vertical motion failure.
Handwheel diagnostic – With fabric under the presser foot, manually rotate the handwheel through a full stitch cycle. Pro tip: Mark the handwheel position with tape to track complete rotations. If fabric doesn’t advance without manual pulling, you’ve confirmed a feed system issue rather than tension problems.
Quick Fix Steps You Can Do Now
Remove Obstructions in Under 5 Minutes
- Power off and unplug your Kenmore sewing machine—safety first
- Remove the needle and presser foot for unobstructed access
- Take off the needle plate – Models 158 and 385 require removing two screws; Ultra Stitch 8 (134xx) uses a slide-and-lift mechanism
- Clear debris using a lint brush or toothpick – pay special attention to thread nests and broken needle fragments jammed between feed dog teeth
Critical warning: Never use metal tools to clean feed dogs—you’ll scratch delicate surfaces and create future snag points. A pipe cleaner works perfectly for tight spaces.
Verify Presser Foot Pressure Settings
- For 385.1764180: The pressure dial hides inside the face plate (settings 1-3). Factory default is 3 for standard fabrics—verify it hasn’t slipped to 1 or 2 during use
- For 158.xxxxxx & Ultra Stitch models: Check the external thumb-wheel on the top rear—don’t leave it fully unscrewed (minimum pressure ≈ 0 kg)
Quick test: With fabric under the foot and pressure set correctly, manually rotate the handwheel. Fabric should advance smoothly without you pulling it. If not, proceed to lubrication steps.
Lubricate Stuck Feed Mechanisms
When Lubrication Solves Your Kenmore Feeding Problem
Lubrication works best when you experience:
– Handwheel stiffness specifically during the feed dog cycle
– Visible forward/backward motion but no vertical drop (common in 158.1690)
– Machines stored over 5 years or purchased second-hand
– Vintage Kenmore models where factory-applied grease has hardened
Step-by-Step Lubrication for 158.xxxxxx Models
- Remove needle plate and bobbin case
- Apply Tri-Flow Superior Lubricant (preferred) or WD-40 as a penetrant into feed-dog shaft bushings
- Cycle the handwheel 20-30 times while applying gentle pressure
- Wait 10 minutes then clean with isopropyl alcohol on cotton swabs
- Apply 2 drops of sewing-machine oil (ISO 22) to the same points
- Cycle handwheel another 10 times
- Use a hair-dryer on low heat for 3-5 minutes to thin the oil and encourage penetration
Pro tip: After reassembly, run the machine for 2 minutes on scrap fabric before starting your actual project—this distributes oil throughout the feed mechanism.
Model-Specific Troubleshooting
Kenmore 385.1764180 Electronic Models
This popular computerized model has unique feeding issues:
– No drop-feed lever – uses a darning plate for free-motion work; ensure it’s properly removed
– LCD stitch length must show >0.0mm – zero length locks feed dogs completely
– Hidden pressure dial inside the face plate is easily overlooked during troubleshooting
Fix: Access the pressure dial by removing the decorative face plate. Turn clockwise to increase pressure (3 is standard). Verify stitch length shows at least 1.0mm on the display.
Kenmore 158.1690 Vintage Mechanical Models
These Janome-made vintage machines need special attention:
– Hardened lithium grease on feed-dog cam causes 90% of feeding issues
– Check lever integrity – the plastic drop-feed lever on the right bed can crack
– Thrift-store rescue protocol – assume 100% need for full lubrication service
Critical step: When reassembling, ensure the drop-feed lever points UP (toward the machine’s rear) for normal sewing. Downward position lowers feed dogs.
Ultra Stitch 8 (Model 13453) Heavy-Duty Models
This workhorse has distinctive feeding characteristics:
– Metal lever near bobbin cover must be UP – bent tabs stay “half-dropped”
– Motor brush wear reduces torque, causing sluggish feed on thick fabrics
– Gear-driven system rarely suffers belt issues but check for sheared gears
Diagnostic trick: Listen for reduced motor speed when feeding heavy fabric—this indicates worn brushes needing replacement.
Internal Repairs When External Fixes Fail

Warning Signs You Need Professional Help
Seek technician assistance immediately if you notice:
– Grinding or rhythmic clicking during the feed cycle
– Metal shavings under the needle plate (indicates gear failure)
– Machine still under 3 years warranty (DIY repairs void coverage)
– Average repair cost: $85-140 for professional service in 2024
Component Failure Indicators
| Problem Component | Your Symptoms | Repair Complexity |
|---|---|---|
| Drive belt | Dogs rise but don’t move backward; stripped teeth | Moderate (requires case opening) |
| Feed eccentric cam | Intermittent feeding; irregular timing | High (cam replacement needed) |
| Vertical feed shaft | No up/down motion; seized mechanism | High (shaft may need replacement) |
| Stepper motor | Motor hums but no movement (385 models) | High (PCB or motor replacement) |
Essential Supplies Checklist

Keep these items ready for kenmore sewing machine not feeding fabric emergencies:
– Sewing-machine oil (ISO 22 specification)
– Tri-Flow Superior Lubricant (for stuck mechanisms)
– White lithium grease (for Janome-made Kenmore gears)
– Lint brush and pipe cleaners
– Phillips #2 screwdriver
– Torx T15 driver (for 158.xxxxxx needle-plate screws)
– 90% isopropyl alcohol and cotton swabs
Pro tip: Store your maintenance kit in a dedicated container with your Kenmore—this ensures you’re always prepared when feeding problems strike mid-project.
Prevent Future Feed Failures
Avoid recurring kenmore sewing machine not feeding fabric issues with these maintenance habits:
– Clean bobbin area after every project—lint buildup causes 65% of feeding problems
– Apply 2 drops sewing-machine oil monthly to feed mechanism points
– Verify drop-feed lever position before each sewing session
– Test fabric feed on scrap material before starting important projects
– Store covered with a quality dust cover to prevent debris accumulation
Critical prevention step: Never sew over pins—they can bend feed dog teeth and cause immediate feeding failure. Slow down when sewing thick seams to avoid overloading the feed mechanism.
Your Kenmore’s fabric feeding system follows a precise four-stroke cycle—upward, forward, downward, and return. When any stroke fails, fabric stops advancing properly. Start with simple checks: debris removal and pressure settings solve 70% of feeding issues. For stubborn problems, systematic lubrication restores function to vintage machines. When grinding sounds or metal shavings appear, professional service becomes the cost-effective choice. By understanding your specific Kenmore model’s quirks and maintaining proper feed mechanism care, you’ll keep your sewing machine advancing fabric smoothly for years to come.


